Compaq 8100 vPro Setup and Configuration for the 8100 Elite Business PC with I
Compaq 8100 - Elite Convertible Minitower PC Manual
 |
View all Compaq 8100 manuals
Add to My Manuals
Save this manual to your list of manuals |
Compaq 8100 manual content summary:
- Compaq 8100 | vPro Setup and Configuration for the 8100 Elite Business PC with I - Page 1
Setup and Configuration for the 8100 Business PC with Intel vPro Processor Technology January 2010 Table of Contents: Introduction ...2 AMT Setup and Configuration 3 AMT System Phases 3 Manual Mode - AMT Setup and Configuration with MEBx 3 BIOS Prerequisite 5 Manual Mode (SMB Mode) - AMT Setup - Compaq 8100 | vPro Setup and Configuration for the 8100 Elite Business PC with I - Page 2
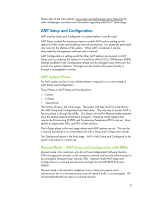
on the HP Compaq 8100 Business PC will be inactive. It must be setup and configured in the system before it can be used. The setup and configuration process is also known as provisioning. There are two methods of AMT setup and configuration: • Manual mode (similar to Small Medium Business (SMB) mode - Compaq 8100 | vPro Setup and Configuration for the 8100 Elite Business PC with I - Page 3
mode AMT Setup and Configuration is a manual process done through the Intel ME BIOS Extension (MEBx). Manual mode is the easiest to implement since it does not require much infrastructure, but it is the least secure since all network traffic is not encrypted. HP recommends that this be done in - Compaq 8100 | vPro Setup and Configuration for the 8100 Elite Business PC with I - Page 4
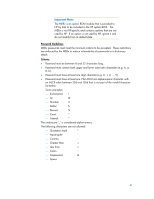
Important Note: The MEBx is an option ROM module that is provided to HP by Intel to be included in the HP system BIOS. The MEBx is not HP-specific and contains options that are not used by HP. If an option is not used by HP, ignore it and do not modify from its default state. Password Guidelines - Compaq 8100 | vPro Setup and Configuration for the 8100 Elite Business PC with I - Page 5
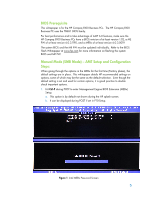
performance and to take advantage of AMT 6.0 features, make sure the HP Compaq 8100 Business PCs have a BIOS revision of at least version 1.02, a ME FW of at least version 6.0.3.1195, and a MEBx of at least version 6.0.3.0019. The system BIOS and the ME FW must be updated individually. Refer to the - Compaq 8100 | vPro Setup and Configuration for the 8100 Elite Business PC with I - Page 6
entered twice for verification. Changing the password indicates that AMT ownership has been established. The system will go from Factory phase to In-Setup phase. The ME and AMT options within the MEBx traffic. It is used for diagnostic purposes. If there is a problem where the ME is affected, it 6 - Compaq 8100 | vPro Setup and Configuration for the 8100 Elite Business PC with I - Page 7
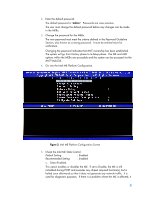
suspect list until root cause is found. Note that if the ME is disabled, then all AMT functions are also disabled. The system will not be remotely manageable. 6. Check Password Policy. Default Setting Recommended Setting : Default Password Only : Default Password Only a. Select Default Password - Compaq 8100 | vPro Setup and Configuration for the 8100 Elite Business PC with I - Page 8
name on the network. Hostnames can be used in place of the system's IP for any applications requiring the IP address. b. Domain Name Enter is not populated, then the default domain of "Provisionserver" will be used when connecting to a Setup and Configuration Server. If the name of the S&CS is not - Compaq 8100 | vPro Setup and Configuration for the 8100 Elite Business PC with I - Page 9
8. TCP/IP Settings. AMT 6.0 supports IPV4 and IPV6 interface. Follow steps 8a-8f to configure for IPV4 and 8g-8h for IPV6. Figure 4: Intel ME TCP/IP Settings Screen a. Wired - Compaq 8100 | vPro Setup and Configuration for the 8100 Elite Business PC with I - Page 10
: 0.0.0.0 : Network Dependent Make sure all AMT systems have a unique static IP address. Multiple systems sharing the same IP address can lead to network collisions, which will cause the systems to not respond correctly. c. Subnet Mask Enter subnet mask Default - Compaq 8100 | vPro Setup and Configuration for the 8100 Elite Business PC with I - Page 11
using a random number as described in RFC 3041. This is the default. Intel ID - The IPv6 Interface ID is automatically generated using the MAC address. Manual ID - The IPv6 Interface ID is configured manually. Selecting this type requires that the Manual Interface ID is set with a valid value. 11 - Compaq 8100 | vPro Setup and Configuration for the 8100 Elite Business PC with I - Page 12
ii. IPv6 Address. AMT 6.0 supports IPv6 network interface. Enter a static IPv6 address Default Setting Recommended Setting : None : Network Dependent Example: 2001:db8::1428:57ab iii. IPv6 default Router. Enter the - Compaq 8100 | vPro Setup and Configuration for the 8100 Elite Business PC with I - Page 13
Figure 7: Intel ME Activate Network Access Screen 10. FW Update Settings. a. Local FW Update Qualifier. Intel ME Firmware Local Update Qualifier Default Setting : Always Open Recommended Setting : Always Open 13 - Compaq 8100 | vPro Setup and Configuration for the 8100 Elite Business PC with I - Page 14
the local update setting with this ME FW Local Update Qualifier. "Always Open" is the default and allows for as many local updates as the system BIOS allows, which is unlimited. Choosing "Never Open" or "Restricted" will add the Intel ME Firmware Local Update option, which can be set to Enable or - Compaq 8100 | vPro Setup and Configuration for the 8100 Elite Business PC with I - Page 15
a valid date range of 1/1/2004 to 1/4/2021. 12. Power Control. Figure 9: Intel ME Power Control Screen a. Intel ME ON in Host Sleep States. Default Setting : Desktop: ON in S0 Recommended Setting : Desktop: ON in S0, ME Wake in S3, S4-5 15 - Compaq 8100 | vPro Setup and Configuration for the 8100 Elite Business PC with I - Page 16
The ME On in Host Sleep State mode will automatically set to Desktop: ON in S0, ME Wake in S3, S4-5 after Activating detect an AMT system as disconnected if the software has to wait for the ME to wake and respond. If the console software being used does not have this issue, HP recommends a setting - Compaq 8100 | vPro Setup and Configuration for the 8100 Elite Business PC with I - Page 17
14. Go into the Intel AMT Configuration. Figure 10: Intel AMT Configuration Screen Press the Enter key when MEBx displays "Update Network settings in the General Settings menu". Press 'Y' at the MEBx prompt below: 17 - Compaq 8100 | vPro Setup and Configuration for the 8100 Elite Business PC with I - Page 18
Selection. Default Setting Recommended Setting : Enabled : Enabled This option allows Intel AMT to be enabled or disabled. By default, HP Compaq 8100 Business PCs are set to enable Intel AMT. Note that setting the Disabled option will disable all remote management capabilities. Setting Disabled - Compaq 8100 | vPro Setup and Configuration for the 8100 Elite Business PC with I - Page 19
Figure 12: Intel ME Features Control Screen with AMT Selected b. Check SOL/IDE-R. Figure 13: Intel ME SOL-IDE-R Configuration Screen 19 - Compaq 8100 | vPro Setup and Configuration for the 8100 Elite Business PC with I - Page 20
a) Username & Password Default Setting Recommended Setting : Enabled : Enabled Select Enabled. This option allows users and passwords to be added from the WebGUI. If it is disabled, then only the administrator has MEBx remote access. b) SOL. Default Setting Recommended Setting : Enabled : - Compaq 8100 | vPro Setup and Configuration for the 8100 Elite Business PC with I - Page 21
Figure 14: Intel ME KVM Configuration Screen i. KVM feature Selection. Default Setting Recommended Setting : Enabled : Enabled Figure 15: Intel ME KVM Configuration Screen 21 - Compaq 8100 | vPro Setup and Configuration for the 8100 Elite Business PC with I - Page 22
MEBx Menu. Select the Previous Menu option to get back MEBx Main Menu and select Exit to exit the MEBx Setup and save settings. The system will reboot. Once the system reboots, it will go from In-Setup phase to Operational phase. AMT is fully operational. Once in the Operational phase, the - Compaq 8100 | vPro Setup and Configuration for the 8100 Elite Business PC with I - Page 23
and domain. Example A: http://192.168.0.1:16992 (IPv4 address) Example B: http://hpsystem.hp.com:16992 Example C: http://[2001:ABC::ABC]:16992 (IPv6 address) 4) The Management PC makes a TCP connection to the AMT system and accesses the top level AMT embedded webpage within the Management Engine of - Compaq 8100 | vPro Setup and Configuration for the 8100 Elite Business PC with I - Page 24
Figure 16: Intel AMT WebGUI Screen 6) Review system information and/or make any necessary changes. Important Note: The MEBx password can be changed for the remote system in the WebGUI. Changing the password in the WebGUI or a remote console will result in two passwords. The new password, known as - Compaq 8100 | vPro Setup and Configuration for the 8100 Elite Business PC with I - Page 25
and Configuration, both the AMT client system and the SCS must share a set of Provisioning ID (PID) and Provisioning Passphrase (PPS). This pair forms a Pre-Shared Key (PSK). Servers on the market. Here are some examples: • HP Client Configuration Manager • Altiris • LANDesk • Microsoft SMS - Compaq 8100 | vPro Setup and Configuration for the 8100 Elite Business PC with I - Page 26
15 to perform AMT Setup. This will take the system from Factory mode to In Setup Mode. Refer to Manual Mode - AMT Setup and Configuration for screen shots of ME Power Control. a. Go into ME ON in Host Sleep States, select Option 2 (Desktop: ON in S0, ME Wake in S3, S4-5) 8) Go into the Intel ME - Compaq 8100 | vPro Setup and Configuration for the 8100 Elite Business PC with I - Page 27
Figure 17a: Intel ME Platform Configuration Screen Figure 17b: Intel AMT Configuration Screen Continued 27 - Compaq 8100 | vPro Setup and Configuration for the 8100 Elite Business PC with I - Page 28
the default. Intel ID - The IPv6 Interface ID is automatically generated using the MAC address. Manual ID - The IPv6 Interface ID is configured manually. Selecting this type requires that the Manual Interface ID is set with a valid value. IPv6 Address Enter a static IPv6 address Default Setting - Compaq 8100 | vPro Setup and Configuration for the 8100 Elite Business PC with I - Page 29
option is only for display, no changes can be made here. b. Provisioning Record. Default Setting : Not Present This option shows provision record data of the system. The provisioning record for a system with PSK provisioning will include the following information: 29 - Compaq 8100 | vPro Setup and Configuration for the 8100 Elite Business PC with I - Page 30
o TLS Provisioning Mode o Provisioning IP o Date of Provisioning The provisioning record for a system with PKI provisioning will include the following information: o TLS Provisioning Mode o DNS o Host Initiated o Hash Data o Hash Algorithm o Serial Number o ISDefault Bit o Time Validity Pass o - Compaq 8100 | vPro Setup and Configuration for the 8100 Elite Business PC with I - Page 31
an S&CS. The Admin Password, PID, and PPS can be pre-populated by HP during manufacturing. Go to the OEM TLS-PSK section for details. ii. Skip Delete PID and PPS. This Option deletes the current PID and PPS entries in the system. iii. Return to previous menu. f. Skip TLS PKI. This option is for - Compaq 8100 | vPro Setup and Configuration for the 8100 Elite Business PC with I - Page 32
the local update setting with this ME FW Local Update Qualifier. "Always Open" is the default and allows for as many local updates as the system BIOS allows, which is unlimited. Choosing "Never Open" or "Restricted" will add the Intel ME Firmware Local Update option, which can be set to Enable or - Compaq 8100 | vPro Setup and Configuration for the 8100 Elite Business PC with I - Page 33
Recommended Setting : Desktop: ON is S0 system as disconnected if the software has to wait for the ME to wake and respond. If the console software being used does not have this issue, HP Configuration menu. a. A message window telling the user that the system resets after configuration will appear. - Compaq 8100 | vPro Setup and Configuration for the 8100 Elite Business PC with I - Page 34
Complete message (only once). 23) System will reboot. 24) Turn off system and remove power. At this point the system is out of Factory Mode and is in In-Setup mode. It is ready to be deployed in a corporation. 25) User plugs system into a power source and connects the network. Only use the - Compaq 8100 | vPro Setup and Configuration for the 8100 Elite Business PC with I - Page 35
then the Setup and Configuration Server's IP address must be manually entered into the AMT system's MEBx. The "Hello" message will contain the following Transport Layer Security (TLS) connection to the AMT system using TLS Pre-Shared-Key (PSK) cipher suite if TLS is supported. 28) The Setup - Compaq 8100 | vPro Setup and Configuration for the 8100 Elite Business PC with I - Page 36
need to go through AMT Setup to go from Factory to In-Setup phase. Once the system is in In-Setup phase, the system can continue to be configured manually or be connected to a network where it will connect with an S&CS and begin Enterprise Mode - AMT Configuration. The Legacy method places all of - Compaq 8100 | vPro Setup and Configuration for the 8100 Elite Business PC with I - Page 37
The In-Setup systems are then connected to the network and service. USB Drive Key Setup and Configuration Password, PID, and PPS information can be Setup and Configured locally with a USB Drive Key. This allows an IT technician to manually Setup and Configure systems without the problems of manually - Compaq 8100 | vPro Setup and Configuration for the 8100 Elite Business PC with I - Page 38
connect platforms if necessary. b. Insert USB Drive Key into a platform. c. Turn on that platform. 6) The system BIOS will detect for a USB Drive Key. a. If found, the BIOS current record so it cannot be used again. b. Place the memory address into the MEBx parameter block. c. Calls MEBx. 8) MEBx - Compaq 8100 | vPro Setup and Configuration for the 8100 Elite Business PC with I - Page 39
OEM image to provision systems securely without the need to manually modify AMT options. RCFG Delayed remote configuration support. Remote Configuration Timeouts in HP Systems The HP Compaq 8100 Business PCs are shipped the ME is active and the system is connected to a network. Consult your ISV management - Compaq 8100 | vPro Setup and Configuration for the 8100 Elite Business PC with I - Page 40
and the system is connected to a network. Remote Configuration Prerequisites RCFG requires certain prerequisites before it can be used. 1) Both the AMT system and the SCS on the AMT system. MEBx and Hashes AMT 6.0 has the feature in the MEBx to allow IT administrators to manually activate a hash - Compaq 8100 | vPro Setup and Configuration for the 8100 Elite Business PC with I - Page 41
Manage Certificate Hashes This option shows the hashes in the system including the name of the hash and whether it is active or not. If no hashes are in the system, then an option to add one is available. If hashes are available, then an - Compaq 8100 | vPro Setup and Configuration for the 8100 Elite Business PC with I - Page 42
CA Certificates The following are a list of supported Certificate Authorities and certificates. Not all of the certificates might be populated in certain configurations. • VeriSign Class 3 Primary CA-G1 o SHA1 Fingerprint: 74 2C 31 - Compaq 8100 | vPro Setup and Configuration for the 8100 Elite Business PC with I - Page 43
may appear. 1) Go into Unconfigure Network Access menu . a. Select the needed Unprovision mode. Full unprovisioning is available for Manual and Enterprise mode provisioned systems. It will return all AMT Configuration settings to factory defaults. All certificate hashes will be deleted and the - Compaq 8100 | vPro Setup and Configuration for the 8100 Elite Business PC with I - Page 44
All MEBx settings can be returned to the factory default by clearing CMOS. This includes resetting the password to the default "admin". The system will need to be Setup and Configured again before remote management is possible. Any nondefault certificate hashes will have to be re-applied. 44 - Compaq 8100 | vPro Setup and Configuration for the 8100 Elite Business PC with I - Page 45
enter the password again. Q: Can the WebGUI be used locally to access the MEBx on the system it is running from? A: No. This is because WebGUI access has to come from an outside network to a specific IP and port. Local access does not originate from an outside network. Q: Why does a new password - Compaq 8100 | vPro Setup and Configuration for the 8100 Elite Business PC with I - Page 46
management console supplier to see if they offer this service. Q: Can AMT be set for static address and the OS set for DHCP or vice versa? A: No. Although it can be done, this is not a supported setting by Intel and may cause unexpected system behavior. Q: What is the default port used by the - Compaq 8100 | vPro Setup and Configuration for the 8100 Elite Business PC with I - Page 47
Global (Gx) states. S0 is the ON state. The PC is fully functioning. All system devices and operating system, if available, are running. S0 is also known as G0. S3 is the Standby (Microsoft terminology) or Suspend-to-RAM state. The memory subsystem and Vaux power rail remains powered, while the rest - Compaq 8100 | vPro Setup and Configuration for the 8100 Elite Business PC with I - Page 48
that must be met for Wake-On-ME to function. • The system is in a sleep state: S3, S4, or S5 • ME HP products and services are set forth in the express warranty statements accompanying such products and services. Nothing herein should be construed as constituting an additional warranty. HP
-
 1
1 -
 2
2 -
 3
3 -
 4
4 -
 5
5 -
 6
6 -
 7
7 -
8
-
9
-
10
-
11
-
12
-
13
-
14
-
15
-
16
-
17
-
18
-
19
-
20
-
21
-
22
-
23
-
24
-
25
-
26
-
27
-
28
-
29
-
30
-
31
-
32
-
33
-
34
-
35
-
36
-
37
-
38
-
39
-
40
-
41
-
42
-
43
-
44
-
45
-
46
-
47
-
48
 |
 |

vPro Setup and Configuration for the
8100 Business PC with Intel vPro
Processor Technology
January 2010
Table of Contents:
Introduction
........................................................................................................
2
AMT Setup and Configuration
..............................................................................
3
AMT System Phases
........................................................................................
3
Manual Mode – AMT Setup and Configuration with MEBx
................................
3
BIOS Prerequisite
............................................................................................
5
Manual Mode (SMB Mode) – AMT Setup and Configuration Steps:
....................
5
Intel AMT WebGUI
............................................................................................
23
Connecting with the Intel AMT WebGUI - SMB Example:
.................................
23
Setup and Configuration Server
.........................................................................
25
Setup and Configuration Server Availability
.......................................................
25
Enterprise Mode Setup and Configuration
..........................................................
25
Enterprise Mode – AMT Setup and Configuration Steps:
..................................
26
Provisioning Methods
........................................................................................
36
Legacy
..........................................................................................................
36
IT TLS-PSK
.....................................................................................................
36
OEM TLS-PSK
................................................................................................
37
USB Drive Key Setup and Configuration
.............................................................
37
USB Drive Key Requirements
.........................................................................
38
Remote Configuration
........................................................................................
39
Remote Configuration Timeouts in HP Systems
................................................
39
Remote Configuration Prerequisites
................................................................
40
MEBx and Hashes
.........................................................................................
40
List of Supported CA Certificates
....................................................................
42
Return to Default
...............................................................................................
43
Full Return to Factory Defaults
............................................................................
44
Appendix B: Power / Sleep / Global States Explained
........................................
47
Appendix C: Wake-On-ME Explained
................................................................
48