Compaq Presario CQ36-100 Compaq Presario CQ35 and CQ36 Notebook PC - Maintenan - Page 56
Hard drive, Remove the hard drive
 |
View all Compaq Presario CQ36-100 manuals
Add to My Manuals
Save this manual to your list of manuals |
Page 56 highlights
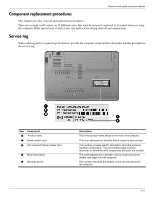
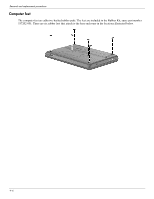
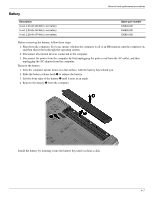
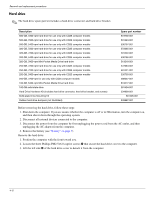
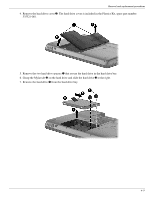
Removal and replacement procedures Hard drive ✎ The hard drive spare part kit includes a hard drive connector and hard drive bracket. Description 500-GB, 7200-rpm hard drive for use only with CQ35 computer models 500-GB, 7200-rpm hard drive for use only with CQ36 computer models 500-GB, 5400-rpm hard drive for use only with CQ35 computer models 320-GB, 7200-rpm hard drive for use only with CQ35 computer models 320-GB, 7200-rpm hard drive for use only with CQ36 computer models 320-GB, 5400-rpm hard drive for use only with CQ35 computer models 320-GB, 5400-rpm Mini-Pocket Media Drive hard drive 250-GB, 7200-rpm hard drive for use only with CQ35 computer models 250-GB, 7200-rpm hard drive for use only with CQ36 computer models 250-GB, 5400-rpm hard drive for use only with CQ35 computer models 250-GB, 7200-rpm for use only with CQ35 computer models 160-GB, 5400-rpm Mini-Pocket Media Drive hard drive 160-GB solid-state drive Hard Drive Hardware Kit (includes hard drive connector, hard drive bracket, and screws) Solid-state Drive Mounting Kit Rubber hard drive bumpers (not illustrated) Spare part number 573738-001 591423-001 530797-001 572085-001 591422-001 530796-001 519218-001 572084-001 591421-001 530795-001 588057-001 519217-001 581404-001 534990-001 581405-001 539887-001 Before removing the hard drive, follow these steps: 1. Shut down the computer. If you are unsure whether the computer is off or in Hibernation, turn the computer on, and then shut it down through the operating system. 2. Disconnect all external devices connected to the computer. 3. Disconnect the power from the computer by first unplugging the power cord from the AC outlet, and then unplugging the AC adapter from the computer. 4. Remove the battery (see "Battery" on page 7). Remove the hard drive: 1. Position the computer with the front toward you. 2. Loosen the three Phillips PM2.5×6.0 captive screws 1 that secure the hard drive cover to the computer. 3. Lift the left side 2 of the hard drive cover to detach it from the computer. 4-8
-
 1
1 -
2
-
3
-
4
-
5
-
6
-
7
-
8
-
9
-
10
-
11
-
12
-
13
-
14
-
15
-
16
-
17
-
18
-
19
-
20
-
21
-
22
-
23
-
24
-
25
-
26
-
27
-
28
-
29
-
30
-
31
-
32
-
33
-
34
-
35
-
36
-
37
-
38
-
39
-
40
-
41
-
42
-
43
-
44
-
45
-
46
-
47
-
48
-
49
-
50
-
 51
51 -
 52
52 -
 53
53 -
 54
54 -
 55
55 -
 56
56 -
 57
57 -
 58
58 -
 59
59 -
 60
60 -
 61
61 -
62
-
63
-
64
-
65
-
66
-
67
-
68
-
69
-
70
-
71
-
72
-
73
-
74
-
75
-
76
-
77
-
78
-
79
-
80
-
81
-
82
-
83
-
84
-
85
-
86
-
87
-
88
-
89
-
90
-
91
-
92
-
93
-
94
-
95
-
96
-
97
-
98
-
99
-
100
-
101
-
102
-
103
-
104
-
105
-
106
-
107
-
108
-
109
-
110
-
111
-
112
-
113
-
114
-
115
-
116
-
117
-
118
-
119
-
120
-
121
-
122
-
123
-
124
-
125
-
126
-
127
-
128
-
129
-
130
-
131
-
132
-
133
-
134
-
135
-
136
-
137
-
138
-
139
-
140
-
141
-
142
-
143
-
144
-
145
-
146
-
147
-
148
-
149
-
150
-
151
-
152
-
153
-
154
 |
 |