Craftsman 17539 Operation Manual
Craftsman 17539 - 6.0 Amp Plate Jointer Manual
 |
View all Craftsman 17539 manuals
Add to My Manuals
Save this manual to your list of manuals |
Craftsman 17539 manual content summary:
- Craftsman 17539 | Operation Manual - Page 1
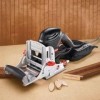
I BISCUIT JOINER DOUBLE INSULATED Model No. 315.175390 ,_ WtheARuNseINr Gm:ust Troeareddaunced tuhnederrissktanodf intjhuery, operator's manual before using this product. Customer Help Line: t-800-932-3188 Sears, Roebuck and Co., 3333 Beverly Rd., Hoffman Estates, IL 60179 USA Visit the Craftsman - Craftsman 17539 | Operation Manual - Page 2
Adjustments ...• Maintenance ...• Accessories ... 10 11-19 20 20-23 24 • Troubleshooting ... 24 • Exploded View and Parts List ... 25-26 • Parts Ordering/Service ... Back Page FULL ONE YEAR WARRANTY ON CRAFTSMAN TOOL If this CRAFTSMAN tool fails to give complete satisfaction within one year from - Craftsman 17539 | Operation Manual - Page 3
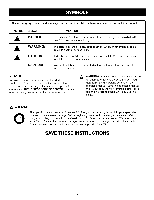
or serious personal injury. SAVE THESE INSTRUCTIONS WORK AREA • Keep your work CARE • Use clamps or other practical way to secure and support the workpiece to a stable platform. Holding the work by hand 's operation. If damaged, have the tool serviced before using. Many accidents are caused by poorly - Craftsman 17539 | Operation Manual - Page 4
unqualified personnel may result in a risk of injury. • When servicing a tool, use only identical replacement parts. Follow instructions in the Maintenance section of this manual. Use of unauthorized parts or failure to follow Maintenance Instructions may create a risk of shock or injury. • Hold - Craftsman 17539 | Operation Manual - Page 5
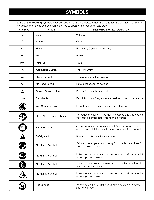
speed, orbits etc., per minute Wet Conditions Alert Do not expose to rain or use in damp locations. O _, @ @ @ ® Read The Operator's Manual Eye Protection Safety Alert No Hands Symbol No Hands Symbol No Hands Symbol No Hands Symbol Hot Surface Topoerreadtourc'se tmheanruisakl obfeifnojrueryu - Craftsman 17539 | Operation Manual - Page 6
servicing, use only identical replacement parts. A WARNING: To avoid serious personal injury, do not attempt to use this product until you read thoroughly and understand completely the operator's manual. Save this operator's manual and review frequently for continuing safe operation and instructing - Craftsman 17539 | Operation Manual - Page 7
Observe all normal safety precautions to avoid electrical shock. NOTE: Servicing of a tool with double insulation requires extreme care and knowledge 14 12 100' 16 16 14 12 10 -- **Used on 12 gauge - 20 amp c_uit NOTE: AWG = American Wire Gauge A WARNING: Keep the extension cord clear of - Craftsman 17539 | Operation Manual - Page 8
10 ft. 4 in. HEIGHT ADJUSTMENT KNOB HEIGHT SETTING SCALE No Load Speed 10,000/min. Input 120 V, 60 Hz, AC only, 6.0 Amps Net Weight 8.4 Ibs. SWITCH TRIGGER DUALGRIP HANDLE CENTERLINE/LINE OF CUTINDICATOR ADJUSTABLE FENCE NON-SKID SURFACE ANGLE SETTING SCALE DEPTH ADJUSTMENT KNOB LOCKING - Craftsman 17539 | Operation Manual - Page 9
in. with a scale showing 0 in. - 1-1/2 in. The adjustable fence should always be used to guide and balance the biscuit joiner, providing ease of operation and maintaining control. BISCUITS Biscuits swell rapidly upon contact with water-based woodworking glues. They are available in three standard - Craftsman 17539 | Operation Manual - Page 10
and satisfactorily operated the tool. • If any parts are damaged or missing, please call 1-800-932-3188 for assistance. PACKING LIST Biscuit Joiner #10 Biscuits (20) Dust bag Carrying Case Operator's Manual INSTALLING/REMOVING See Figure 2. THE DUST BAG The dust bag located on the rear of the - Craftsman 17539 | Operation Manual - Page 11
must then be cut to fit inside the slots and act as splines. Newer methods of spline joinery use a plate or biscuit joiner to cut precise mating oval slots in adjoining boards. This biscuit joiner is a fast, simple, and accurate plungecutting tool that can be used to cut slots in hardwood, softwood - Craftsman 17539 | Operation Manual - Page 12
adjustments to the depth setting can be made by loosening the knurled adjustment knob and making fine adjustments with the jam nut. • Unplug the biscuit joiner. • Loosen the knurled adjustment knob. This knob is used as a lock nut only. Loosen by twisting it in the opposite direction away from the - Craftsman 17539 | Operation Manual - Page 13
up to 2 in. from the center of the blade. Scale marks are in increments of 1/16 in. SETTING THE FENCE HEIGHT See Figure 7. • Unplug the biscuit joiner. • Loosen the locking knob approximately one turn. • Move the fence up or down by rotating the height adjustment knob until the indicator point is - Craftsman 17539 | Operation Manual - Page 14
the board and align the indicator marks on the fence with the centerline mark(s) on the board. • Depress the switch trigger to turn on the biscuit joiner, then push it forward to extend the blade into the wood. • When the base assembly bottoms out against the depth of cut adjustment knob setting - Craftsman 17539 | Operation Manual - Page 15
the board and align the indicator marks on the fence with the centerline mark(s) on the board. • Depress the switch trigger to turn on the biscuit joiner, then push it forward to extend the blade into the wood. • When the base assembly bottoms out against the depth of cut adjustment knob setting - Craftsman 17539 | Operation Manual - Page 16
to the face of another board. Attaching shelves to bookcases and inner support braces to frames are typical applications. Actual cutting of a T-joint is as lining up, the spacing of the biscuit slots from side-to-side must also match. • Plug the biscuit joiner into the power supply and cut - Craftsman 17539 | Operation Manual - Page 17
piece of wood is used for a fence or guide. It must be square with the sides of the vertical board and parallel with the centedine. • Align the centedine on the bottom of the base assembly with marked intersection for biscuit slot. • Plug the biscuit joiner into the power supply and prepare to cut - Craftsman 17539 | Operation Manual - Page 18
making boxes or things where you don't want to show the end grain of the wood. MAKING FLAT MITER JOINTS See Figure 18. • Unplug the biscuit joiner. • Place the pieces of wood to be joined on a level workbench. • Finally, disassemble the workpieces and place a bead of glue in each slot. Also, spread - Craftsman 17539 | Operation Manual - Page 19
thejoint.Reinsertthebiscuitsandassembleworkpieces. • Clampworkpiecetsogetheruntilthegluesetsup. Iftheworkpiecesareofthesamethicknessc, lamp themsecurelyto a workbenchwiththeshortsidesup. Setthefenceangleat 45°. Place the biscuit joiner on the workpiece with the adjustable fence resting on the short - Craftsman 17539 | Operation Manual - Page 20
_k WARNING: When servicing, use only identical Craftsman replacement parts. Use of any other parts may other parts should be replaced at a Sears Service Center. REPLACING THE BLADE See Figures 22 - 24. After extended use, the blade on your biscuit joiner may become dull and need replacing. If you - Craftsman 17539 | Operation Manual - Page 21
Placea screwdriveirnthe holeprovidedinthebearing plate. • Placeoneofthenon-cuttingteethlocatedbehindeach of the tool when held in normal operating position. The direction of rotation is marked on the joiner blade. An arrow on the bottom of the front base assembly also indicates direction of rotation. - Craftsman 17539 | Operation Manual - Page 22
the blade. See "Replacing the Blade." • With the blade removed, place the biscuit joiner right side up. Using a pair of needle nose pliers, stretch and release the springs from the tabs on the bearing plate. SHOWNWITHOUTDUSTBAG SCREW(S) SHOE DUSTBAG PORT \ SPRING Fig. 25 PLIERS Fig. 26 22 - Craftsman 17539 | Operation Manual - Page 23
rearbase assemblies. • Reinstaollr replacethe blade. • Securethe shoewiththewashersandscrews. • Replacethedustbag. CLEANING THE DUST BAG See Figure 28. • Unplug the biscuit joiner. • Remove the dust bag. • Slide the clip off the end of the dust bag.0 • Thoroughly clean the dust bag - Craftsman 17539 | Operation Manual - Page 24
PROBLEM 1. Biscuits do not fit the slots. Biscuits not wood particles from being drawn into the dust bag. Remove the front and rear base assemblies and clean blade, bearing plate, base assembly slots, and surrounding areas. See "Cleaning the Base Assembly and Dust Path." A. Wood particles and resin - Craftsman 17539 | Operation Manual - Page 25
8 CRAFTSMAN BISCUIT JOINER - MODEL NUMBER 315.175390 SEE NOTE 23 i 27 28 32 30 31 32 30 • 37 39 19_ 21 _22 25 24 24 42 42 NOTE: The assembly shown represents an important part of the Double Insulated System. To avoid the possibility of alteration or damage to the System, service should be - Craftsman 17539 | Operation Manual - Page 26
CRAFTSMAN BiSCUiT JOINER - MODEL NUMBER 315.175390 2 35 Screw (M4 X 8 mm 4 36 Track (L 1 37 Bearing Plate Assembly (Incl. Key 16) ...... 1 38 Bail Bearing (CW#6200RS 1 39 Warning Label 2 Carrying Case (net shown 1 Operator's Manual * Standard Hardware Item - May Be Purchased Locally **
-
 1
1 -
 2
2 -
 3
3 -
 4
4 -
 5
5 -
 6
6 -
 7
7 -
8
-
9
-
10
-
11
-
12
-
13
-
14
-
15
-
16
-
17
-
18
-
19
-
20
-
21
-
22
-
23
-
24
-
25
-
26
 |
 |

OPERATOR'S
MANUAL
II:RRFTSMRN I
BISCUIT
JOINER
DOUBLE
INSULATED
Model No.
315.175390
,_
WARNING:
To
reduce the risk of injury,
the user must read and understand
the
operator's
manual before using this product.
Customer
Help
Line:
t-800-932-3188
Sears,
Roebuck
and Co.,
3333
Beverly
Rd.,
Hoffman
Estates,
IL 60179
USA
Visit the Craftsman
web page: www.sears.com/craftsman
983000-495
8-04
Save this
manual
for future
reference