Craftsman 17539 Operation Manual - Page 10
Unpacking, Packing, Installing/removing - biscuit joiner manual
 |
View all Craftsman 17539 manuals
Add to My Manuals
Save this manual to your list of manuals |
Page 10 highlights
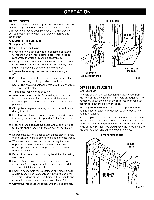
UNPACKING This product requires assembly. • Carefully remove the tool and any accessories from the box. Make sure that all items listed in the packing list are included. • Inspect the tool carefully to make sure no breakage or damage occurred during shipping. • Do not discard the packing material until you have carefully inspected and satisfactorily operated the tool. • If any parts are damaged or missing, please call 1-800-932-3188 for assistance. PACKING LIST Biscuit Joiner #10 Biscuits (20) Dust bag Carrying Case Operator's Manual INSTALLING/REMOVING See Figure 2. THE DUST BAG The dust bag located on the rear of the biscuit joiner provides a dust collection system. Wood particles are drawn up through the base and collect in the dust bag during cutting operations. For more efficient operation, empty the dust bag when half full. To install, slide the dust bag adaptor onto the dust port on the biscuit joiner. To remove the dust bag, grasp the adaptor and pull the dust bag away from the biscuit joiner. \ DUST PORT DUST BAG _ WthiAs RtNooINl Gu:ntil tIhf eanmy ispsairntgs apraertsmisasreingrepdlaocendo.t oFpaeilruartee to do so could result in possible serious personal injury. A WARNING: Do not attempt to modify this tool or create accessories not recommended for use with this tool. Any such alteration or modification is misuse and could result in a hazardous condition leading to possible serious personal injury. _ WARNING: Do not connect to power supply until assembly is complete. Failure to comply could result in accidental starting and possible serious injury. TO INSERT TO REMOVE Fig. 2 ATTACHING THE BISCUIT JOINER TO A VACUUM See Figure 3. The dust collection system of your biscuit joiner has a 1-1/4 in. port for inserting a vacuum hose. • Unplug the biscuit joiner. • Remove the dust bag. • Attach a vacuum hose to the dust port. • Connect the biscuit joiner and the vacuum to a power supply. A WARNING: When the tool is not connected to vacuum, always reinstall the dust bag back onto the tool. Failure to do so could cause dust or foreign objects to be thrown into your face or eyes which could result in possible serious injury. VACUUM HOSE DUST PORT 10 Fig. 3
-
 1
1 -
2
-
3
-
4
-
 5
5 -
 6
6 -
 7
7 -
 8
8 -
 9
9 -
 10
10 -
 11
11 -
 12
12 -
 13
13 -
 14
14 -
 15
15 -
16
-
17
-
18
-
19
-
20
-
21
-
22
-
23
-
24
-
25
-
26
 |
 |
