Craftsman 17539 Operation Manual - Page 23
Applyathincoatof general
 |
View all Craftsman 17539 manuals
Add to My Manuals
Save this manual to your list of manuals |
Page 23 highlights
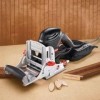
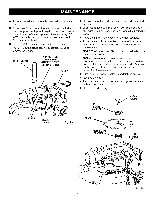
• Usinga screwdriver,emovethetwoscrewsthatconnectthefrontandrearbaseassemblies. • Carefullsyeparatethefrontbaseassemblyfromthe rearbaseassemblyR. emovtehefrontbaseassembly. NOTET: hesepiecesaretightlyjoined.It maybehelpful to usea malleto lightlytapthe areawherethe assembliems eet. • Removetherearbaseassembly. • Withtheassemblieseparatedc,leanwoodparticles andresinfromthe bladearea,dustbagport,frontand rearassemblieasndallsurroundingareas. • Applya thincoatof generapl urposegreasein slotsor onthebearingplatewherethebaseslides. • Replacethe rearbaseassembly. • ReplacethefrontbaseassemblyR. eplaceandtighten thescrewsthatconnecthefrontand rearbase assemblies. • Reinstaollr replacethe blade. • Securethe shoewiththewashersandscrews. • Replacethedustbag. CLEANING THE DUST BAG See Figure 28. • Unplug the biscuit joiner. • Remove the dust bag. • Slide the clip off the end of the dust bag.0 • Thoroughly clean the dust bag by shaking out all debris. • Replace the clip. • Replace the dust bag. TRACK(S) FRONTBASE ASSEMBLY SLOT(S) SCREWS REARBASE ASSEMBLY Fig. 27 Fig. 28 23
-
 1
1 -
2
-
3
-
4
-
5
-
6
-
7
-
8
-
9
-
10
-
11
-
12
-
13
-
14
-
15
-
16
-
17
-
 18
18 -
 19
19 -
 20
20 -
 21
21 -
 22
22 -
 23
23 -
 24
24 -
 25
25 -
 26
26
 |
 |
