Craftsman 17539 Operation Manual - Page 16
Making, T- Joints
 |
View all Craftsman 17539 manuals
Add to My Manuals
Save this manual to your list of manuals |
Page 16 highlights
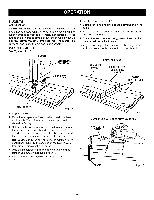
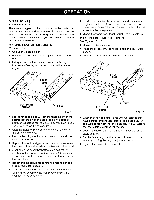
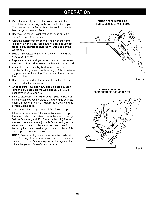
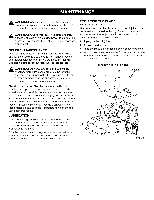
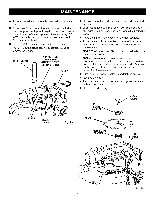
T- JOINTS See Figure 13. A T-joint is used when the end of a board is joined to the face of another board. Attaching shelves to bookcases and inner support braces to frames are typical applications. Actual cutting of a T-joint is as simple as any other cut. However, it is critical that you mark the centerlines, mark the intersection points for each slot, and cut each slot correctly. MAKING T- JOINTS See Figures 13- 15. T-J01NT CENTERLINE MARK(S) • Set the fence angle at 90 ° • Set the fence height at the desired dimension on the scale. • Select the correct depth of cut setting for the biscuit size you plan to use. • Clamp the workpiece securely, then cut each slot at the marked centerline intersection. Next, you must adjust the fence on the biscuit joiner in order to cut slots into the face of the vertical board. VERTICALBOARD HORIZONTAL BOARD BISCUITSLOTS/ _ CENTERLINE MARKS BOARD CENTERLINES BISCUITSLOT(S) Fig. 13 • Unplug the biscuit joiner. • Place the two pieces of wood to be joined on a level workbench. The inside face of the vertical board should be facing up. • Determine the location of each biscuit joint and mark the centerlines on each board. The centerlines for both boards must line up with each other. Measure carefully; these measurements must be accurate and precise. NOTE: Measure twice and cut once. In addition to the centedines lining up, the spacing of the biscuit slots from side-to-side must also match. • Plug the biscuit joiner into the power supply and cut slots in all boards that require end slots. Follow the procedures explained in "Edge-To-Edge Joints." Fig. 14 TO CUT ENDSSLOTSIN HORIZONTALBOARD HORIZONTAL BOARD CLAMP Fig. 15 16
-
 1
1 -
2
-
3
-
4
-
5
-
6
-
7
-
8
-
9
-
10
-
 11
11 -
 12
12 -
 13
13 -
 14
14 -
 15
15 -
 16
16 -
 17
17 -
 18
18 -
 19
19 -
 20
20 -
 21
21 -
22
-
23
-
24
-
25
-
26
 |
 |
