Craftsman 17539 Operation Manual - Page 19
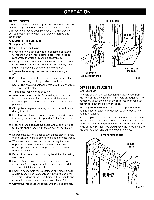
pareto cuttheslot.
 |
View all Craftsman 17539 manuals
Add to My Manuals
Save this manual to your list of manuals |
Page 19 highlights
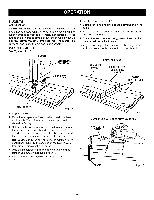
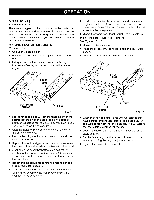
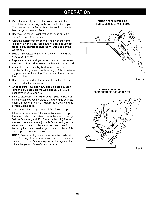
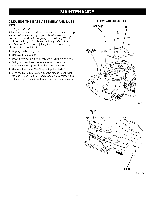
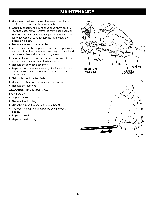
• Placethebiscuitjoinerontheworkpiecewiththe adjustablefencerestingonthelongsideof workpiece. Thebaseor verticaflenceshouldbeagainsthemiterededgeof theworkpiece. • Recheckthefenceheightsettingto makesureit will notcutthroughthe workpiece. • Aligntheindicatormarkonthefencewiththe centerlineontheworkpieceM. akesurethe baseor vertical fenceis pressedflatagainsthemiterededgeofthe workpiece. • Plugthebiscuitjoinerintothepowersupplyandprepareto cutthe slot. • Depresstheswitchtriggerto turnonthebiscuitjoiner, thenpushitforwardto extendthe bladeintothe wood. • Whenthebaseassemblybottomsout againstthe depthof cutadjustmenktnobsetting,pullback,releasingpressureonthespring.Thebladewillretractfrom the biscuitslot. • Repeatthisprocedureforcuttingthematingslotand all requiredmiterjoint slots. • Onceallslotshavebeencut,placea biscuitineach jointanddry-assemblteheworkpiecesM. akesure eachjoint linesup andfits. • Finallyd, isassemblweorkpieceasndplacea beadof gluein eachslot.Also,spreada beadofglueoverthe entiresurfaceof thejoint.Reinsertthebiscuitsandassembleworkpieces. • Clampworkpiecetsogetheruntilthegluesetsup. Iftheworkpiecesareofthesamethicknessc, lamp themsecurelyto a workbenchwiththeshortsidesup. Setthefenceangleat 45°. Place the biscuit joiner on the workpiece with the adjustable fence resting on the short side of the workpiece and the base or vertical fence against the mitered edge of the workpiece. Fol- low steps above to cut required slots. NOTE: Before cutting slots, make sure the blade will not cut through the workpiece and that both the verti- cal and horizontal fences are pressed flat against the mitered edge and face of the workpiece. CUTTINGEDGEMITER SLOT FROMLONGSIDE OFWORKPIECE Fig. 20 CUTTINGEDGEMITER SLOT FROMSHORTSIDE OFWORKPIECE Fig. 21 19
-
 1
1 -
2
-
3
-
4
-
5
-
6
-
7
-
8
-
9
-
10
-
11
-
12
-
13
-
 14
14 -
 15
15 -
 16
16 -
 17
17 -
 18
18 -
 19
19 -
 20
20 -
 21
21 -
 22
22 -
 23
23 -
 24
24 -
25
-
26
 |
 |
