Craftsman 17541 Operation Manual - Page 31
I Z_ Warning
 |
View all Craftsman 17541 manuals
Add to My Manuals
Save this manual to your list of manuals |
Page 31 highlights
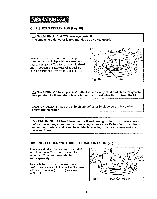
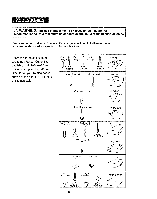
REPLACEMENT OF CARBON BRUSHES (Fig. 20) Replacement brush sets are available through Sears Parts and Repair Centers° !o Unplug the router motor before inspecting or replacing brushes. 2. Replace both carbon brushes when either has less than !/4-in. length of carbon remaining, or if the spring or wire is damaged or burned. 3. Using a slotted screwdriver, remove the black plastic cap on each side of the router motor (Fig° 20) and carefully withdraw the spring-loaded brush assemblies° Keep brushes clean and sliding freely in their guide channels. t saOmTeE:Twoay rethinesytalclamtehe osuat.mTheis bruwsihllesa,voimd akae brseuarke-inthepebrriuosdh. es go back in the 4, Insert new brush assemblies into guide channels, with the carbon part going in first, being certain to fit the two metal "ears" into their slots in the channel (Fig. 20). 5 Remember to replace both end caps after inspecting or servicing brushes. Tighten the caps snugly, but do not over-tighten, The router should be allowed to "RUN IN" (run at no load without a cutter bit) for 5 minutes before use, to seat the new brushes properly° Fig. 20 Cap Ears I Zm_otoWr AfrRomNINthGe: powFoer ysoouurrcseafbeteyf,orAeLWpeArYfoSrmtuinrgn oafnfyswmiatcinhteannadncuenpolurgcleroauntinerg, LUBRICATION All of the bearings in this tool are lubricated with a sufficient amount of high-grade lubricant for the life of the tool under normal operating conditions. Therefore, no further lubrication is required. 31
-
 1
1 -
2
-
3
-
4
-
5
-
6
-
7
-
8
-
9
-
10
-
11
-
12
-
13
-
14
-
15
-
16
-
17
-
18
-
19
-
20
-
21
-
22
-
23
-
24
-
25
-
 26
26 -
 27
27 -
 28
28 -
 29
29 -
 30
30 -
 31
31 -
 32
32 -
 33
33 -
 34
34 -
 35
35 -
 36
36 -
37
-
38
-
39
-
40
 |
 |
