Craftsman 21174 Owners Manual - Page 10
onflat,firm,andwater-resistant
 |
View all Craftsman 21174 manuals
Add to My Manuals
Save this manual to your list of manuals |
Page 10 highlights
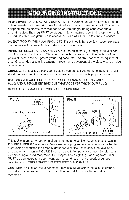
TheUtilitySharpeniesdr esignefodrsharpeninkgnivess,cissorfsla, tchiselsa,ndmore. ALWAYWSEAREYEPROTECTIOHNot!sparkms aybeproducedduringsharpening operations. 1. Theelectricpaol wesrwitchmusbt eintheOFFposition. 2. Thepowecrordmusbt eunpluggefrdomtheelectricrael ceptacle. 3. PlacetheUtilitSy harpenoenrflat,firm,andwater-resistsaunrtface. 4. Loosetnhetwolockknobtshatholdthefrontoolrestuntitlhetoolrestcanbe moveadwayfromthestoneT. helockknobms ayberepositionbeydpullintghe knoboutslightlyT.hispermitsheknobto berotatefdoradditionlaoloseninogr tightening. 7_ Fig. C Partially fill a measuring cup with tap water. Proceed to s!owiy pour approximately 3-6 ounces of water over the stone as shown in Fig. C. Do not have the Utility Sharpener operating while pouring in the water. The rotating grinding wheel will cause water to be splashed possibly onto the electrical switch. 6. Plug in the power cord and turn ON the Utility Sharpener. Let the tool run for one minute. This will let the grinding wheel absorb some of the water and provide a cool grinding surface. 7. After one minute, turn OFF the Utility Sharpener and unplug the power cord from the electrical receptacle. Proceed to fill the water trough unti! water is almost about to spill out of the drainage opening in the rear of the Utility Sharpener. 8. The Water Trough will need to be refilled occasionally during extended sharpening operations. 9. Return the front tool rest back into position. 10. Adjust both the front and rear tool rests until they are approximately 1/8" from the grinding wheel. Firmly tighten all four of the lock knobs. 11. Carefully inspect the item to be sharpened. Look for any cracks or bends, if the item is damaged, then discard it. DO NOT attempt to sharpen a damaged tool. 10
-
 1
1 -
2
-
3
-
4
-
 5
5 -
 6
6 -
 7
7 -
 8
8 -
 9
9 -
 10
10 -
 11
11 -
 12
12 -
 13
13 -
 14
14 -
 15
15 -
16
-
17
-
18
-
19
-
20
-
21
-
22
-
23
-
24
-
25
-
26
-
27
-
28
-
29
-
30
-
31
-
32
 |
 |
