Craftsman 21174 Owners Manual - Page 11
Wipe the Utility Sharpener
 |
View all Craftsman 21174 manuals
Add to My Manuals
Save this manual to your list of manuals |
Page 11 highlights
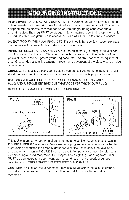
12. if the item to be sharpened is in good condition, then proceed to lay the item fiat on either of the tool rests as shown in Fig. D. Loosen the lock knobs and adjust the tool rest until the original bevel angle of the item to be sharpened is matched. Maintain a 1/8" distance from the grinding wheel after the tool rest has been adjusted to the proper angle. Firmly tighten the lock knobs. NOTE: To sharpen scissors, hold as shown in Fig. E. You must sharpen the bevel side of each scissors blade. DO NOT attempt to sharpen the flat side of the blade. This will ruin the scissors. Fig. D Fig. E 13. Practice a few times while the Utility Sharpener is OFF, slowIy pulling the tool across the grinding wheel while keeping the tool fiat on the tool rest. ALWAYS pull the item to be sharpened across the wheel from the angle to the tip of the blade. DO NOT ever push the item across the grinding wheel 14. Plug the power cord into the electrical receptacle and turn ON the Utility Sharpener. Ordinarily, cutting edges are sharpened with the grinding wheel turning toward the blade. However, if you find it more comfortable, you may sharpen with the wheel turning away from the blade. 15. Proceed to Iay the item to be sharpened fiat onto the tool rest and hold onto it firmIy with both hands. Slowly and Iightly putl the item across the rotating grinding wheel. inspect the item after a few passes to check the progress. The cutting edge should have a shiny appearance the entire length of the cutting surface, if the surface has dark and shiny spots, the angle of the tool rest is not properly adjusted or the user is not keeping the item fiat on the tool rest. Make adjustments as necessary. 16. Alternate sharpening on both sides of the tool. 17. Upon completing the sharpening operations, a smaII burr might form on the cutting edge. Remove the burr by turning the Utility Sharpener OFF and unplugging it from the electrical receptacle. Lightly pull the blade across the stationary grinding wheel until the small burr is removed. 18. Dump out the water that was poured into the water trough earlier by tilting the Utility Sharpener backward. 19. Wipe the Utility Sharpener off with a clean dry rag and inspect for any damage to the grinding wheel. 11
-
 1
1 -
2
-
3
-
4
-
5
-
 6
6 -
 7
7 -
 8
8 -
 9
9 -
 10
10 -
 11
11 -
 12
12 -
 13
13 -
 14
14 -
 15
15 -
 16
16 -
17
-
18
-
19
-
20
-
21
-
22
-
23
-
24
-
25
-
26
-
27
-
28
-
29
-
30
-
31
-
32
 |
 |
