Craftsman 25980 User Instructions - Page 3
Fig. 5b, Fig. 6 - accurip saw guide
 |
View all Craftsman 25980 manuals
Add to My Manuals
Save this manual to your list of manuals |
Page 3 highlights
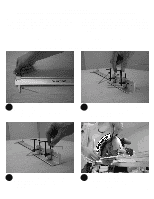
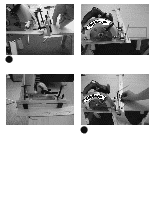
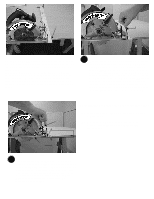
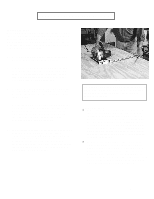
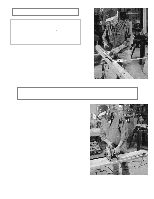
Push Against Saw Base Plate Fig. 5 75 Position the Accu-Rip on your saw base plate as shown in Fig.5. You will need to slightly raise the saw to slide the base of the Accu-Rip under the saw base plate. Fig. 5a Push the Accu-Rip towards the saw until the AccuRip is flush against the front edge of the saw base as shown in Fig 5a. Depending on your saw's design, at this point you may need to loosen the T-Bolts slightly more to allow adequate clearance. (A) T-Bolts (C) L-Brackets "0" Mark Aligned with Material Edge Fig. 5b Important note on positioning your Accu-Rip Saw Guide: Make sure that the Zero mark on the Accu-Rip Saw Guide is aligned with the edge of your table or material as shown in Fig. 5b. Also, make sure that saw blade is firmly resting against the edge of the table or material as shown in Fig. 4., with the blade guard raised. This will align the saw blade properly with the Zero mark on the Accu-Rip Saw Guide, insuring correct cutting widths. Fig. 6 76 With your Accu-Rip now positioned properly, adjust the L-Brackets (C) so that the T-Bolts (A) can be tightened down onto a relatively flat area of the saw's base plate, as shown in Fig. 6. The location of the L-Brackets (C) should also allow you to reach the T-Bolts (A), for tightening and loosening these onto the base plate. NOTE: The exact positioning of the L-Brackets and T-Bolts will vary on different saw designs. IMPORTANT: To insure the maximum hold and stability during operation, try to position the L-Brackets as follows: 1) The L-Brackets (C) should be placed as far into the saw's base plate as possible, without interfering with the saw's operation. This position may be different on various saw designs, and is largely determined by the location of available space for locating the T-Bolts (A). You should be able to place your fingers firmly on the T-Bolts (A) to tighten and loosen. 2) Position the L-Brackets as far apart from each other as possible on the saw base. 3) Be sure the location of the T-Bolts does not interfere with correct saw operation. 3
-
 1
1 -
 2
2 -
 3
3 -
 4
4 -
 5
5 -
 6
6 -
 7
7 -
 8
8
 |
 |
