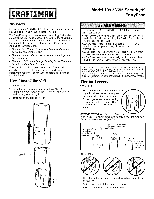
Craftsman 95355 User Guide
Craftsman 95355 - EntryEase Fingerprint Keyless Entry Pad Manual
 |
UPC - 012381535552
View all Craftsman 95355 manuals
Add to My Manuals
Save this manual to your list of manuals |
Craftsman 95355 manual content summary:
- Craftsman 95355 | User Guide - Page 1
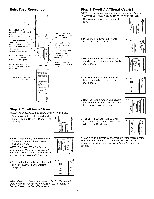
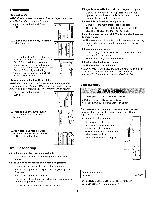
Overview For use with any 315 MHz SECURITY÷ ® garage door openers having a purple "learn" button (refer to Step 4). The EntryEase system uses biometric technology that enables an authorized user to gain access by scanning their fingerprint. The sensor strip on the unit makes a numeric template of - Craftsman 95355 | User Guide - Page 2
EntryEase Reference Cover _ Resend button: When pressed the door will stop if X moving up or reverse if \ rnovingdown• Send LED (yellow): Lit\ after a passed fingerprint \ sianaddil.td_Cnates_at ethe and can be used to stop _ or reverse door travel. --_ Pass LED (green): Lit when _ a - Craftsman 95355 | User Guide - Page 3
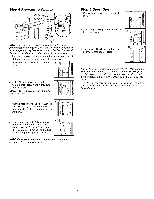
to the 30 second time interval, a second person may be needed to press the "learn" button. If there is no purple "learn" button refer to Troubleshooting. 1. Press and release the purple "learn" button on the motor unit of the garage door opener. See illustration above. 2. Open cover and wait for - Craftsman 95355 | User Guide - Page 4
batteries. Screw the battery cover back on. 4. Slide entry cover back into place. Troubleshooting • If no known enrolled users are available: -- The memory must be erased not wet. I RUenpit laccoevmeren.t.....p...a..r.t.s FOR SERVICE DIAL OUR TOLL FREE NUMBER: 1-800-4-MY-HOME ®(1-800-469-4663) - Craftsman 95355 | User Guide - Page 5
Generalidades Para usar con cualquier abridor de puertas de garaje SECURITY÷ ®de 315 MHz que tenga un botdn de "programaci6n" de color morado (consulte el Paso 4). El sistema EntryEase usa tecnologia biometrica que permite a un usuario autorizado tener acceso escaneando su huella dactilar El sensor - Craftsman 95355 | User Guide - Page 6
EntryEase Reference Tapa Bot6n Resend (Reenviar): Cuando se opdme este bot6n, la puerta se parar4 si est4 subiendo o cambiar4 de sentido de desplazamientosi est4 bajando. k LED Send (Enviar) (amarillo): _ Se enciende despu6sde \ escanearuna huelladactilar \ aceptadae indicaque el bot6n\ Resend est, - Craftsman 95355 | User Guide - Page 7
Paso 4 Programe el abridor Paso 50peraci6n 1. Abra la tapa y espere a que se encienda el LED Ready. 2. Pase el dedo lenta y firmemente por el sensor. 1 JIh fll 2 NOTA: La unidad debe tener un usuario registrado antes de que pueda programarse el abridor. Debido al intervalo de 30 segundos, tal vez - Craftsman 95355 | User Guide - Page 8
Borrar/Reajustar • Para borrar usuarios: NOTA: AI borrar un usuario se borraran TODAS las huellas dactilares almacenadas. El usuario NO necesita reprogramar el abridor. 1. Abra la tapa y espere a que se encienda el LED Ready. 2. El usuario inscrito debe registrar lenta y firmemente una huella
-
 1
1 -
 2
2 -
 3
3 -
 4
4 -
 5
5 -
 6
6 -
 7
7 -
8
 |
 |

Model
139.53555
Security+
®
EntryEase
Overview
For use
with
any 315 MHz SECURITY÷
® garage door openers
having a purple
"learn" button (refer to Step 4).
The EntryEase
system
uses biometric
technology
that enables
an authorized
user to gain access by scanning
their fingerprint.
The sensor
strip on the unit makes a numeric template
of the
fingerprint
that is unique to that user. The unit's memory
can
store up to four fingerprints.
•
The term
"enroll"
refers to scanning
the fingerprint
so the
device
will recognize
the user.
°
The term
"swipe"
refers to the movement
of the finger across
the sensor
strip.
•
The term
"LED"
stands
for Light Emitting
Diode.
There are 6
LEDs located
on the EntryEase.
When unit is on, it is programmed
to shut off after a short
period of time. The unit's sensor
strip
is sensitive
so it is
important
to read the Tips for Success
before attempting
to
use the EntryEase.
Step
1 Install
the
Unit
1. Remove
cover.
2. Fasten bottom screw to mounting
surface. Allow
1/8"
(3 mm) to protrude
above surface.
Position
unit on screw
head and adjust for snug fit.
3. Fasten top screw.
Replace cover.
o
2
To prevent possible SERIOUSINJURYor DEATHfrom a moving
gate or garage door:
• Install Keyless Entry Control within sight of the garage door, out of
reach of children at a minimum height of 5 feet (1.5 m), and away
from all moving parts of door.
• ALWAYSkeep remote controls out of reach of children. NEVER
permit children to operate, or play with remote control
transmitters.
• Activate gate or door ONLYwhen it can be seen clearly, is properly
adjusted, and there are no obstructions to door travel.
• ALWAYSkeep gate or garage door in sight until completely closed.
NEVERpermit anyone to cross path of moving gate or door.
NOTICE:Tocomply with FCCandor Industry Canada(IC) rules, adjustment or modificationsof
this receiver and/or transmitter are prohibited, exceptfor changing the code setting or replacing
thebattery.THEREARENOOTHERUSERSERVICEABLEPARTS.
Testedto Comply with FCCStandardsFOR HOMEOR OFFICEUSE. Operationis subject to the
following two conditions: (1) this device may not cause harmful interference, and (2) this device
must acceptany interferencereceived,including interferencethat may cause undesired operation.
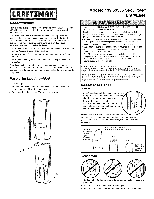
Tips
for
Success
CORRECT
1. Make sure finger
is clean
and dry. Place
finger flat above the sensor
strip with f
the top knuckle
above the sensor.
)
2. Swipe finger straight
down keeping
firm contact with the sensor. The
swipe should be a slow, constant
speed.
SPECIAL
NOTES:
Use the same finger for
every swipe.
It is important
to swipe finger
slowly and firmly as
this is the reason most swipes fail.
A
Start swipe
with
/
_
the top knuckle
/
I
above
the
"_
_
I
sensor
strip.
_/_=;::_
ISensor
StriPl
Swipe
finger
straight
down
keeping
firm contact
with
the sensor.
ISensor
StripI
_The
scan
should end
at the tip of
finger.
INCORRECT
°
Do not bend finger
during swipe as this will only scan the tip
of your finger.
°
Swipe finger straight
down, not at an angle.
°
Swipe flat, not tilted or rolled to one side.