Craftsman 95355 User Guide - Page 1
Craftsman 95355 - EntryEase Fingerprint Keyless Entry Pad Manual
 |
UPC - 012381535552
View all Craftsman 95355 manuals
Add to My Manuals
Save this manual to your list of manuals |
Page 1 highlights
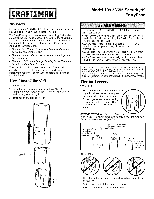
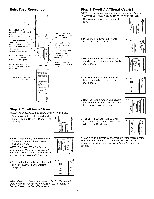
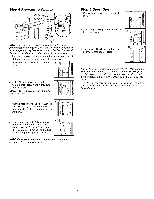
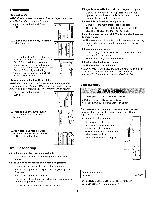
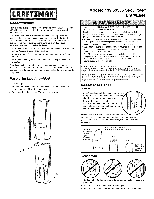
Overview For use with any 315 MHz SECURITY÷ ® garage door openers having a purple "learn" button (refer to Step 4). The EntryEase system uses biometric technology that enables an authorized user to gain access by scanning their fingerprint. The sensor strip on the unit makes a numeric template of the fingerprint that is unique to that user. The unit's memory can store up to four fingerprints. • The term "enroll" refers to scanning the fingerprint so the device will recognize the user. ° The term "swipe" refers to the movement of the finger across the sensor strip. • The term "LED" stands for Light Emitting Diode. There are 6 LEDs located on the EntryEase. When unit is on, it is programmed to shut off after a short period of time. The unit's sensor strip is sensitive so it is important to read the Tips for Success before attempting to use the EntryEase. Step 1 Install the Unit 1. Remove cover. 2. Fasten bottom screw to mounting surface. Allow 1/8" (3 mm) to protrude above surface. Position unit on screw head and adjust for snug fit. 3. Fasten top screw. Replace cover. Model 139.53555 Security+ ® EntryEase To prevent possible SERIOUSINJURY or DEATHfrom a moving gate or garage door: • Install Keyless Entry Control within sight of the garage door, out of reach of children at a minimum height of 5 feet (1.5 m), and away from all moving parts of door. • ALWAYSkeep remote controls out of reach of children. NEVER permit children to operate, or play with remote control transmitters. • Activate gate or door ONLYwhen it can be seen clearly, is properly adjusted, and there are no obstructions to door travel. • ALWAYSkeep gate or garage door in sight until completely closed. NEVERpermit anyone to cross path of moving gate or door. NOTICE:To comply with FCCand or Industry Canada(IC) rules, adjustment or modifications of this receiver and/or transmitter are prohibited, exceptfor changing the code setting or replacing the battery. THEREARE NO OTHERUSERSERVICEABLEPARTS. Tested to Comply with FCCStandards FOR HOMEOR OFFICEUSE. Operation is subject to the following two conditions: (1) this device may not cause harmful interference, and (2) this device must acceptany interferencereceived,including interferencethat may cause undesired operation. Tips for Success CORRECT 1. Make sure finger is clean and dry. Place finger flat above the sensor strip with f the top knuckle above the sensor. 2. Swipe finger straight down keeping firm contact with the sensor. The swipe should be a slow, constant speed. ) SPECIAL NOTES: Use the same finger for every swipe. It is important to swipe finger slowly and firmly as this is the reason most swipes fail. A Start swipe with / _ the top knuckle / I above the "_ _ I sensor strip. _/_=;::_ ISensor StriPl Swipe finger straight down keeping firm contact with the sensor. ISensor StripI _The scan should end at the tip of finger. INCORRECT o ° Do not bend finger during swipe as this will only scan the tip 2 of your finger. ° Swipe finger straight down, not at an angle. ° Swipe flat, not tilted or rolled to one side.
-
 1
1 -
 2
2 -
 3
3 -
 4
4 -
 5
5 -
 6
6 -
 7
7 -
8
 |
 |
