Cub Cadet Pro Z 160L EFI Owners Manual - Page 16
Executing a Zero Turn, Executing a Y Manuever, Stopping the Tractor, Driving On Slopes, Operating
 |
View all Cub Cadet Pro Z 160L EFI manuals
Add to My Manuals
Save this manual to your list of manuals |
Page 16 highlights
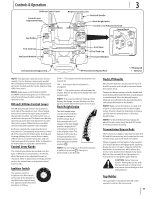
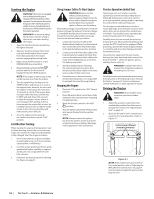
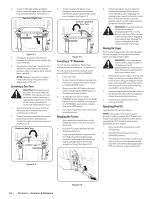
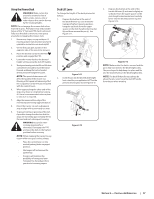
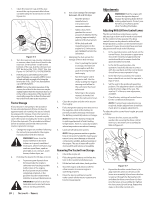
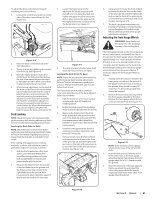
2. To turn to the right while traveling in reverse, move the right drive control lever forward of the left lever. See Figure 3-7. Rearward Right Turn Figure 3-7 3. The greater the fore-to-aft distance between the two levers, the sharper the tractor will turn. 4. To execute a "pivot turn," move the turn side drive control lever to the neutral position, while moving the other control lever rearward. NOTE: Making a "pivot turn" on grass will greatly increase the potential for defacement of the turf. Executing a Zero Turn WARNING! When executing a zero turn, the tractor MUST BE STOPPED. Executing a zero turn while the tractor is moving can significantly reduce your control of the tractor and will cause severe turf defacement to occur. 1. Stop the forward or reverse motion of the tractor by moving the two drive control levers to neutral. 2. To turn clockwise, move the left control lever forward while simultaneously moving the right control lever rearward. See Figure 3-8. Clockwise Zero Turn 3. To turn counter-clockwise, move the right control lever forward while simultaneously moving the left control lever rearward. See Figure 3-9. Counter-clockwise Zero Turn Figure 3-9 Executing a "Y" Manuever For low traction conditions, follow these procedures for zero turns (the "Y-manuever"): To turn clockwise (front of machine moves toward RIGHT) when traveling FORWARD: 1. Come to a stop. 2. Slowly move both lap bars rearward (no more than ½ maximum reverse speed) to initiate REVERSE travel, 3. Slowly move the LEFT lap bar forward while maintaining the RIGHT lap bar in the rearward travel position. 4. To stop the turn and re-initiate FORWARD travel, slowly move the RIGHT lap bar from the REVERSE travel position to a FORWARD travel position equal to that of the LEFT lap bar. 5. For counter-clockwise turns, reverse the above procedure. Stopping the Tractor 1. Move both drive control levers to the neutral position to stop the motion of the tractor. 2. Push the PTO switch downward to the disengaged position. 3. Use the deck lift handle to raise the deck to its highest position by depressing the button at the end of the handle and pulling upwards. Make sure the latch engages on the pin. See Figure 3-10. 4. If dismounting the tractor, move the drive control handles fully outward in the neutral position engaging the parking brake, move the throttle control lever to the FAST position, turn the ignition switch to STOP and remove the ignition key from the switch. WARNING! Do not leave the seat of the tractor without disengaging the PTO, moving drive control levers fully outward in the neutral position engaging the parking brake. If leaving the tractor unattended, turn the ignition key OFF and remove. Driving On Slopes Refer to the slope gauge in the Safe Operation Section on page 6 to help determine slopes where you may operate safely. WARNING! Do not operate on inclines with a slope in excess of 15 degrees (a rise of approximately 2-1⁄2 feet every 10 feet). The tractor could overturn and cause serious injury. 1. Always drive across slopes, never up and down. Control the speed and direction of the tractor using primarily the control lever on the downhill side of the tractor, with the uphill control lever remaining essentially in a fixed position. 2. Avoid turning downhill if possible. Start at the bottom of a slope and work upward. Always slow down before turning. 3. Use extra care and go slowly when turning downhill. Operating The PTO Operate the PTO clutch as follows: NOTE: During your units initial break-in period, in order to engage the PTO and avoid engine stall, allow the engine to warm before engaging the PTO. Break-In period varies depending on your engine. 1. Move the throttle control lever to the FAST position. 2. Pull the PTO switch upward to the ENGAGED position. 3. The operator must remain in the tractor seat at all times. If the operator should leave the seat without disengaging the PTO, the tractor's engine will shut off. Figure 3-8 16 Section 3 - Controls & Operation Figure 3-10
-
 1
1 -
2
-
3
-
4
-
5
-
6
-
7
-
8
-
9
-
10
-
 11
11 -
 12
12 -
 13
13 -
 14
14 -
 15
15 -
 16
16 -
 17
17 -
 18
18 -
 19
19 -
 20
20 -
 21
21 -
22
-
23
-
24
-
25
-
26
-
27
-
28
-
29
-
30
-
31
-
32
 |
 |
