D-Link DCS-1000 Product Manual
D-Link DCS-1000 Manual
 |
View all D-Link DCS-1000 manuals
Add to My Manuals
Save this manual to your list of manuals |
D-Link DCS-1000 manual content summary:
- D-Link DCS-1000 | Product Manual - Page 1
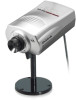
D-Link DCS-1000/W 2.4 GHz Internet Camera and Wireless Internet Camera Manual (10/04/04) Building Networks for People - D-Link DCS-1000 | Product Manual - Page 2
9 Security 10 Using the Internet Camera as a Security System 11 Software Installation 15 IPView Application Installation 35 IPView - Getting Started 41 Uninstall IPView Application 68 Appendix 70 Technical Specifications 86 Contacting Technical Support 88 Warranty 89 Registration 92 - D-Link DCS-1000 | Product Manual - Page 3
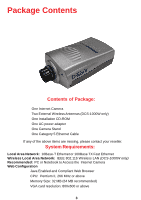
Cable If any of the above items are missing, please contact your reseller. System Requirements: Local Area Network: 10Base-T Ethernet or 100Base TX Fast Ethernet Wireless Local Area Network: IEEE 802.11b Wireless LAN (DCS-1000W only) Recommended: PC or Notebook to Access the Internet Camera - D-Link DCS-1000 | Product Manual - Page 4
): IPView Configuration • Windows XP, Me, 2000, 98SSe or 98 • CPU: Pentium II, 350 MHz or above • Memory Size: 128 MB (256 MB recommended) • VGA card resolution: 800 x 600 or above Introduction The Internet Camera connects directly to an Ethernet, Fast Ethernet, or 802.11b Network. It is - D-Link DCS-1000 | Product Manual - Page 5
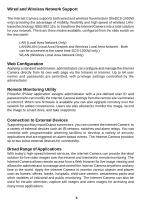
Wired and Wireless Network Support The Internet Camera supports both wired and wireless transmission (theDCS-1000W only) providing the advantage of mobility, flexibility and high-speed of wireless LANbased technology, IEEE 802.11b, to transform the Internet Camera into a total solution for your - D-Link DCS-1000 | Product Manual - Page 6
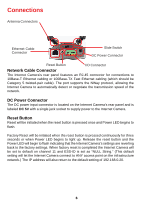
Slide Switch DC Power Connector Reset Button I/O Connector Network Cable Connector The Internet Camera's rear panel features an RJ-45 connector for connections to 10Base-T Ethernet cabling or 100Base-TX Fast Ethernet cabling (which should be Category 5 twisted-pair cable). The port supports the - D-Link DCS-1000 | Product Manual - Page 7
desired for the Internet Camera and is positioned on the rear panel. The three settings are as follows: • LAN (Local Area Network Only) • LAN/WLAN (Local Area Network and Wireless Local Area Network. Both can be accessed at the same time. DCS-1000W only.) • WLAN (DCS-1000W Only) I/O Connector There - D-Link DCS-1000 | Product Manual - Page 8
refer to the Web Configuration section for detailed information and usage. LAN/WLAN LED (DCS-1000W only) The LAN/WLAN LED is positioned on the right side of the Internet Camera's lens while facing the Internet Camera. It is located to the right of the Power LED Steady orange confirms good connection - D-Link DCS-1000 | Product Manual - Page 9
Hardware Installation 1. Attach Wireless Antenna (DCS-1000W only) From the rear panel of the Internet Camera, screw the 2 external antennas that came with DCS-1000W into the antenna connector. 2. Configure Network Communication From the rear panel of the Internet Camera select the desired network - D-Link DCS-1000 | Product Manual - Page 10
Administrator has the exclusive privilege to access the System Administration setting to allow users the security level of entry and authorize privileges for all users. The Internet Camera supports multi-level password protection/access to the Internet Camera that can be restricted to defined users - D-Link DCS-1000 | Product Manual - Page 11
Using the Internet Camera as a Security System D-Link's IP Camera System is one of the most cost effect security solutions today. Both the DCS-1000 Wired model and DCS-1000W Wired/Wireless model have input/output controls for interfacing with security systems. On the back of the Camera you will - D-Link DCS-1000 | Product Manual - Page 12
contact switches can be used for Passive components. This limitation is because the camera only supplying 5V and less then 100mA current to those circuits. Distance = 200mA = .20A Total : .277A Purchase a 12V DC 1.2A Max power adapter to cover all Active Sensors and Siren, with room to grow. 12 - D-Link DCS-1000 | Product Manual - Page 13
Follow the instructions for setting up the camera either wired/wireless. If this is a home and the camera is behind an Internet router additional set-up notes for you router can be found on www.dlink.com. Once logged into the camera on the main menu click/select trigger and the following - D-Link DCS-1000 | Product Manual - Page 14
Additional Component Listing for use with the Internet Camera All components listed below can be found at www.smarthome.com Passive Components Glass Break Sensor PN: 5150w - Sentrol Inc.Any contact switch or pressure - D-Link DCS-1000 | Product Manual - Page 15
of the D-Link Broadband Gateway products from support.dlink.com/ products. The DI-713 or DI-714 are good products to use as an example as their Quick Install Guides are the most up-to-date. Main Menu Image After the default IP address is entered from the Browser, the Internet Camera Home screen will - D-Link DCS-1000 | Product Manual - Page 16
Click on "System Administration" from the Home screen to access the settings required for the Internet Camera. There will be several options in the System menu bar to choose from to set your Internet Camera and they are as follows: ƒ System ƒ Image ƒ Users ƒ Date/Time ƒ Trigger ƒ Information - D-Link DCS-1000 | Product Manual - Page 17
System Administration System Administration - System The System menu contains commands for settings that are required for inputting key details to set-up the Internet Camera for operation. Click on System in the System Administration menu bar and the System screen will appear as illustrated below: - D-Link DCS-1000 | Product Manual - Page 18
by the Internet Camera. Admin: This field is used for entering the Administrator ID along with the password to access the System Administration settings. Be sure to enter the password twice to confirm , once in the Admin Password field and again in the Confirm Password field. The default setting for - D-Link DCS-1000 | Product Manual - Page 19
account, the cick on PPPoE and enter the Service Name, User ID and Password into the respective fields. The Internet Camera will get an IP address from the ISP each time it starts up. DNS IP Address: DNS (Domain Name System) server is an Internet service that translates domain names (ie. www.dlink - D-Link DCS-1000 | Product Manual - Page 20
Name: (for Wireless Internet Camera only) This field is used to setup which wireless network (ESS-ID Extended Service Set ID) DCS-1000W is to be connected for communication. The ESS-ID is a unique identifier shared among all points in a wireless network environment. The default Network Name is - D-Link DCS-1000 | Product Manual - Page 21
Encryption WEP Key: (for Wireless Internet Camera only) Wireless network communications are easily intercepted. WEP (Wired Equivalent Privacy) is an encryption method specified by the IEEE 802.11b standard to make any intercepted communications extremely difficult to interpret by unauthorized - D-Link DCS-1000 | Product Manual - Page 22
wireless transmission be sure to Enable the Encryption Key by entering the relevant data. Note: Carefully input the Encryption Code, any error setting the code will cause the communication link to fail. LED Control: The LED control allows you to setup the Wireless Internet Camera The default setting - D-Link DCS-1000 | Product Manual - Page 23
from the driver CD is included in this manual. Refer to the section labeled Software Installation. Open a second port: The Web Server field allows settings to open a second port for the Internet Camera. This will permit users IP Sharing Gateways to support multiple Internet Cameras. By default Port - D-Link DCS-1000 | Product Manual - Page 24
less video quality, and lower video compression will result in larger files with higher video quality. The default setting is Medium. Frame Rate: Select the frame rate desired with the default setting at Auto for optimal frame rate. A setting of Auto will get best results. Brightness Control: Adjust - D-Link DCS-1000 | Product Manual - Page 25
(default). 50 Hz and 60 Hz variants are available to accommodate the different light frequencies found in USA (60 Hz) and Europe (50 Hz) to ensure better image quality. Save/Cancel: After making sure all settings in the System are correct, click on Save to store the settings in the Internet Camera - D-Link DCS-1000 | Product Manual - Page 26
, any user will be required to enter a login password to access the video image from the Internet Camera. The password dialog box is illustrated below. System Administration - DateTime The DateTime menu contains commands for setting the Internet Camera's time and date requirements to provide correct - D-Link DCS-1000 | Product Manual - Page 27
setting for the Internet Camera. IP Address: Enter the IP Address of the Time Server in this field. Protocol: Two options of NTP or Time are available for your selection to link with the Time Server. The default setting is NTP. TimeZone: The System administrator must select the time zone for the - D-Link DCS-1000 | Product Manual - Page 28
can alternatively click on the Cancel icon to restore all settings to the values last saved to or retrieved from the Internet Camera. System Administration - Trigger The Trigger menu contains commands for the I/O Trigger connectors providing the physical interface for 2 digital outputs and 2 digital - D-Link DCS-1000 | Product Manual - Page 29
The default setting for the I/O Trigger functions is "disabled." You must enable the above. Save/Cancel: After making sure all settings in the System are correct, click on the "Save" icon to store the settings for the Internet Camera. You can alternatively click on the "Cancel" icon to restore - D-Link DCS-1000 | Product Manual - Page 30
manual operation settings. Click on Upload in the system administration Manual Operation. FTP Server: There are 6 basic settings for your FTP server. • Host Address: The IP Address of the target FTP server. • Port Number: The standard port number for FTP server is Port 21 and it's also the default - D-Link DCS-1000 | Product Manual - Page 31
Password: Enter the user password in the FTP server uses passive mode. The default setting is No. Time Schedule: Select Upload Suffix, and set up the Sequence Number. Manual Operation: When you click on the image the System are correct, click on Save to store the settings for the Internet Camera. - D-Link DCS-1000 | Product Manual - Page 32
table provides detailed information about the Internet Camera such as the Model Name, Firmware Version, Mac Address, and IP Address. System Administration - Tools The Tools menu contains commands for restarting the Internet Camera. Click on "Tools" in the system administration menu bar and the Tools - D-Link DCS-1000 | Product Manual - Page 33
and adjust the focus, by manually turning the lens clockwise or counter-clockwise to the desired image quality. Please refer to the appendix for detailed information regarding Adjusting the Internet Camera Focus and Replacing the Lens. View Image - ActiveX Mode To view video images from the browser - D-Link DCS-1000 | Product Manual - Page 34
permitted to connect to Internet Camera to utilize the output trigger function. Please refer to appendix for detailed information. Note 2: The Administrator has the authority to allow users to set the output trigger functions, through the Upload setting, in the System Administration menu bar. Note - D-Link DCS-1000 | Product Manual - Page 35
be displayed when the Location field is entered in the Web Configuration settings under "System." Date/Time*** - The date/time of the Internet Camera will show the date and time which comes either from the time server or from manual settings. In the View Image - Java Mode you are allowed two output - D-Link DCS-1000 | Product Manual - Page 36
Once executed a prompt will appear requesting the input of the desired language selection. Make the desired selection and click on OK to continue. The Welcome screen will appear. Click on the Next button to proceed with the installation. 36 - D-Link DCS-1000 | Product Manual - Page 37
details carefully and click on the Yes icon to continue with the installation procedure. A prompt will appear and in the Destination Location dialog box, you may click on Next to accept the recommended destination location or click on Browse to select another location. After specifying the desired - D-Link DCS-1000 | Product Manual - Page 38
continue. If you wish to modify your settings, click on Back to return to the previous screens. Please wait until one of the two dialog boxes appear, select "Yes, I want to restart my computer now" and click on Finish to restart the computer to complete the installation procedure. 38 - D-Link DCS-1000 | Product Manual - Page 39
, the application program for the Internet Camera is automatically installed to \Programs\Files Directory. To start running the IPView click on windows Start > Menu > Programs > IPView >IPView Once IPView is executed a Login prompt will appear, you must enter the default User Name: admin into the - D-Link DCS-1000 | Product Manual - Page 40
Once logged in, the IPView application is executed and the IPView interface will appear as follows in the default List View format: 40 - D-Link DCS-1000 | Product Manual - Page 41
User Interface with detailed procedures for using the application. IPView IPView is responsible for the management of preview, configuration, and searching for each camera. It is designed with a user-friendly interface for ease of control and navigation as illustrated below. List view format 41 - D-Link DCS-1000 | Product Manual - Page 42
application. Once IPView is executed a Login prompt will appear, you must enter the default User Name: admin into the respective field and click on OK to log into the application. To change the User Name and Password select Tools > Options. The Options dialog box will appear as illustrated below. 42 - D-Link DCS-1000 | Product Manual - Page 43
or use the hot key F10. How to Change the IP Address Change the IP Address To change an IP Address for a camera select Camera > Add. An Add Camera dialog box will appear as illustrated below. Click on Browse, the Browse Camera dialog box will appear with a blank screen as illustrated below. 43 - D-Link DCS-1000 | Product Manual - Page 44
installed on the local area network as depicted below: Highlight the camera you wish to change and click Change IP. The Change IP Address dialog box will appear as depicted below: Enter the new IP Address, the Subnet Mask and the Default gateway into the respective fields and click OK. IPView will - D-Link DCS-1000 | Product Manual - Page 45
is entered incorrectly a dialog box will appear to notify you of the error. Note: If you want to add a camera through the Internet, you must key in a physical IP Address. If you are unsure of the IP Address of the camera you can click on Browse, the Browse Camera dialog box will appear with a blank - D-Link DCS-1000 | Product Manual - Page 46
are installed on the local area network as depicted below: Highlight the camera you wish to add and click on Add. The Add Camera dialog box will appear once again with the IP Address entered. Click on Add. The camera will be automatically added into the IPView list view format. Alternatively, you - D-Link DCS-1000 | Product Manual - Page 47
appears, make sure to enter the correct User Name and Password. Click OK. The camera will be added into IPView, in list format. If the User Name and Password are entered incorrectly, the camera will not be added into IPView. The above dialog box will appear only if your have already set the User - D-Link DCS-1000 | Product Manual - Page 48
wish to delete from IPView list view format. From the menu bar select Camera > Delete. A Delete Camera dialog box will appear. Click Yes to delete the camera, or click No if you do not wish to delete the camera as illustrated below. Make sure to save any changes you have made. Note: Alternatively - D-Link DCS-1000 | Product Manual - Page 49
format). The viewing screen will appear with the video image. Note: The icon on the upper left corner of the screen will appear with the camera number that is being displayed To return to the IPView list view format, right-click on the icon located on the upper left corner of - D-Link DCS-1000 | Product Manual - Page 50
or left. How to take a Snap-Shot with the Camera Snap shot To take a snap shot with the camera, you must highlight the camera you wish to use from the list view format. From the menu bar select Camera > Snap shot. A Save Image dialog box will appear for you to save the snap shot picture - D-Link DCS-1000 | Product Manual - Page 51
will appear. Select the Start icon. According to the default setting, an AVI file will appear in your IPView folder to save the recorded videos. Note : Please stop recording before you want to change any setting in the internet camera. Alternatively you can click the Start icon as illustrated or - D-Link DCS-1000 | Product Manual - Page 52
dialog box will appear. Select the desired options from the tab selections to Configure the camera as shown below. General Allows settings for the camera name, location and administrator information such as administrator ID and password. Please refer to the Web Configuration section under System - D-Link DCS-1000 | Product Manual - Page 53
IP Assignment There are two options: Manually Assign or Assign Automatically Using. (Please refer to the Web Configuration section: System Administration - System for further details.) 53 - D-Link DCS-1000 | Product Manual - Page 54
DNS DNS (Domain Name System) server is an Internet service that translates domain names into IP addresses. Enter at least one DNS IP Address. Please refer to the Web Configuration section under System Administration - System for further details. 54 - D-Link DCS-1000 | Product Manual - Page 55
Wireless - (For Wireless Internet Camera only) Allows for the settings for Connection mode, Network name, Wireless Channel and WEP key. Please see the Web Configuration section under System AdministrationSystem for further details. 55 - D-Link DCS-1000 | Product Manual - Page 56
control location, and second port. (Please refer to the Web Configuration section under System Administration - System for further details.) Image Provides the settings for the video image of the camera such as brightness, contrast, hue, resolution, compression, frame rate, and light freq. (Please - D-Link DCS-1000 | Product Manual - Page 57
Users Allows the system administrator to allow or deny users permission to monitor the camera from a remote site by using Add or Delete user. To add a user click on the Add icon and the Add User dialog box will appear. Enter the User Name and Password into the specific field. Select the I/O Output - D-Link DCS-1000 | Product Manual - Page 58
Date/Time Set the camera's time and date to provide correct time information to users who might be thousands of miles away in a remote site by selecting Synchronized with Time Server or Set Manually. (Please refer to the Web Configuration section under System Administration - TimeDate for further - D-Link DCS-1000 | Product Manual - Page 59
-Sensor and alarm relay. (Please refer to the Web Configuration section under System Administration - Trigger for further details.) Information Displays information about the camera such as the model, firmware version, MAC address, and IP address. (Please refer to the Web Configuration section under - D-Link DCS-1000 | Product Manual - Page 60
Tools Contains commands to reset the camera and update firmware (please refer to the appendix for detailed information). Please refer to the Web Configuration section under System Administration - Tools for further details on reset. 60 - D-Link DCS-1000 | Product Manual - Page 61
Recording The software will create a camera name folder as the File Path and record the video images with file name by date and time. You can adjust the maximum file size from the Max File Size field. (The default size is 50MB.) If the recorded video files reach the file size allocated, video images - D-Link DCS-1000 | Product Manual - Page 62
Menu Bar The menu bar provides easier access for users to navigate the IPView with different selections along with hot key capabilities as follows: Menu Bar - File File on the menu bar contains New, Open, Save, Save As and Exit for users to create new files, open existing files, save files, and exit - D-Link DCS-1000 | Product Manual - Page 63
provides users with management capabilities for Columns, List, Camera and Refresh. You can view the Camera in 1 Camera, 4 Cameras, 9 Cameras, or 16 Cameras mode. The View menu bar is pictured below. Columns When Columns is launched, a dialog box will appear displaying the Column Settings. Select the - D-Link DCS-1000 | Product Manual - Page 64
such as the camera name, IP address, user name, and location, will be displayed in the list view. Note: Right click on any camera to bring up a context sensitive menu of actions you can apply to the selected camera. Double-clicking on the desired camera will bring up the Property dialog box. You can - D-Link DCS-1000 | Product Manual - Page 65
the real-time image select Camera > Enable and the real-time video image will stop and shutdown. Menu Bar - Tools Tools on the menu bar allows management of the security settings such as User Name and Password. From the menu bar, select Tools> Options and a dialog box will appear. Menu Bar - Help - D-Link DCS-1000 | Product Manual - Page 66
to configure the camera. The hot key is F2. Snap shot to capture a single still image. The hot key is F5. Start recording video image. Alternatively the hot key is F7. Stop recording video image. Alternatively the hot key is F9. Options to modify the User Name and Password for IPView. The - D-Link DCS-1000 | Product Manual - Page 67
Context Sensitive Menu In List View format, highlight a camera and right-click to bring up a context sensitive menu for features such as features will be available: Enable, Rotate Right, Rotate Left, Snap Shot, Start, List, 1 Camera, 4 Cameras, 9 Cameras, 16 Cameras, Previous Page and Next Page. 67 - D-Link DCS-1000 | Product Manual - Page 68
Uninstall IPView Application Click on windows Start Menu / Programs / IPView / Uninstall IPView. A new prompt screen will be displayed like the one on Cancel to reject the uninstall process. After you click on Next, a Confirm Uninstall dialog box will appear. Click OK to continue the process. 68 - D-Link DCS-1000 | Product Manual - Page 69
The InstallShield Wizard prompt will appear. Click Finish to complete the uninstallation procedure. 69 - D-Link DCS-1000 | Product Manual - Page 70
Q: What is an Internet Camera? A:The Internet Camera is a standalone system connecting directly to an Ethernet or Fast Ethernet network and supported by the wireless transmission based on the IEEE 802.11b standard. It is different from the conventional PC Camera, the Internet Camera is an all-in - D-Link DCS-1000 | Product Manual - Page 71
Camera? A: The Internet Camera uses Category 5 UTP cable allowing 10 Base-T and 100 BaseT networking. Q: Can the Internet Camera be setup as a PC-cam on the computer? A: No, the Internet Camera is used only on Ethernet and Fast Ethernet network and supported by wireless transmission. The D-Link - D-Link DCS-1000 | Product Manual - Page 72
problem, run the PING utility (follow the instructions in Appendix B - PING Your IP Address). If the utility returns "no response" or similar, the finding is probably correct, then you should proceed as follows: In Windows 95/98/2000 and Windows NT, check that the IP Address of the Internet Camera - D-Link DCS-1000 | Product Manual - Page 73
might be at fault. In ad-hoc mode make sure the Internet Camera wireless channel and ESS-ID is set to match the PC/Notebook wireless channel and ESS-ID for direct communication. Since The Internet Camera ad-hoc mode supports two modes (802.11 ad-hoc mode and proprietary ad-hoc mode), make sure - D-Link DCS-1000 | Product Manual - Page 74
using Windows XP, please make sure that you have downloaded Java and installed it properly. A3: Make sure that your web browser supports Java. If you are using Internet Explorer or Netscape Navigator with a version number of lower than 4, then you will need to upgrade your web browser software in - D-Link DCS-1000 | Product Manual - Page 75
Start a DOS window. Type ping x.x.x.x, where x.x.x.x is the IP address of the Internet Camera. The replies, as illustrated below, will provide an explanation to the problems. I/O Connector I/O Connector Definition for the Internet Camera An 8-pole connector is provided for auxiliary I/O connections - D-Link DCS-1000 | Product Manual - Page 76
connecting other devices through the Output connector, please make sure the maximum current of DC 5V, 100mA is strictly observed. 3. Any failure of the above two points might cause serious damage to the camera. Note: Through the Web Configuration in the Trigger section, you must first enable the - D-Link DCS-1000 | Product Manual - Page 77
on the Update button to proceed with the update process. Once completed, click OK as illustrated below: Warning The download firmware procedure cannot be interrupted. If the network connection is broken during the download procedure it might possibly cause serious damage to the Internet Camera. 77 - D-Link DCS-1000 | Product Manual - Page 78
Time Zone Table GMT stands for Greenwich Mean Time, which is the global time that all time zones are measured from. 78 - D-Link DCS-1000 | Product Manual - Page 79
79 - D-Link DCS-1000 | Product Manual - Page 80
be installed to a Public Domain with a Fixed IP address. 1. Installation: Copy the "xplug.ocx" file Configuration: From the Web Configuration menu select "System" and under the "Loading ActiveX From" input should now be able to access the Internet Camera from the web browser by selecting ActiveX - D-Link DCS-1000 | Product Manual - Page 81
Installation to a Local PC Insert the CD-ROM into the CD-ROM drive to initiate the auto-run program. Once completed a menu screen will appear as follows: To install Xplug Control click on the "Xplug Control" button to activate the installation procedure for the plug-in program. Once executed a - D-Link DCS-1000 | Product Manual - Page 82
The Welcome screen will appear. Click Next to proceed with the installation. The License Agreement prompt will appear as below. Read the details carefully and click Yes to continue with the installation procedure. 82 - D-Link DCS-1000 | Product Manual - Page 83
Click Finish to complete Setup of the Xplug Control Utility program for the Internet Camera. Adjusting the Cameras Focus The Internet Camera features an exchangeable C/CS-type lens that can be used for different applications as necessary. It supports rotational focus control so the lens can be - D-Link DCS-1000 | Product Manual - Page 84
Lens Adjust by turning clockwise or counter-clockwise Note: You can further adjust the Internet Camera's image quality through the Web Configuration under System Administration - Image. Please refer to Web Configuration section for further details. Warning Direct exposure to sunlight may cause - D-Link DCS-1000 | Product Manual - Page 85
with any standard C or CS lens commonly used within the surveillance industry. Follow the instructions below to replace the supplied lens with any C or CS type lens. 1. Unscrew the Internet Camera lens 2. When using a C-lens, attach the new lens to a CS-C adapter 3. Screw the new lens onto the - D-Link DCS-1000 | Product Manual - Page 86
1- 128 Range 1- 128 System Hardware LAN Connector: One RJ-45 port to connect to 10/100Mbps Ethernet, auto-sensed Wireless LAN: Built-in 802.11b wireless LAN module (Wi-Fi compliant Input Port (II-) Pin 8 Output Port (II-) Note: The output voltage is DC 5V and maximum current is 100mA. 86 - D-Link DCS-1000 | Product Manual - Page 87
Support Communication: 10/100Mbps Ethernet only 10/100Mbps Ethernet and 802.11b wireless LAN. 802.11b wireless LAN only Encryption: 64 bit, 128 bit or OFF Communication protocol: HTTP, FTP, TCP/IP, UDP, ARP, ICMP, BOOTP, RARP, DHCP, PPPoE Web Configuration Requirements: • Internet - D-Link DCS-1000 | Product Manual - Page 88
: (877) 453-5465 24 hours a day, seven days a week. D-Link Technical Support over the Internet: http://support.dlink.com When contacting technical support, please provide the following information: • Serial number of the unit • Model number or product name • Software type and version number 88 - D-Link DCS-1000 | Product Manual - Page 89
to refund at D-Link's sole discretion. Such repair or replacement will be rendered by D-Link at an Authorized D-Link Service Office. The replacement Hardware need not Warranty: The Limited Warranty provided hereunder for hardware and software of D-Link's products, will not be applied to and does not - D-Link DCS-1000 | Product Manual - Page 90
covered in the operating manual for the product, and normal maintenance; Damage that occurs in shipment, due to act of God, failures due to power surge, and cosmetic damage; Any hardware, software, firmware or other products or services provided by anyone other than D-Link; Products that have been - D-Link DCS-1000 | Product Manual - Page 91
such as translation, transformation, or adaptation without permission from D-Link Corporation/D-Link Systems, Inc., as stipulated by the United States Copyright Act of and, if not installed and used in accordance with the instructions, may cause harmful interference to radio communication. However, - D-Link DCS-1000 | Product Manual - Page 92
Registration Register online your D-Link product at http://support.dlink.com/register/ 92 - D-Link DCS-1000 | Product Manual - Page 93
Focus 83 Antenna Connector 7 ASCII input format: (for Wireless Internet Camera 21 Assign Automatically Using 19 B Bracket Cavity 7 Broad Range of Applications 5 C Change Password 42 Change the IP Address 43 Columns 63 Connecting the DCS-1000W to the Camera Stand 10 Connection to External Devices - D-Link DCS-1000 | Product Manual - Page 94
format 21 HEX input format: (for Wireless Internet Camera on 21 How to Add a Camera 45 How to Adjust the Property Setting 51 How to Change the Password 42 How to Change the IP Address 43 How to Delete a Camera 48 How to format the Camera view 49 How to PING Your IP Address 74 How to take a Snap - D-Link DCS-1000 | Product Manual - Page 95
16 System Requirements 3 T Time Zone Table 78 Trouble Shooting 71 Troubleshooting 71 U Upgrade Firmware 77 Upload 30 V Video specification 86 View Image - ActiveX Mode 33 View Image - Java Mode 34 Viewing Format 63 W Web Configuration 5, 15 Wired and Wireless Network Support 5 Wireless 55 Wireless
-
 1
1 -
 2
2 -
 3
3 -
 4
4 -
 5
5 -
 6
6 -
 7
7 -
8
-
9
-
10
-
11
-
12
-
13
-
14
-
15
-
16
-
17
-
18
-
19
-
20
-
21
-
22
-
23
-
24
-
25
-
26
-
27
-
28
-
29
-
30
-
31
-
32
-
33
-
34
-
35
-
36
-
37
-
38
-
39
-
40
-
41
-
42
-
43
-
44
-
45
-
46
-
47
-
48
-
49
-
50
-
51
-
52
-
53
-
54
-
55
-
56
-
57
-
58
-
59
-
60
-
61
-
62
-
63
-
64
-
65
-
66
-
67
-
68
-
69
-
70
-
71
-
72
-
73
-
74
-
75
-
76
-
77
-
78
-
79
-
80
-
81
-
82
-
83
-
84
-
85
-
86
-
87
-
88
-
89
-
90
-
91
-
92
-
93
-
94
-
95
 |
 |

DCS-1000/W
Internet Camera
Manual
(10/04/04)
Building Networks for People
D-Link
2.4 GHz
and
Wireless Internet Camera