D-Link DCS-1000 Product Manual - Page 9
Hardware Installation - dcs1000w network camera
 |
View all D-Link DCS-1000 manuals
Add to My Manuals
Save this manual to your list of manuals |
Page 9 highlights
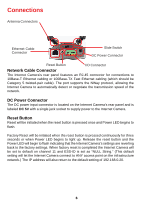
Hardware Installation 1. Attach Wireless Antenna (DCS-1000W only) From the rear panel of the Internet Camera, screw the 2 external antennas that came with DCS-1000W into the antenna connector. 2. Configure Network Communication From the rear panel of the Internet Camera select the desired network communication for the Internet Camera from the Slide Switch. Position the Slide Switch to the setting required for either LAN or LAN/WLAN (DCS1000W only) position. Please refer to the Physical Description section for detailed information. 3. Connect an Ethernet cable Connect an Ethernet cable to the network cable connector located on the Internet Camera's rear panel and attach it to the network. 4. Attach the external power supply Attach the external power supply to the DC power input connector located on the Internet Camera's rear panel and labeled DC 5V and connect it to your local power supply. Note: The LED indicator labeled Power will illuminate to indicate a proper connection to the power supply. 9
-
 1
1 -
2
-
3
-
 4
4 -
 5
5 -
 6
6 -
 7
7 -
 8
8 -
 9
9 -
 10
10 -
 11
11 -
 12
12 -
 13
13 -
 14
14 -
15
-
16
-
17
-
18
-
19
-
20
-
21
-
22
-
23
-
24
-
25
-
26
-
27
-
28
-
29
-
30
-
31
-
32
-
33
-
34
-
35
-
36
-
37
-
38
-
39
-
40
-
41
-
42
-
43
-
44
-
45
-
46
-
47
-
48
-
49
-
50
-
51
-
52
-
53
-
54
-
55
-
56
-
57
-
58
-
59
-
60
-
61
-
62
-
63
-
64
-
65
-
66
-
67
-
68
-
69
-
70
-
71
-
72
-
73
-
74
-
75
-
76
-
77
-
78
-
79
-
80
-
81
-
82
-
83
-
84
-
85
-
86
-
87
-
88
-
89
-
90
-
91
-
92
-
93
-
94
-
95
 |
 |
