D-Link DCS-2132L User Manual
D-Link DCS-2132L Manual
 |
View all D-Link DCS-2132L manuals
Add to My Manuals
Save this manual to your list of manuals |
D-Link DCS-2132L manual content summary:
- D-Link DCS-2132L | User Manual - Page 1
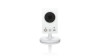
Version 2.0 | 03/31/2014 User Manual HD Day/Night Network Camera Cloud Camera DCS-2132L - D-Link DCS-2132L | User Manual - Page 2
2.0 Manual Revisions Date July 25, 2012 June 6, 2013 March 31, 2014 Description DCS-2132L Revision A1 with firmware version 1.00 Updated for firmware version 1.10 Updated for revision B1 with firmware version 2.00 Trademarks © 2014 D-Link Systems, Inc. All Rights Reserved. D-Link and the D-Link - D-Link DCS-2132L | User Manual - Page 3
and Date 49 Event Setup 50 SD Card 59 Advanced 60 Digital Input/Output 60 ICR and IR 61 HTTPS 62 Access List 63 Maintenance 64 Device Management 64 Backup and Restore 65 Firmware Upgrade 66 Status 67 Device Info 67 Log 68 Help 69 Troubleshooting 70 D-Link DCS-2132L User Manual 3 - D-Link DCS-2132L | User Manual - Page 4
DI/DO Specifications 71 Technical Specifications 72 Contacting Technical Support 74 Warranty 75 Registration 80 D-Link DCS-2132L User Manual 4 - D-Link DCS-2132L | User Manual - Page 5
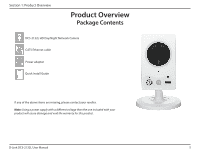
Section 1: Product Overview Product Overview Package Contents DCS-2132L HD Day/Night Network Camera CAT5 Ethernet cable Power adapter Quick Install Guide If any of the above items are missing, please contact your reseller. Note: Using a power supply with a different voltage than the one included - D-Link DCS-2132L | User Manual - Page 6
® 12, Safari® 4, and Chrome™ 20 and above • Existing 10/100 Ethernet-based network or 802.11n wireless network • A microSD memory card (optional) is required for recording to onboard storage. An SDHC Class 6 or above is recommended. • Broadband Internet connection D-Link DCS-2132L User Manual 6 - D-Link DCS-2132L | User Manual - Page 7
. Other features include image monitoring, recording images to a hard drive, viewing up to 32 cameras on one screen, and taking snapshots. IR LED for Day and Night Functionality The built-in infrared LEDs enables night time viewing of up to 16 feet (5 meters). D-Link DCS-2132L User Manual 7 - D-Link DCS-2132L | User Manual - Page 8
5 Camera Lens Records video of the surrounding area 6 Microphone Records audio from the surrounding area 7 Light Sensor The IR-Cut Removable sensor monitors lighting conditions and switches between color and infrared accordingly 8 Speaker Audio output D-Link DCS-2132L User Manual 8 - D-Link DCS-2132L | User Manual - Page 9
hold this button for 10 seconds to reset the camera 4 Power Connector Connects to the included 5V DC power adapter 5 DI/DO Connector I/O connectors for external devices 6 Adjustment Ring Tighten or loosen the adjustment ring to adjust the camera's position D-Link DCS-2132L User Manual 9 - D-Link DCS-2132L | User Manual - Page 10
Section 1: Product Overview Sides 1 1 microSD Card Slot Insert a microSD card for local storage of recorded images and videos D-Link DCS-2132L User Manual 10 - D-Link DCS-2132L | User Manual - Page 11
frequency sources (such as microwave ovens), your wireless connection may degrade dramatically or drop completely. Make sure your 2.4GHz phone base is as far away from your wireless devices as possible. The base transmits a signal even if the phone is not in use. D-Link DCS-2132L User Manual 11 - D-Link DCS-2132L | User Manual - Page 12
Section 2: Installation Installation Camera Installation Wizard If you have a D-Link Cloud Router, skip to "Zero Configuration Setup" on page 20 and follow the steps. You do not have to download and run the setup wizard software. If you do not have a cloud router, open a web browser and go to http - D-Link DCS-2132L | User Manual - Page 13
2: Installation Select your preferred language for the installation from the drop-down menu and click on Start to proceed. Connect the included Ethernet cable to the network cable connector located on the panel at the rear of the DCS-2132L and attach it to the network. D-Link DCS-2132L User Manual - D-Link DCS-2132L | User Manual - Page 14
Section 2: Installation Connect the other end of the same Ethernet cable to your router. Attach the external power supply to the DC Power receptor located on the rear panel of the DCS-2132L and connect it to your wall outlet or power strip. D-Link DCS-2132L User Manual 14 - D-Link DCS-2132L | User Manual - Page 15
Section 2: Installation The LED on the front of the DCS-2132L will blink red, then turn solid green once it successfully connects to your network. Click Next to proceed. If the LED continues to blink red, check your connections or click on the "What should I do if the LED stays red?" link for more - D-Link DCS-2132L | User Manual - Page 16
it. The password is case sensitive and must contain at least two letters. To move the camera to a wireless connection by using WPS or by selecting a wireless network, select the appropriate option then follow the steps displayed. Otherwise, click Next to continue. D-Link DCS-2132L User Manual 16 - D-Link DCS-2132L | User Manual - Page 17
Section 2: Installation Complete the mydlink account registration details and make sure to check the I accept mydlink terms and conditions box and click the Next button. If you already have a mydlink account, enter your login details and click Next to proceed. D-Link DCS-2132L User Manual 17 - D-Link DCS-2132L | User Manual - Page 18
Section 2: Installation Confirm your mydlink account details and give the camera a unique name and click Done. If you choose not to register the camera with mydlink, just confirm your camera login details and IP address and click Done. D-Link DCS-2132L User Manual 18 - D-Link DCS-2132L | User Manual - Page 19
Section 2: Installation Your DCS-2132L camera is now set up. Log on to your mydlink account and explore the exciting benefits available to you. D-Link DCS-2132L User Manual 19 - D-Link DCS-2132L | User Manual - Page 20
www.mydlink.com and log into your account. Once mydlink detects your camera, a New Device Found! notice will appear in the bottom-right corner. Click on the camera from the New Devices list and then click Yes to add your camera. WPS Button Your setup is complete! D-Link DCS-2132L User Manual 20 - D-Link DCS-2132L | User Manual - Page 21
Lightly pull the base forward to make sure that it is locked. 4. Place the base cover on the base and screw the camera stem clockwise into the 4 mounting base. 5. Adjust the angle of the camera as desired, then tighten the collar on the camera 5 stem to lock it in place. D-Link DCS-2132L User - D-Link DCS-2132L | User Manual - Page 22
registering your DCS-2132L camera with a mydlink account in the Camera Installation Wizard, you will be able to remotely access your camera from the www.mydlink.com website. After signing in to your mydlink account, you will see a screen similar to the following: D-Link DCS-2132L User Manual 22 - D-Link DCS-2132L | User Manual - Page 23
camera's cable connections and make sure they are secure. • Check to make sure that the LED on your camera is lit solid green. If you still cannot access your camera, reset your camera and run the Camera Installation Wizard again from: http://www.mydlink.com/download. D-Link DCS-2132L User Manual - D-Link DCS-2132L | User Manual - Page 24
screen, the Live Video tab will be selected by default. If the camera is available, a Live Video feed will be displayed. Video will be shown at VGA resolution of 640 x 480 by default. You can always switch resolution between HD, 480p and 240p from the control panel. D-Link DCS-2132L User Manual 24 - D-Link DCS-2132L | User Manual - Page 25
Section 3: mydlink SD Card The SD Card tab allows you to review recorded footage captured to the microSD card. Select the date of the footage you wish to preview from the drop-down menu, then choose from the recordings available for that date. D-Link DCS-2132L User Manual 25 - D-Link DCS-2132L | User Manual - Page 26
the settings on your camera. Advanced Setting: Click to configure advanced features for your camera. You will need to enter the username and password of your camera (not mydlink). Remove Device: Click to remove and un-register the camera from your mydlink account. D-Link DCS-2132L User Manual 26 - D-Link DCS-2132L | User Manual - Page 27
Setup Wizard, you can get the camera's IP address from your router. When you see the login window, enter the User name admin and the password you created while using the Setup Wizard. If you did not create a password, the default password is blank. Click OK to proceed. D-Link DCS-2132L User Manual - D-Link DCS-2132L | User Manual - Page 28
and forth within the FOV (field of view). Stop This button stops the camera ePTZ motion. Preset Path This button starts the camera's motion along the predefined path. ePTZ Speed: You may select a value between 0 and 64. 0 is the slowest and 64 is the fastest. D-Link DCS-2132L User Manual 28 - D-Link DCS-2132L | User Manual - Page 29
field of view (FOV) of the camera. The red box indicates the visible region Audio In (from microphone) Start/Stop Audio Out (to speaker) Start/Stop Digital Output Go To: If any presets have been defined, you will be able to select a preset from this list. (Preset List) D-Link DCS-2132L User Manual - D-Link DCS-2132L | User Manual - Page 30
Motion Detection Setup Wizard. Refer to instructions for "Motion Detection Setup Wizard" on page 34. Manual Click to manually set up your camera's motion detection Motion settings, or to modify the settings. Refer to "Motion Detection Setup: Detection" on page 47. D-Link DCS-2132L User Manual 30 - D-Link DCS-2132L | User Manual - Page 31
to Enable PPPoE and enter the User Name and Password for your PPPoE connection. Only select this option if your camera is directly connected to your broadband modem. If it is on a network with a router or gateway, do not select this option. Click Next to continue. D-Link DCS-2132L User Manual 31 - D-Link DCS-2132L | User Manual - Page 32
connect to the DDNS server. Timeout: You can specify how often the camera notifies the DDNS server of its current global IP address by entering a whole number representing hours. Click Next to continue. Enter a unique name for your camera and click Next to continue. D-Link DCS-2132L User Manual 32 - D-Link DCS-2132L | User Manual - Page 33
A summary of your camera settings is displayed for confirmation. If the settings are incorrect, click Back to make changes. Otherwise click Apply. Note: Make a note of the IP camera settings so you can access your DCS-2132L on your network or by using a web browser. D-Link DCS-2132L User Manual 33 - D-Link DCS-2132L | User Manual - Page 34
and adjust the camera's ability to detect movement. Click Next to continue. Step 2 This step allows you to enable motion detection based on a customized schedule. You can choose to always record motion, or you can specify the day and hours. Click Next to continue. D-Link DCS-2132L User Manual 34 - D-Link DCS-2132L | User Manual - Page 35
event notifications from your camera. Although you may Wizard. Review your settings, and click on Back if you need to make modifications. If settings are correct, click Apply to save them. Please wait a few moments while the camera saves your settings and restarts. D-Link DCS-2132L User Manual - D-Link DCS-2132L | User Manual - Page 36
name server) that translates names to IP addresses. Secondary DNS: The secondary DNS acts as a backup to the primary DNS. Enable UPnP Enabling this setting allows your camera to be configured as Presentation: a UPnP (Universal Plug and Play) device on your network. D-Link DCS-2132L User Manual 36 - D-Link DCS-2132L | User Manual - Page 37
to mobile devices, such as mobile phones or PDAs. The default port number is 554. You may specify the address of a particular stream. For instance, live1.sdp can be accessed at rtsp://x.x.x.x/video1.sdp where the x.x.x.x represents the ip address of your camera. D-Link DCS-2132L User Manual 37 - D-Link DCS-2132L | User Manual - Page 38
Multicast for stream: The DCS-2132L gives you the ability to multicast each of the available streams via group address and specify the TTL value for each stream. If you do not want to use the default settings, enter the port and TTL settings you prefer to use. D-Link DCS-2132L User Manual 38 - D-Link DCS-2132L | User Manual - Page 39
your wireless network uses TKIP or AES encryption. If you use Open or Shared authentication, WEP encryption should be the setting. Key: If you use WEP, WPA-PSK, or WPA2-PSK authentication, enter the Key (also known as password) used for your wireless network. D-Link DCS-2132L User Manual 39 - D-Link DCS-2132L | User Manual - Page 40
or e-mail used to connect to your DDNS account. Password: Enter the password used to connect to your DDNS server account. Timeout: Enter the DNS timeout values you wish to use. Status: Indicates the connection status, which is automatically determined by the system. D-Link DCS-2132L User Manual 40 - D-Link DCS-2132L | User Manual - Page 41
over the camera image to draw a mask area. Right clicking on the camera image brings up the following menu options: Disable All: Disables all mask areas Enable All: Enables all mask areas Reset All: Clears from Auto, Outdoor, Indoor, Fluorescent, and Push Hold. D-Link DCS-2132L User Manual 41 - D-Link DCS-2132L | User Manual - Page 42
the exposure mode. Use the drop-down box to set the camera for Indoor, Outdoor, or Night environments, or to Moving to capture moving objects. The Low sharpening to apply to the image. Reset Default: Click this button to reset the image to factory default settings. D-Link DCS-2132L User Manual 42 - D-Link DCS-2132L | User Manual - Page 43
profiles for your computer and mobile display. In addition, you may also configure the two-way audio settings for your camera. After making any changes, click Save Settings. Aspect ratio: Set the aspect ratio "Constant bit rate" and select the desired bandwidth. D-Link DCS-2132L User Manual 43 - D-Link DCS-2132L | User Manual - Page 44
setting controls the amount of gain applied to incoming audio to increase its volume. Audio out off: Selecting this checkbox will mute outgoing audio. Audio out volume level: This setting controls the amount of gain applied to outgoing audio to increase its volume. D-Link DCS-2132L User Manual 44 - D-Link DCS-2132L | User Manual - Page 45
to change the displayed camera view to the preset. Clicking the Remove button will delete the currently selected preset. Preset Sequence: This section allows you to create a preset sequence, which automatically moves the camera's view between a set of preset views. D-Link DCS-2132L User Manual 45 - D-Link DCS-2132L | User Manual - Page 46
the dropdown menu at the bottom of this window, set the Dwell time to determine how long the camera view will stay at that preset, then click the Add button. The preset name will appear in the it from the list, enter a new dwell time, then click the Update button. D-Link DCS-2132L User Manual 46 - D-Link DCS-2132L | User Manual - Page 47
on the camera image brings up the following menu options: Select All: Draws a motion detection area over the entire screen. Clear All: Clears any motion detection areas that have been drawn. Restore: Restores the previously specified motion detection areas. D-Link DCS-2132L User Manual 47 - D-Link DCS-2132L | User Manual - Page 48
Sound Detection will allow your camera to use the built-in microphone to trigger events with audio. The events triggered may be snapshots or recordings. Refer to "Event Setup" on page 50. Enable Save Settings, or click Don't Save Settings to discard your changes. D-Link DCS-2132L User Manual 48 - D-Link DCS-2132L | User Manual - Page 49
the DCS-2132L with an Internet time server. Choose the one that is closest to your location. Set the Date and Time Manually: This option allows you to set the time and date manually. Copy Your Computer's Time This will synchronize the time information from your PC. Settings: D-Link DCS-2132L User - D-Link DCS-2132L | User Manual - Page 50
Setup In a typical application, when motion is detected, the DCS-2132L You can configure the network camera to send snapshots or videos to your e-mail address or FTP site. Event network camera will know what action shall be performed when a trigger is activated. D-Link DCS-2132L User Manual 50 - D-Link DCS-2132L | User Manual - Page 51
to update the fields accordingly. 2. To delete the selected item from the pull-down menu of event, server or media, click Delete. 3. Click on the item name to pop up a window for modifying. Note: You can add up to four events, five servers, and five media fields. D-Link DCS-2132L User Manual 51 - D-Link DCS-2132L | User Manual - Page 52
for the target e-mail server account. FTP: Enter the configuration for the target FTP server account. Network Storage: Specify a network storage device. Only one network storage device is supported. SD Card: Use the camera's onboard microSD card storage. D-Link DCS-2132L User Manual 52 - D-Link DCS-2132L | User Manual - Page 53
to snapshots. Source: Set the video profile to use as the media source. Refer to "Audio and Video" on page 43 for more information on video profiles. Send pre-event image(s) media source. Refer to "Audio and Video" on page 43 for more information on video profiles. D-Link DCS-2132L User Manual 53 - D-Link DCS-2132L | User Manual - Page 54
filename of saved video clips. System log: Select this option to set the media type to system logs. This will save the event to the camera system log, but will not record any snapshots or video. D-Link DCS-2132L User Manual 54 - D-Link DCS-2132L | User Manual - Page 55
input. System Boot: Triggers an event when the system boots up. Network Lost: Triggers an event when the network connection is lost. Passive Infrared Sensor: Triggers an event when the PIR sensor is activated by moving infrared objects even in dark environment. D-Link DCS-2132L User Manual 55 - D-Link DCS-2132L | User Manual - Page 56
trigger the digital output for a specific number of seconds when an event occurs. Server: Specify the location where the event information should be saved to. D-Link DCS-2132L User Manual 56 - D-Link DCS-2132L | User Manual - Page 57
Source: The source of the stream. Recording Schedule: Check the box(es) by the day(s) of the week for recording. Time: Click Always 6MB, and the total cyclical recording size is 600MB, then the camera will record 100 files in the specified location (folder) and then Link DCS-2132L User Manual 57 - D-Link DCS-2132L | User Manual - Page 58
separated based on the maximum length you specify. File Name Prefix: The prefix name will be added on the file name of the recording file(s). D-Link DCS-2132L User Manual 58 - D-Link DCS-2132L | User Manual - Page 59
. Playback Recorded Video: If video files are stored on the microSD card, click on the video folder and choose the video file you would like to view. Format SD Card: Click this button to automatically format the microSD card and create "picture" and "video" folders. D-Link DCS-2132L User Manual 59 - D-Link DCS-2132L | User Manual - Page 60
taken and e-mailed. After making any changes, click Save Settings. Select D/I or D/O Mode: The camera will send a signal when an event is triggered, depending upon the type of device connected to the specify whether or not to illuminate the status LED on the camera. D-Link DCS-2132L User Manual 60 - D-Link DCS-2132L | User Manual - Page 61
on your specific application. Off: The IR light will always be off. On: The IR light will always be on. Sync with ICR: The IR light will turn on when the ICR sensor is on. Schedule: The IR light will turn on or off according to the schedule that you specify below. D-Link DCS-2132L User Manual 61 - D-Link DCS-2132L | User Manual - Page 62
install and activate an HTTPS certificate for secure access to your camera. After making any changes, click Save Settings. Enable HTTPS Secure Connection: Enable the HTTPS (Hypertet Transfer Protocol Secure) service. Create Certificate Method: Choose the way . D-Link DCS-2132L User Manual 62 - D-Link DCS-2132L | User Manual - Page 63
List is set from 1.1.1.0 to 192.255.255.255 and the range of the Deny List is set from 1.1.1.0 to 170.255.255.255. Only users with IPs located between 171.0.0.0 and 192.255.255.255 can access the network camera. Alowed List Denied List D-Link DCS-2132L User Manual 63 - D-Link DCS-2132L | User Manual - Page 64
for the camera, which will be shown on the OSD when it is enabled. Show Time: Select this option to enable the time-stamp display on the video screen. LED: Select ON or OFF to indicate whether or not you want the status LED on the camera to function. Click Save. D-Link DCS-2132L User Manual 64 - D-Link DCS-2132L | User Manual - Page 65
and then restore the pre-defined settings to your camera by clicking Load Configuration. Restore to Factory Defaults: You may reset your camera and restore the factory settings by clicking Restore Factory Defaults. Reboot Device: This will restart your camera. D-Link DCS-2132L User Manual 65 - D-Link DCS-2132L | User Manual - Page 66
the firmware. Current Firmware Version: Displays the detected firmware version. Current Product Name: Displays the camera model name. File Path: Locate the file (upgraded firmware) on your hard drive by clicking Browse. Upload: Uploads the new firmware to your camera. D-Link DCS-2132L User Manual - D-Link DCS-2132L | User Manual - Page 67
Section 4: Configuration Status Device Info This page displays detailed information about your device and network connection. D-Link DCS-2132L User Manual 67 - D-Link DCS-2132L | User Manual - Page 68
Section 4: Configuration Log This page displays the log information of your camera. You may download the information by clicking Download. You may also click Clear to delete the saved log information. D-Link DCS-2132L User Manual 68 - D-Link DCS-2132L | User Manual - Page 69
Section 4: Configuration Help This page provides helpful information regarding camera operation. D-Link DCS-2132L User Manual 69 - D-Link DCS-2132L | User Manual - Page 70
router's user manual. • The DCS-2132L will automatically create a wireless connection to your router. While connecting, the WPS status LED will flash. Once the connection process is complete, the WPS status LED will turn solid. 2. WHAT SHOULD I DO IF I FORGET MY PASSWORD? You must reset your camera - D-Link DCS-2132L | User Manual - Page 71
from DI to DC 5V, activated by setting NO. or NC. DC 5V Output / Max. 100 mA GND Internal 5V Power DND 5V DI 100 mA DO Reed switch R Diode DC Power 5V N.C / N.O External 3~12V Power DND 5V DC Power 3V~12V DI 100 mA DO Reed switch R Diode ALARM D-Link DCS-2132L User Manual ALARM 71 - D-Link DCS-2132L | User Manual - Page 72
, 800x592, 640x480, 480x352, 320x240 ƒƒ DI/DO port ƒƒ microSD/SDHC card slot ƒƒ HTTP / HTTPS ƒƒ Samba Client ƒƒ PPPoE ƒƒ UPnP port forwarding ƒƒ RTP / RTSP/ RTCP ƒƒ IP filtering ƒƒ QoS ƒƒ CoS ƒƒ Multicast ƒƒ IGMP ƒƒ ONVIF compliant ƒƒ HTTP and RTSP digest encryption D-Link DCS-2132L User Manual 72 - D-Link DCS-2132L | User Manual - Page 73
IP D-ViewCam™ Software Functions ƒƒ Remote management/control of up to 32 cameras ƒƒ Viewing of up to 32 cameras on one screen ƒƒ Supports all management functions provided in web interface ƒƒ Scheduled motion triggered, or manual ƒƒCE ƒƒCE LVD ƒƒFCC ƒƒC-Tick D-Link DCS-2132L User Manual 73 - D-Link DCS-2132L | User Manual - Page 74
of the product (e.g. DCS-2132L) • Hardware Revision (located on the label on the bottom of the Network Camera (e.g. rev B1)) • Serial Number (s/n number located on the label on the bottom of the Network Camera). You can find software updates and user documentation on the D-Link website as well as - D-Link DCS-2132L | User Manual - Page 75
the defective Hardware will be refunded by D-Link upon return to D-Link of the defective Hardware. All Hardware or part thereof that is replaced by D-Link, or for which the purchase price is refunded, shall become the property of D-Link upon replacement or refund. D-Link DCS-2132L User Manual 75 - D-Link DCS-2132L | User Manual - Page 76
Software is properly installed on approved hardware and operated as contemplated in its documentation. D-Link further warrants that, during the Software Warranty Period, the magnetic media on which D-Link delivers the Software ID Number at https://rma.dlink.com/. D-Link DCS-2132L User Manual 76 - D-Link DCS-2132L | User Manual - Page 77
software, firmware or other products or services provided by anyone other than D-Link; and Products that have been purchased from inventory clearance or liquidation sales or other sales in which D-Link , FITNESS FOR A PARTICULAR PURPOSE AND NONINFRINGEMENT. D-Link DCS-2132L User Manual 77 - D-Link DCS-2132L | User Manual - Page 78
from D-Link Corporation/D-Link Systems, Inc., as stipulated by the United States Copyright Act of 1976 and any amendments thereto. Contents are subject to change without prior notice. Copyright ©2014 by D-Link Corporation/D-Link Systems, Inc. All rights reserved. D-Link DCS-2132L User Manual 78 - D-Link DCS-2132L | User Manual - Page 79
programmed at the factory to match the intended destination. The firmware setting is not accessible by the end user. For detailed warranty information applicable to products purchased outside the United States, please contact the corresponding local D-Link office. D-Link DCS-2132L User Manual 79 - D-Link DCS-2132L | User Manual - Page 80
Appendix E: Registration Registration Product registration is entirely voluntary and failure to complete or return this form will not diminish your warranty rights. Version 2.0 March 31, 2014 D-Link DCS-2132L User Manual 80
-
 1
1 -
 2
2 -
 3
3 -
 4
4 -
 5
5 -
 6
6 -
 7
7 -
8
-
9
-
10
-
11
-
12
-
13
-
14
-
15
-
16
-
17
-
18
-
19
-
20
-
21
-
22
-
23
-
24
-
25
-
26
-
27
-
28
-
29
-
30
-
31
-
32
-
33
-
34
-
35
-
36
-
37
-
38
-
39
-
40
-
41
-
42
-
43
-
44
-
45
-
46
-
47
-
48
-
49
-
50
-
51
-
52
-
53
-
54
-
55
-
56
-
57
-
58
-
59
-
60
-
61
-
62
-
63
-
64
-
65
-
66
-
67
-
68
-
69
-
70
-
71
-
72
-
73
-
74
-
75
-
76
-
77
-
78
-
79
-
80
 |
 |

User Manual
HD Day/Night Network Camera
DCS-2132L
Cloud Camera
Version 2.0 | 03/31/2014