D-Link DG-104SH Product Manual - Page 15
Configuring the VoIP Gateway Using a Web Browser, Setting Up the Connection
 |
View all D-Link DG-104SH manuals
Add to My Manuals
Save this manual to your list of manuals |
Page 15 highlights
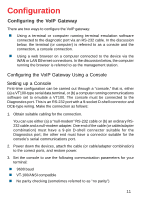
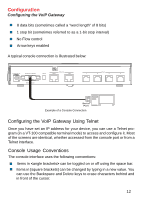
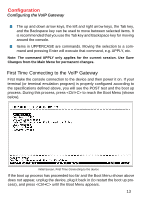
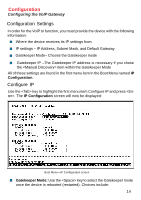
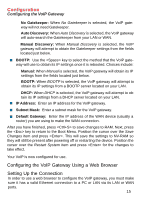
Configuration Configuring the VoIP Gateway No Gatekeeper: When No Gatekeeper is selected, the VoIP gateway will not need Gatekeeper. Auto Discovery: When Auto Discovery is selected, the VoIP gateway will auto-search the Gatekeeper from your LAN or WAN. Manual Discovery: When Manual Discovery is selected, the VoIP gateway will attempt to obtain the Gatekeeper settings from the fields located just below. „ BOOTP: Use the key to select the method that the VoIP gateway will use to obtain its IP settings once it is rebooted. Choices include: Manual: When Manual is selected, the VoIP gateway will obtain its IP settings from the fields located just below. BOOTP: When BOOTP is selected, the VoIP gateway will attempt to obtain its IP settings from a BOOTP server located on your LAN. DHCP: When DHCP is selected, the VoIP gateway will attempt to obtain its IP settings from a DHCP server located on your LAN. „ IP Address: Enter an IP address for the VoIP gateway. „ Subnet Mask: Enter a subnet mask for the VoIP gateway. „ Default Gateway: Enter the IP address of the WAN device (usually a router) you are using to make the WAN connection. After you have finished, press to save changes to RAM. Next, press the key to return to the Boot Menu. Position the cursor over the Save Changes item and press . This will save the settings to NV-RAM so they will still be present after powering off or restarting the device. Position the cursor over the Restart System item and press for the changes to take effect. Your VoIP is now configured for use. Configuring the VoIP Gateway Using a Web Browser Setting Up the Connection In order to use a web browser to configure the VoIP gateway, you must make sure it has a valid Ethernet connection to a PC or LAN via its LAN or WAN ports. 15
-
 1
1 -
2
-
3
-
4
-
5
-
6
-
7
-
8
-
9
-
 10
10 -
 11
11 -
 12
12 -
 13
13 -
 14
14 -
 15
15 -
 16
16 -
 17
17 -
 18
18 -
 19
19 -
 20
20 -
21
-
22
-
23
-
24
-
25
-
26
-
27
-
28
-
29
-
30
-
31
-
32
-
33
-
34
-
35
-
36
-
37
-
38
-
39
-
40
-
41
-
42
-
43
-
44
-
45
-
46
-
47
-
48
-
49
-
50
-
51
-
52
-
53
-
54
-
55
-
56
-
57
-
58
-
59
-
60
-
61
-
62
-
63
-
64
-
65
-
66
-
67
-
68
-
69
-
70
-
71
-
72
-
73
-
74
-
75
-
76
-
77
-
78
-
79
-
80
-
81
-
82
-
83
 |
 |