Dell 5200n Mono Laser Printer Dell™ Workgroup Laser Printer M5200 Ow - Page 15
Yes recommended, Finish, Install, the printer for Use on this Computer only Personal Installation.
 |
View all Dell 5200n Mono Laser Printer manuals
Add to My Manuals
Save this manual to your list of manuals |
Page 15 highlights
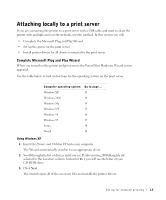
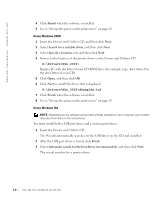
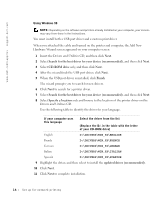
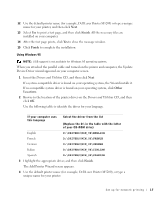
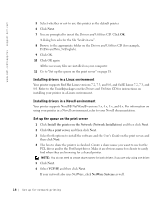
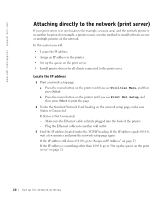
4 Select your printer and driver from the list on the screen, and then click OK. Use the following table to identify the driver for your language. If your computer uses this language Select the driver from the list (Replace the D:\ in the table with the letter of your CD-ROM drive) English D:\DRIVERS\WIN_9X\ENGLISH\LMPCL5C.INF French D:\DRIVERS\WIN_9X\FRENCH\LMPCL5C.INF German D:\DRIVERS\WIN_9X\GERMAN\LMPCL5C.INF Italian D:\DRIVERS\WIN_9X\ITALIAN\LMPCL5C.INF Spanish D:\DRIVERS\WIN_9X\SPANISH\LMPCL5C.INF 5 Click Next to install the printer driver. 6 Click Next to complete installation. 7 Use the default printer name (for example, Dell Laser Printer M5200) or type a unique name for your printer, and then click Next. 8 Click Yes (recommended), and then click Finish to print a test page. 9 After the test page prints, click Yes to close the window. 10 Click Finish to complete the installation and close the wizard. 11 Go to "Set up the queue on the print server" on page 18. Using Windows NT NOTE: USB support is not available for Windows NT operating systems. NOTE: You need administrative access to install printer drivers on your computer. 1 Insert the Drivers and Utilities CD. 2 Click Install the printer for Use on this Computer only (Personal Installation). When all the files are installed on your computer, the Congratulations screen appears. 3 Click Finish to complete the installation and close the wizard. 4 Go to "Set up the queue on the print server" on page 18. Set up for network printing 15
-
 1
1 -
2
-
3
-
4
-
5
-
6
-
7
-
8
-
9
-
 10
10 -
 11
11 -
 12
12 -
 13
13 -
 14
14 -
 15
15 -
 16
16 -
 17
17 -
 18
18 -
 19
19 -
 20
20 -
21
-
22
-
23
-
24
-
25
-
26
-
27
-
28
-
29
-
30
-
31
-
32
-
33
-
34
-
35
-
36
-
37
-
38
-
39
-
40
-
41
-
42
-
43
-
44
-
45
-
46
-
47
-
48
-
49
-
50
-
51
-
52
-
53
-
54
-
55
-
56
-
57
-
58
-
59
-
60
-
61
-
62
-
63
-
64
-
65
-
66
-
67
-
68
-
69
-
70
-
71
-
72
-
73
-
74
-
75
-
76
-
77
-
78
-
79
-
80
-
81
-
82
-
83
-
84
-
85
-
86
-
87
-
88
-
89
-
90
-
91
-
92
-
93
-
94
-
95
-
96
-
97
-
98
-
99
-
100
 |
 |
