Dell 5200n Mono Laser Printer Dell™ Workgroup Laser Printer M5200 Ow - Page 25
Install printer drivers
 |
View all Dell 5200n Mono Laser Printer manuals
Add to My Manuals
Save this manual to your list of manuals |
Page 25 highlights
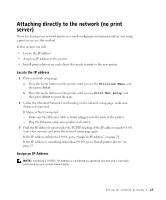
17 Repeat steps 10 through 13 to set each Octet for Gateway. A Static IP Address has been assigned to the printer. You can verify the settings by opening a web browser on any computer on the same network and entering the IP address into the Address line of the browser. Example: http://192.168.1.108. If the IPS address was setup correctly, the browser should display a Web page provided by the Dell Laser Printer M5200 printer. Install printer drivers 1 Insert the Drivers and Utilities CD. 2 Click Install the printer on the Network (Network Installation). 3 Click On one or more remote client computers. 4 Type your Administrator user name and password. 5 Specify which client computers are allowed to print to the new Dell Laser Printer M5200 printer. Browse or type each client's computer name or IP address. You can specify as many clients as you wish. 6 When you are finished adding clients, click Next. 7 Select the software and documentation you want your users to have access to. 8 Select TCP/IP, and then click Next. If your network also uses NetWare, select NetWare Systems too. 9 Set TCP/IP Port as the Port Type. 10 Specify a port name that is meaningful in your environment. The port name establishes a logical link between the printer and each client. 11 Type the printer IP address, for example, 192.168.0.11. If you don't know the IP address, see "Locate the IP address" on page 23. 12 Click Finish. The Congratulations screen appears. 13 Click Finish. Now all of the clients connected to this printer can select this printer to print their jobs. Set up for network printing 25
-
 1
1 -
2
-
3
-
4
-
5
-
6
-
7
-
8
-
9
-
10
-
11
-
12
-
13
-
14
-
15
-
16
-
17
-
18
-
19
-
 20
20 -
 21
21 -
 22
22 -
 23
23 -
 24
24 -
 25
25 -
 26
26 -
 27
27 -
 28
28 -
 29
29 -
 30
30 -
31
-
32
-
33
-
34
-
35
-
36
-
37
-
38
-
39
-
40
-
41
-
42
-
43
-
44
-
45
-
46
-
47
-
48
-
49
-
50
-
51
-
52
-
53
-
54
-
55
-
56
-
57
-
58
-
59
-
60
-
61
-
62
-
63
-
64
-
65
-
66
-
67
-
68
-
69
-
70
-
71
-
72
-
73
-
74
-
75
-
76
-
77
-
78
-
79
-
80
-
81
-
82
-
83
-
84
-
85
-
86
-
87
-
88
-
89
-
90
-
91
-
92
-
93
-
94
-
95
-
96
-
97
-
98
-
99
-
100
 |
 |
