Dell 926 All In One Inkjet Printer User's Guide - Page 23
Printing Photos From a PictBridge-Enabled Camera, Print, Arrow, Select
 |
View all Dell 926 All In One Inkjet Printer manuals
Add to My Manuals
Save this manual to your list of manuals |
Page 23 highlights
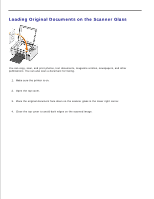
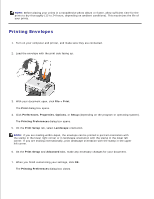
8. Click OK or Print. Printing Photos From a PictBridge-Enabled Camera 1. Insert one end of the USB cable into the camera. 2. Insert the other end of the USB cable into the PictBridge port on the front of the printer. Refer to the instructions included with your camera for selection of the appropriate camera USB settings and PictBridge connection and usage information. 3. Turn on your digital camera. The printer automatically enters the PictBridge mode. NOTE: When your printer is not connected to a computer, and a PictBridge camera is connected to your printer, some of the functions of your printer operator panel buttons may be unavailable. These functions become available after you disconnect the PictBridge camera from your printer. 4. Press the left or right Arrow button to scroll through the print settings, and then press the Select button . For more information, see PictBridge Mode. NOTE: If you choose to change the print settings from the printer, some print settings made on the digital camera may be changed. 5. Refer to the instructions included with your camera to begin printing photos. NOTE: For many digital cameras, there are two USB mode selections: computer and printer (or PTP). For PictBridge printing, the printer (or PTP) USB selection should be used. For more information, refer to the documentation included with your camera. NOTICE: Do not unplug the USB cable or touch the printer in the area of the PictBridge port while the light is blinking.
-
 1
1 -
2
-
3
-
4
-
5
-
6
-
7
-
8
-
9
-
10
-
11
-
12
-
13
-
14
-
15
-
16
-
17
-
 18
18 -
 19
19 -
 20
20 -
 21
21 -
 22
22 -
 23
23 -
 24
24 -
 25
25 -
 26
26 -
 27
27 -
 28
28 -
29
-
30
-
31
-
32
-
33
-
34
-
35
-
36
-
37
-
38
-
39
-
40
-
41
-
42
-
43
-
44
-
45
-
46
-
47
-
48
-
49
-
50
-
51
-
52
-
53
-
54
-
55
-
56
-
57
-
58
-
59
-
60
-
61
-
62
-
63
-
64
-
65
-
66
-
67
-
68
-
69
-
70
-
71
-
72
-
73
-
74
-
75
-
76
-
77
-
78
-
79
-
80
-
81
-
82
-
83
-
84
-
85
-
86
-
87
-
88
-
89
-
90
-
91
-
92
-
93
-
94
-
95
-
96
-
97
-
98
-
99
-
100
-
101
-
102
-
103
-
104
-
105
-
106
-
107
-
108
 |
 |
