Dell A920 Owner's Manual
Dell A920 - Personal All-in-One Printer Color Inkjet Manual
 |
View all Dell A920 manuals
Add to My Manuals
Save this manual to your list of manuals |
Dell A920 manual content summary:
- Dell A920 | Owner's Manual - Page 1
Dell™ Personal All-In-One Printer A920 Owner's Manual Look Inside For: • Learning about your printer • Understanding the software • Maintenance and Troubleshooting www.dell.com/supplies | support.dell.com - Dell A920 | Owner's Manual - Page 2
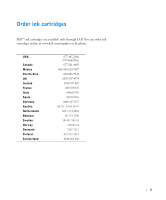
Order ink cartridges Dell™ ink cartridges are available only through Dell. You can order ink cartridges online at www.dell.com/supplies or by phone. USA Canada Mexico Puerto Rico UK Ireland France 05 30 35 020 - 674 4881 02.713 1590 08 587 705 81 231622 64 3287 5215 09 2533 1411 0848 801 888 ii - Dell A920 | Owner's Manual - Page 3
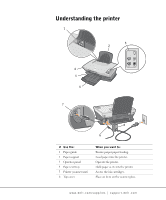
guide 2 Paper support 3 Operator panel 4 Paper exit tray 5 Printer (scanner unit) 6 Top cover When you want to: Ensure proper paper feeding. Load paper into the printer. Operate the printer. Hold paper as it exits the printer. Access the ink cartridges. Place an item on the scanner glass. www.dell - Dell A920 | Owner's Manual - Page 4
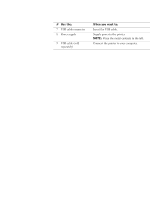
# Use the: 7 USB cable connector 8 Power supply 9 USB cable (sold separately) When you want to: Insert the USB cable. Supply power to the printer. NOTE: Place the metal contacts to the left. Connect the printer to your computer. - Dell A920 | Owner's Manual - Page 5
of your printer. NOTICE: A NOTICE indicates either potential damage to hardware or loss of data and tells you how to avoid the problem. CAUTION: Technical Data and Computer Software clause at DFARS 252.227-7013 and in applicable FAR provisions: Dell Computer Corporation, One Dell Way, Round Rock, - Dell A920 | Owner's Manual - Page 6
your computer and working environment from potential damage. • Use only the power supply provided with this product or the manufacturer's authorized replacement power supply. • Connect the power cord to an electrical outlet that is near the product and easily accessible. • Refer service or repairs - Dell A920 | Owner's Manual - Page 7
SAFETY INFORMATION iv 1 Learning about your printer Setting up the printer 2 Using the operator panel 2 2 Understanding the software Accessing the Dell All-In-One Center 4 The All-In-One Main page 4 View Saved Images page 5 Maintain/Troubleshoot page 6 Accessing Print Properties 6 The I Want - Dell A920 | Owner's Manual - Page 8
scan features 19 Using Optical Character Recognition 19 Faxing 20 Using BVRP fax software 21 Installing BVRP fax software 21 Configuring BVRP fax software 21 Sending a one-page fax with BVRP 22 Sending a multiple-page fax with BVRP 23 Receiving faxes with BVRP 23 Viewing your faxes in - Dell A920 | Owner's Manual - Page 9
" Return Policy (Canada Only 60 Dell Software and Peripherals (Canada Only 60 One-Year End-User Manufacturer Guarantee (Latin America and the Caribbean Only 61 Dell Computer Corporation Ink and Toner Cartridges Limited Warranties 63 Ink and Toner Cartridges Limited Warranty (U.S. and Canada Only - Dell A920 | Owner's Manual - Page 10
Ink and Toner Cartridges Limited Warranty (Latin America Only) 64 Dell Software License Agreement 65 Index 69 viii Contents - Dell A920 | Owner's Manual - Page 11
SECTION 1 Learning about your printer Setting up the printer Using the operator panel 1 - Dell A920 | Owner's Manual - Page 12
www.dell.com/supplies | support.dell.com Setting up the printer If you have not already done so, follow the steps on the Placemat (poster) to complete the hardware and software installation. If problems occur during the setup process, see Setup troubleshooting on page 34. Using the operator panel - Dell A920 | Owner's Manual - Page 13
SECTION 2 Understanding the software Accessing the Dell All-In-One Center Accessing Print Properties Using the Dell Printer Solution Center Using the Dell Image Expert 2 - Dell A920 | Owner's Manual - Page 14
and troubleshooting help, as well as cartridge ordering information. Accessing the Dell All-In-One Center To access the Dell All-In-One Center, click Start → Programs → Dell Printers → Dell AIO Printer A920 → Dell All-In-One Center. The All-In-One Main page appears. The All-In-One Main page The - Dell A920 | Owner's Manual - Page 15
will be printed or copied. NOTE: For more information about the All-In-One Main page, View Saved Images page, or the Maintain/Troubleshoot page, click the Help button located in the upper right corner of the screen. : Click See More Copy Settings to view all settings. Understanding the software 5 - Dell A920 | Owner's Manual - Page 16
In-One Main page) provides you with direct links to the Dell Printer Solution Center. Choose from these topics: • Maintain or fix quality problems • Troubleshoot All-In-One problems • Device status and ink levels • More printing ideas and how to's • Contact information • Advanced • View the software - Dell A920 | Owner's Manual - Page 17
the print settings. I Want To menu Select one of the projects from the menu to help print main tabs of the Print Properties software. The following table describes each Copies-Customize how the printer prints several copies of the document oriented on the printed page. You can print portrait or - Dell A920 | Owner's Manual - Page 18
also provides you with direct links to different parts of the Dell Printer Solution Center (see page 8), as well as software version information. Using the Dell Printer Solution Center The Dell Printer Solution Center is a guide you can refer to for printer help and to check the current print status - Dell A920 | Owner's Manual - Page 19
guide. • Go online to view more ideas. Troubleshooting • Check the current printer status. • View recommended Help topics. • View common troubleshooting topics. • Search for more specific troubleshooting topics. • Visit the support area online. Maintenance • Install a new ink cartridge - Dell A920 | Owner's Manual - Page 20
-In-One Center send a scanned image to list, select Dell Image Expert. For detailed instructions using the Dell Image Expert, refer to the documentation. The User's Guide can be found at C:\Program Files\Dell Computer\Dell ImageExpert\Dell Image Expert User's Guide.pdf. If you purchased your printer - Dell A920 | Owner's Manual - Page 21
SECTION 3 Using the printer Loading paper Placing your document on the scanner glass Printing Copying Scanning Editing scanned images Using special scan features Faxing Creating other projects 3 - Dell A920 | Owner's Manual - Page 22
.dell.com Loading paper To load other paper types, follow the guidelines on page 13. To load most types of paper: 1 Place the paper against the right side of the paper support with the print side facing you and the top of the paper feeding into the paper support. 2 Squeeze and slide the paper guide - Dell A920 | Owner's Manual - Page 23
17.0 in. 25 iron-on transfers • You follow the loading instructions on the iron-on packaging. • The blank side faces you. 20 sheets of banner paper The banner paper is designed for use with inkjet printers. NOTE: To avoid smearing ink, remove each transparency or photo from the paper exit tray - Dell A920 | Owner's Manual - Page 24
www.dell.com/supplies | support.dell.com Before you begin copying, scanning, printing, or sending faxes, refer to the information below about how much paper the printer exit tray can hold. The printer paper exit tray can hold: • 25 sheets of paper • 10 sheets of labels • 1 transparency • 10 - Dell A920 | Owner's Manual - Page 25
Placing your document on the scanner glass 1 Open the top cover. 2 Place the item you want to copy face down on the scanner glass. NOTE: Make sure the upper left corner of the front of the item aligns with the arrow. 3 Close the scanner lid to avoid dark edges. Using the printer 15 - Dell A920 | Owner's Manual - Page 26
| support.dell.com Printing The Print Properties I Want To menu (see page 7) provides you with printing wizards to help you complete tasks such as printing banners, photographs, or posters. 1 Load paper. For help, see page 12. 2 With your document open, click File → Print. 3 To change the printer - Dell A920 | Owner's Manual - Page 27
Copy Now. Copying photos 1 Place your photo on the scanner glass. For help, see page 15. 2 Make sure your computer and printer are on. 3 Open the Dell All-In-One Center. For help, see page 4. 4 Click Preview Now. 5 Adjust the dotted lines to fit around the part of the image you want to print. 6 From - Dell A920 | Owner's Manual - Page 28
www.dell.com/supplies | support.dell.com Scanning The following steps show you how to scan and save images. 1 Place your document on the scanner glass. For help, see page 15. 2 Open the Dell All-In-One Center. For help, see page 4. The All-In-One Main page appears. 3 Click Preview Now to see your - Dell A920 | Owner's Manual - Page 29
Place your document on the scanner glass. For help, see page 15. 2 Open the Dell All-In-One Center. For help, see page 4. The All-In-One Main page appears. 3 From the Creative Tasks section, click Edit text found in a scanned document (OCR). 4 Follow the instructions on your computer screen. 5 When - Dell A920 | Owner's Manual - Page 30
www.dell.com/supplies | support.dell.com Faxing In order to send and receive faxes with your printer: • Your computer must have faxing software installed and configured. You may use BVRP Classic Phone Tools/FaxTools or Microsoft Fax Console. - See "Using BVRP fax software" on page 21 to use BVRP. - - Dell A920 | Owner's Manual - Page 31
If you have either of these entries, skip to "Configuring BVRP fax software." 4 Click on the desktop. The All Programs window closes. 5 Insert the Dell Personal All-In-One Printer A920 Drivers and Utilities CD. An installation window appears. 6 Click Cancel, click the Start button, and then click My - Dell A920 | Owner's Manual - Page 32
. 15 Click Next, click Next, and then click Finish. Sending a one-page fax with BVRP 1 Click the Start button. 2 Move your mouse pointer over All Programs, then Dell Printers, and then Dell AIO Printer A920. 3 Click Dell All-In-One Center. 4 Place the document you want to fax face down under the lid - Dell A920 | Owner's Manual - Page 33
Sending a multiple-page fax with BVRP 1 Click the Start button. 2 Move your mouse pointer over All Programs, then Dell Printers, and then Dell AIO Printer A920. 3 Click Dell All-In-One Center. 4 Click See More Scan Settings. 5 Click Display Advanced Scan Settings. 6 Click to select Scan multiple - Dell A920 | Owner's Manual - Page 34
dell.com/supplies | support.dell.com Using Fax Console Installing Fax Console 1 Click the Start button. 2 Click Control Panel. 3 Click Add or Remove Programs. 4 Click Add/Remove Windows Components. 5 Click to select Fax Services. 6 Click Next. If prompted, insert the Microsoft Windows XP the printer - Dell A920 | Owner's Manual - Page 35
10 Click to select Print it on and use the drop-down menu to the right of this field to select Dell AIO Printer A920 one-page fax with Fax Console 1 Click the Start button. 2 Move your mouse pointer over All Programs, then Dell Printers, and then Dell AIO Printer A920. 3 Click Dell All-In-One Center - Dell A920 | Owner's Manual - Page 36
. Fax troubleshooting If you are having trouble sending or receiving a fax, ensure that: • Your computer is equipped with a working data/fax modem. • An active phone line is connected to the line-in connector of your data/fax modem. • Faxing software is installed and configured. • Your printer is - Dell A920 | Owner's Manual - Page 37
by following wizards provided in the software. Select a project from one of the following locations and follow the instructions on the screen. • From the Dell All-In-One Center Creative Tasks section. For help accessing the Dell All-In-One Center, see page 4. • From the Print Properties I Want To - Dell A920 | Owner's Manual - Page 38
www.dell.com/supplies | support.dell.com 28 Using the printer - Dell A920 | Owner's Manual - Page 39
SECTION 4 Maintenance Ordering supplies Replacing the ink cartridges Aligning the ink cartridges Cleaning the ink cartridge nozzles 4 - Dell A920 | Owner's Manual - Page 40
for help installing ink cartridges. Replacing the ink cartridges CAUTION: Before performing any of the procedures listed in this section, read and follow the Safety Instructions on page iv. 1 Make sure the printer is on. 2 Lift the printer (scanner unit) until the scanner support keeps it - Dell A920 | Owner's Manual - Page 41
instances when you will align your ink cartridges: after installing cartridges and to improve print quality. To align the ink cartridges: 1 Load plain paper in the printer. For help, see page 12. 2 Open the Dell Printer Solution Center. For help, see page 8. 3 From the Maintenance tab, click Align - Dell A920 | Owner's Manual - Page 42
the nozzles: 1 Load plain paper in the printer. For help, see page 12. 2 Open the Dell Printer Solution Center. For help, see page 8. 3 From the Maintenance tab, click Clean to fix horizontal streaks. 4 Click Print. A nozzle page prints, forcing ink through the nozzles to clean the clogged nozzles - Dell A920 | Owner's Manual - Page 43
SECTION 5 Troubleshooting Setup troubleshooting General troubleshooting More troubleshooting 5 - Dell A920 | Owner's Manual - Page 44
• You only have one Dell Personal AIO Printer A920 attached to your computer. • Your operating system is compatible with your printer. The Dell Personal AIO Printer A920 supports both Microsoft ® Windows® XP and Windows 2000. General troubleshooting When your printer has a problem, before contacting - Dell A920 | Owner's Manual - Page 45
6 SECTION 6 Regulatory notices Federal Communications Commission (FCC) compliance information statement Industry Canada compliance statement European Community (EC) directives conformity The United Kingdom Telecommunications Act 1984 ENERGY STAR Copyright advisory - Dell A920 | Owner's Manual - Page 46
www.dell.com/supplies | support.dell.com Federal Communications Commission (FCC) compliance information statement The Dell Personal AIO Printer A920 has been tested and found to comply with the limits for a Class B digital device, pursuant to Part 15 of the FCC Rules. Operation is subject to the - Dell A920 | Owner's Manual - Page 47
conformity A declaration of conformity with the requirements of the directives has been signed by the Director of Manufacturing and Technical Support, Lexmark International, S.A., Boigny, France. This product satisfies the Class B limits of EN 55022 and safety requirements of EN 60950. The United - Dell A920 | Owner's Manual - Page 48
www.dell.com/supplies | support.dell.com ENERGY STAR The EPA ENERGY STAR Office Equipment program is a partnership effort with office equipment manufacturers to promote the introduction of energy-efficient products and to reduce air pollution caused by power generation. Companies participating in - Dell A920 | Owner's Manual - Page 49
7 SECTION 7 Appendix Contacting Dell Limited Warranties and Return Policy Dell Computer Corporation Ink and Toner Cartridges Limited Warranties Dell Software License Agreement - Dell A920 | Owner's Manual - Page 50
11 Aruba Bahamas Barbados Department Name or Service Area, Website and E-Mail Address General Support General Support Website: www.dell.com.ar Tech Support and Customer Care Sales Tech Support Fax Customer Care Fax General Support General Support General Support Area Codes, Local Numbers, and Toll - Dell A920 | Owner's Manual - Page 51
./large bus., government) Sales (Home Sales/Small Business) Sales (med./large bus., government) Spare Parts Sales & Extended Service Sales Cayman Islands General Support Colombia General Support Costa Rica General Support Area Codes, Local Numbers, and Toll-Free Numbers 02 481 92 88 02 481 - Dell A920 | Owner's Manual - Page 52
Name or Service Area, Website and E-Mail Address Denmark (Copenhagen) Website: support.euro.dell.com International Access Code: 00 Country Code: 45 E-mail Support (portable computers): [email protected] E-mail Support (desktop computers): [email protected] E-mail Support (servers - Dell A920 | Owner's Manual - Page 53
: 00 Country Code: 49 City Code: 6103 Department Name or Service Area, Website and E-Mail Address Website: support.euro.dell.com E-mail: support.euro.dell.com/fr/fr/emaildell/ Home and Small Business Technical Support Customer Care Switchboard Switchboard (calls from outside of France) Sales Fax - Dell A920 | Owner's Manual - Page 54
: 1 Department Name or Service Area, Website and E-Mail Address Website: support.euro.dell.com E-mail: support.euro.dell.com/gr/en/emaildell/ Technical Support Gold Technical Support Switchboard Sales Fax General Support General Support Technical Support Sales Website: support.euro.dell.com E-mail - Dell A920 | Owner's Manual - Page 55
Jamaica Latin America Department Name or Service Area, Website and E-Mail Address Website: support.euro.dell.com E-mail: support.euro.dell.com/it/it/emaildell/ Home and Small Business Technical Support Customer Care Fax Switchboard Corporate Technical Support Customer Care Fax Switchboard General - Dell A920 | Owner's Manual - Page 56
Support Sales Customer Service Main Netherlands Antilles Netherlands (Amsterdam) International Access Code: 00 Country Code: 31 City Code: 20 General Support Website: support.euro.dell.com E-mail (Technical Support): (Enterprise): [email protected] (Latitude): nl_latitude_support@dell - Dell A920 | Owner's Manual - Page 57
Phone City Code: 22 Customer Care Sales Customer Service Fax Reception Desk Fax Switchboard Portugal Website: support.euro.dell.com International Access Code: 00 E-mail: support.euro.dell.com/pt/en/emaildell/ Country Code: 351 Technical Support Customer Care Sales Puerto Rico St. Kitts - Dell A920 | Owner's Manual - Page 58
St. Vincent and the Grenadines General Support Singapore (Singapore) Technical Support International Access Code: 005 Customer Service (Penang, Malaysia) Country Code: 65 Transaction Sales Corporate Sales Spain (Madrid) Website: support.euro.dell.com International Access Code: 00 E-mail - Dell A920 | Owner's Manual - Page 59
Department Name or Service Area, Website and E-Mail Address Website: support.euro.dell.com E-mail: [email protected] E-mail Support for Latitude and Inspiron: [email protected] E-mail Support for OptiPlex: [email protected] E-mail Support for Servers: [email protected] Technical - Dell A920 | Owner's Manual - Page 60
Access Code: 00 Country Code: 44 City Code: 1344 Department Name or Service Area, Website and E-Mail Address Area Codes, Local Numbers, and Toll-Free Numbers Website: support.euro.dell.com Customer Care website: support.euro.dell.com/uk/en/ECare/Form/Home.asp E-mail: dell_direct_support - Dell A920 | Owner's Manual - Page 61
1-800-289-3355 or toll-free: 1-800-879-3355 Dell Outlet Store (Dell refurbished computers) toll-free: 1-888-798-7561 Software and Peripherals Sales toll-free: 1-800-671-3355 Spare Parts Sales toll-free: 1-800-357-3355 Extended Service and Warranty Sales toll-free: 1-800-247-4618 Fax toll - Dell A920 | Owner's Manual - Page 62
, abuse, misuse, or problems with electrical power - Servicing not authorized by Dell - Usage that is not in accordance with product instructions - Failure to follow the product instructions or failure to perform preventive maintenance - Problems caused by using accessories, parts, or components not - Dell A920 | Owner's Manual - Page 63
Medium, Large, or Global Commercial Customers, Healthcare Customers, and Value Added Resellers (VARs): Technical Support and Customer Service Government and Education Customers: Technical Support and Customer Service Dell-Branded Memory U.S. Only 1-800-624-9896 1-800-624-9897 1-800-822-8965 1-800 - Dell A920 | Owner's Manual - Page 64
defective part with new or refurbished parts, service contract is with Dell, service will be provided to you under the terms of the service agreement. Please refer to that contract for details on how to obtain service. If you purchased through us a service contract with one of our third-party service - Dell A920 | Owner's Manual - Page 65
new hardware, accessories, parts, and unopened software still in its sealed package, excluding the products listed below, may be returned within thirty days from the date on the packing slip or invoice. To return applications software or an operating system that has been installed by Dell, you must - Dell A920 | Owner's Manual - Page 66
, abuse, misuse, or problems with electrical power - Servicing not authorized by Dell - Usage that is not in accordance with product instructions - Failure to follow the product instructions or failure to perform preventive maintenance - Problems caused by using accessories, parts, or components not - Dell A920 | Owner's Manual - Page 67
OR LOST SOFTWARE. OUR LIABILITY one year and the limited warranty on the lamps for Dell-branded projectors lasts only ninety days. The limited warranty begins on the date of the packing slip or invoice. The warranty period is not extended if we repair or replace a warranted product or any parts. Dell - Dell A920 | Owner's Manual - Page 68
Purchase Program: Technical Support Customer Service Dell-Branded Memory Canada Only the problem is not covered under this warranty, we will notify you and inform you of service alternatives that warranties: We will replace any defective part with new or refurbished parts, if we agree that it needs - Dell A920 | Owner's Manual - Page 69
to that contract for details on how to obtain service. Dell's service contracts can be found online at www.dell.ca or by calling Customer Care at 1-800-847-4096. If you purchased through us a service contract with one of our third-party service providers, please refer to that contract (mailed to you - Dell A920 | Owner's Manual - Page 70
, and all of the manuals, floppy disk(s), CD(s), power cables, and other items included with a product must be returned with it. For customers who want to return, for refund or credit only, either application or operating system software that has been installed by Dell, the whole system must - Dell A920 | Owner's Manual - Page 71
or replacement, returned products must be in as-new condition, software products must be unopened, and all of the manuals, floppy disk(s), CD(s), power cables, and other items included with a product must be returned with it. One-Year End-User Manufacturer Guarantee (Latin America and the Caribbean - Dell A920 | Owner's Manual - Page 72
/or any rights resulting from other contracts concluded by the end user with Dell and/or any other seller. Dell World Trade LP One Dell Way, Round Rock, TX 78682, USA Dell Computadores do Brasil Ltda (CNPJ No. 72.381.189/0001-10)/ Dell Commercial do Brasil Ltda (CNPJ No. 03 405 822/0001-40) Avenida - Dell A920 | Owner's Manual - Page 73
cartridge purchase cost, at Dell's sole option. This limited warranty does not apply to ink or toner cartridges that have been refilled or improperly stored or due to problems NOT BEING AVAILABLE FOR USE, OR FOR LOST DATA OR LOST SOFTWARE. DELL'S LIABILITY WILL BE NO MORE THAN THE AMOUNT YOU PAID FOR - Dell A920 | Owner's Manual - Page 74
material or manufacturing process for the life of the cartridge. For the original purchaser of genuine Dell-branded ink cartridges, Dell warrants that the cartridges will be free from defects resulting from material or manufacturing process for one year beginning from the date of delivery. If this - Dell A920 | Owner's Manual - Page 75
with the Dell product, for which there is no separate license agreement between you and the manufacturer or owner of the software (collectively the "Software"). By opening or breaking the seal on the Software packet(s), installing or downloading the Software, or using the Software that has - Dell A920 | Owner's Manual - Page 76
www.dell.com/supplies | support.dell.com Limited Warranty Dell warrants that the Software disks will be free disk damage has resulted from accident, abuse, misapplication, or service or modification by someone other than Dell. Any replacement disk is warranted for the remaining original warranty - Dell A920 | Owner's Manual - Page 77
212 and 48 C.F.R. 227.7202-1 through 227.7202-4, all U.S. Government end users acquire the software and documentation with only those rights set forth herein. Contractor/manufacturer is Dell Products, L.P., One Dell Way, Round Rock, Texas 78682. General This license is effective until terminated. It - Dell A920 | Owner's Manual - Page 78
www.dell.com/supplies | support.dell.com 68 Appendix - Dell A920 | Owner's Manual - Page 79
C cards loading, 13 cartridges aligning, 31 cleaning, 32 removing, 30 replacing, 30 D Dell All-In-One Center, 4 accessing, 4 Dell Printer Solution Center, 8 accessing, 8 Advanced tab, 9 Contact Information tab, 9 How To tab, 9 Maintenance tab, 9 Troubleshooting tab, 9 duplexing, 7 E envelopes - Dell A920 | Owner's Manual - Page 80
photo, 13 plain, 13 transparencies, 13 Paper Setup tab, 7 parts of your printer, i photo cards loading, 13 photo paper loading, 13 photos posters, 7 Printing Status window changing appearance of, 9 Q Quality/Copies tab, 7 R removing ink cartridges, 30 replacing ink cartridges, 30 S safety information - Dell A920 | Owner's Manual - Page 81
document, 15 settings, saving for future use, 8 setup, 2 software setup, 2 specialty papers banner, 13 cards, 13 custom size paper T toner, ordering, ii transparencies loading, 13 troubleshooting setup problems, 34 Troubleshooting tab, 9 V View Saved Images page, 5 Open with... section, 5 Print a - Dell A920 | Owner's Manual - Page 82
72 Index - Dell A920 | Owner's Manual - Page 83
www.dell.com/supplies | support.dell.com
-
 1
1 -
 2
2 -
 3
3 -
 4
4 -
 5
5 -
 6
6 -
 7
7 -
8
-
9
-
10
-
11
-
12
-
13
-
14
-
15
-
16
-
17
-
18
-
19
-
20
-
21
-
22
-
23
-
24
-
25
-
26
-
27
-
28
-
29
-
30
-
31
-
32
-
33
-
34
-
35
-
36
-
37
-
38
-
39
-
40
-
41
-
42
-
43
-
44
-
45
-
46
-
47
-
48
-
49
-
50
-
51
-
52
-
53
-
54
-
55
-
56
-
57
-
58
-
59
-
60
-
61
-
62
-
63
-
64
-
65
-
66
-
67
-
68
-
69
-
70
-
71
-
72
-
73
-
74
-
75
-
76
-
77
-
78
-
79
-
80
-
81
-
82
-
83
 |
 |

www.dell.com/supplies | support.dell.com
Dell™ Personal All-In-One Printer A920
Owner’s Manual
Look Inside For:
• Learning about your printer
• Understanding the software
• Maintenance and Troubleshooting