Dell PowerConnect W-IAP3WN Dell Instant 6.1.3.4-3.1.0.0 User Guide - Page 147
Instant Firewall
 |
View all Dell PowerConnect W-IAP3WN manuals
Add to My Manuals
Save this manual to your list of manuals |
Page 147 highlights
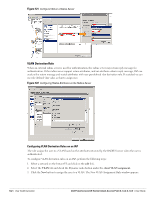
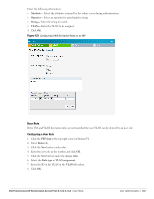
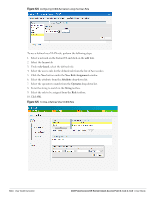
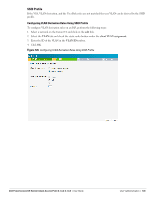
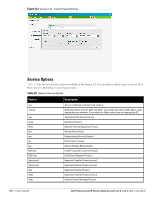
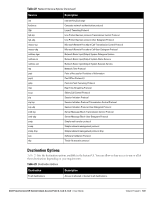
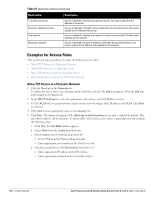
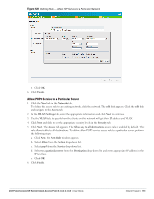
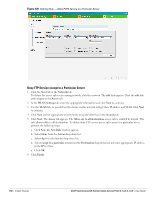
Chapter 14 Instant Firewall A firewall is a system designed to prevent unauthorized internet users from accessing a private network connected to the internet. It defines access rules and monitors all data entering or leaving the network and blocks data that does not satisfy the specified security policies. Dell Instant implements a Instant Firewall feature that uses a simplified firewall policy language. An administrator can define the firewall policies on an SSID or wireless LAN such as the Guest network or an Employee network. At the end of the authentication process, these policies are uniformly applied to users connected to that network. The Instant Firewall gives you the flexibility to limit packets or bandwidth available to a particular class of users. Instant Firewall manages packets according to the first rule the packet matches. 1. In the Networks tab, click the New link. The New WLAN window appears. 2. Navigate to Access tab to specify the access rules for the network. 3. Slide to Network-based using the scroll bar and click New to add a new rule. The New Rule window consists of the following options: Rule type- Select the rule type (Access control, VLAN assignment) from the drop-down list. Action- Select Allow or Deny from the drop-down list to allow or deny traffic with the specified service type and destination. Log- Select this checkbox if you want a log entry to be created when this rule is triggered. Instant firewall supports firewall based logging function. Firewall logs on IAP are generated as syslog messages. Blacklist- Select this checkbox if you want the client to be blacklisted when this rule is triggered. The blacklisting will last for the duration specified as Auth failure blacklist time on the Blacklisting tab of the PEF window. See "Client Blacklisting" on page 223 for more information. Classify media- Select this checkbox if you want to prioritize video and voice traffic. When enabled, deep packet inspection is performed on all non-NATed traffic, and the traffic is marked as follows: Video: Priority 5 (Critical) Voice: Priority 6 (Internetwork Control) Disable scanning- Select this checkbox if you want ARM scanning to be paused when this rule is triggered, to optimize performance. NOTE: This feature only takes effect if ARM scanning is enabled, from the ARM tab of the RF dialog. DSCP tag- Select this checkbox if you want to specify a DSCP value to prioritize traffic when this rule is triggered. Specify a value between 0 and 63. The higher the value, the higher the priority. 802.1p priority- Select this checkbox if you want to specify an 802.1p priority. Specify a value between 0 and 7. The higher the value, the higher the priority. Dell PowerConnect W-Series Instant Access Point 6.1.3.4-3.1.0.0 | User Guide Instant Firewall | 147
-
 1
1 -
2
-
3
-
4
-
5
-
6
-
7
-
8
-
9
-
10
-
11
-
12
-
13
-
14
-
15
-
16
-
17
-
18
-
19
-
20
-
21
-
22
-
23
-
24
-
25
-
26
-
27
-
28
-
29
-
30
-
31
-
32
-
33
-
34
-
35
-
36
-
37
-
38
-
39
-
40
-
41
-
42
-
43
-
44
-
45
-
46
-
47
-
48
-
49
-
50
-
51
-
52
-
53
-
54
-
55
-
56
-
57
-
58
-
59
-
60
-
61
-
62
-
63
-
64
-
65
-
66
-
67
-
68
-
69
-
70
-
71
-
72
-
73
-
74
-
75
-
76
-
77
-
78
-
79
-
80
-
81
-
82
-
83
-
84
-
85
-
86
-
87
-
88
-
89
-
90
-
91
-
92
-
93
-
94
-
95
-
96
-
97
-
98
-
99
-
100
-
101
-
102
-
103
-
104
-
105
-
106
-
107
-
108
-
109
-
110
-
111
-
112
-
113
-
114
-
115
-
116
-
117
-
118
-
119
-
120
-
121
-
122
-
123
-
124
-
125
-
126
-
127
-
128
-
129
-
130
-
131
-
132
-
133
-
134
-
135
-
136
-
137
-
138
-
139
-
140
-
141
-
 142
142 -
 143
143 -
 144
144 -
 145
145 -
 146
146 -
 147
147 -
 148
148 -
 149
149 -
 150
150 -
 151
151 -
 152
152 -
153
-
154
-
155
-
156
-
157
-
158
-
159
-
160
-
161
-
162
-
163
-
164
-
165
-
166
-
167
-
168
-
169
-
170
-
171
-
172
-
173
-
174
-
175
-
176
-
177
-
178
-
179
-
180
-
181
-
182
-
183
-
184
-
185
-
186
-
187
-
188
-
189
-
190
-
191
-
192
-
193
-
194
-
195
-
196
-
197
-
198
-
199
-
200
-
201
-
202
-
203
-
204
-
205
-
206
-
207
-
208
-
209
-
210
-
211
-
212
-
213
-
214
-
215
-
216
-
217
-
218
-
219
-
220
-
221
-
222
-
223
-
224
-
225
-
226
-
227
-
228
-
229
-
230
-
231
-
232
-
233
-
234
-
235
-
236
-
237
-
238
-
239
-
240
-
241
-
242
-
243
-
244
-
245
-
246
 |
 |
