Dell PowerVault 221S Rack-to-Tower Conversion Guide - Page 10
Installing the Base, Covers, and Bezel
 |
View all Dell PowerVault 221S manuals
Add to My Manuals
Save this manual to your list of manuals |
Page 10 highlights
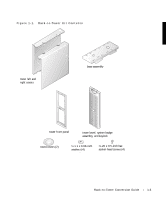
www.dell.com | support.dell.com Installing the Base, Covers, and Bezel 1 To install the base: a Position the base assembly and align the two holes on its underside with the two threaded holes on the right side (the base) of the chassis (see Figure 1-4). b Secure the two hex-socket-head screws and flat washers to the base using a 3/16-inch hex (Allen) wrench. 2 To replace the system right and left covers: a Raise the system into the tower position, resting on its base. b Position the covers on their respective sides of the chassis 12.7 millimeters (0.5 inch) behind the front panel. Tabs on the bottom of each cover should drop into slots in the base assembly. c Slide the covers toward the front panel until two holes on the top of the cover align with two threaded holes in the system chassis. d Use a 3/16-inch hex (Allen) wrench to secure the two hex-socket-head screws and flat washers into the two holes at the top of the system. e Install round covers over the screws you just installed (see Figure 1-4). 1-8 Rac k -t o -Tow er C on v e r si on Guide
-
 1
1 -
2
-
3
-
4
-
 5
5 -
 6
6 -
 7
7 -
 8
8 -
 9
9 -
 10
10 -
 11
11 -
 12
12 -
 13
13 -
 14
14 -
 15
15 -
16
-
17
-
18
-
19
-
20
-
21
-
22
-
23
-
24
-
25
-
26
-
27
-
28
-
29
-
30
-
31
-
32
-
33
-
34
-
35
-
36
-
37
-
38
-
39
-
40
-
41
-
42
-
43
-
44
-
45
-
46
-
47
-
48
-
49
-
50
-
51
-
52
-
53
-
54
-
55
-
56
-
57
-
58
-
59
-
60
-
61
-
62
-
63
-
64
-
65
-
66
-
67
-
68
-
69
-
70
-
71
-
72
 |
 |
