Dell S2440L User's Guide - Page 23
Using the On-Screen Display OSD Menu - set up
 |
View all Dell S2440L manuals
Add to My Manuals
Save this manual to your list of manuals |
Page 23 highlights
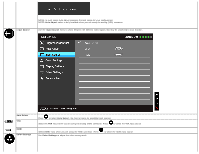
Front Panel Button Use the buttons on the front of the monitor to adjust the image settings. Front Panel Button 1 Up 2 Down 3 OK 4 Back Description Use the Up button to adjust (increase ranges) items in the OSD menu. Use the Down button to adjust (decrease ranges) items in the OSD menu. Use the OK button to confirm your selection. Use the Back button to go back to the previous menu. Using the On-Screen Display (OSD) Menu Accessing the Menu System NOTE: If you change the settings and then either proceed to another menu or exit the OSD menu, the monitor automatically saves those changes. The changes are also saved if you change the settings and then wait for the OSD menu to disappear. 1. Press the button to launch the OSD menu and display the main menu.
-
 1
1 -
2
-
3
-
4
-
5
-
6
-
7
-
8
-
9
-
10
-
11
-
12
-
13
-
14
-
15
-
16
-
17
-
 18
18 -
 19
19 -
 20
20 -
 21
21 -
 22
22 -
 23
23 -
 24
24 -
 25
25 -
 26
26 -
 27
27 -
 28
28 -
29
-
30
-
31
-
32
-
33
-
34
-
35
-
36
-
37
-
38
-
39
-
40
-
41
-
42
-
43
-
44
-
45
-
46
 |
 |
