Dell Vostro 1014 Service Manual - Page 20
Replacing the Hard Drive Assembly, Removing the Hard Drive Bracket
 |
View all Dell Vostro 1014 manuals
Add to My Manuals
Save this manual to your list of manuals |
Page 20 highlights
5. Pull the mylar tab towards the hard drive assembly to release the hard drive interposer from the connector on the system board. 6. Lift the hard drive assembly from the computer. Replacing the Hard Drive Assembly Perform the above steps in the reverse order to replace the hard drive assembly in the computer. Removing the Hard Drive Bracket 1. Follow the procedures in Before Working Inside Your Computer. 2. Remove the battery. 3. Remove the access panel. 4. Remove the hard drive.
-
 1
1 -
2
-
3
-
4
-
5
-
6
-
7
-
8
-
9
-
10
-
11
-
12
-
13
-
14
-
 15
15 -
 16
16 -
 17
17 -
 18
18 -
 19
19 -
 20
20 -
 21
21 -
 22
22 -
 23
23 -
 24
24 -
 25
25 -
26
-
27
-
28
-
29
-
30
-
31
-
32
-
33
-
34
-
35
-
36
-
37
-
38
-
39
-
40
-
41
-
42
-
43
-
44
-
45
-
46
-
47
-
48
-
49
-
50
-
51
-
52
-
53
-
54
-
55
-
56
-
57
-
58
-
59
-
60
-
61
-
62
-
63
-
64
-
65
-
66
-
67
-
68
-
69
-
70
-
71
-
72
-
73
-
74
-
75
-
76
 |
 |

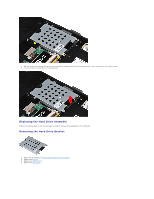
5.
Pull the mylar tab towards the hard drive assembly to release the hard drive interposer from the connector on the system board.
6.
Lift the hard drive assembly from the computer.
Replacing the Hard Drive Assembly
Perform the above steps in the reverse order to replace the hard drive assembly in the computer.
Removing the Hard Drive Bracket
1.
Follow the procedures in
Before Working Inside Your Computer
.
2.
Remove the
battery
.
3.
Remove the
access panel
.
4.
Remove the
hard drive
.