Dell XPS Gen 4 Owner's Manual
Dell XPS Gen 4 Manual
 |
View all Dell XPS Gen 4 manuals
Add to My Manuals
Save this manual to your list of manuals |
Dell XPS Gen 4 manual content summary:
- Dell XPS Gen 4 | Owner's Manual - Page 1
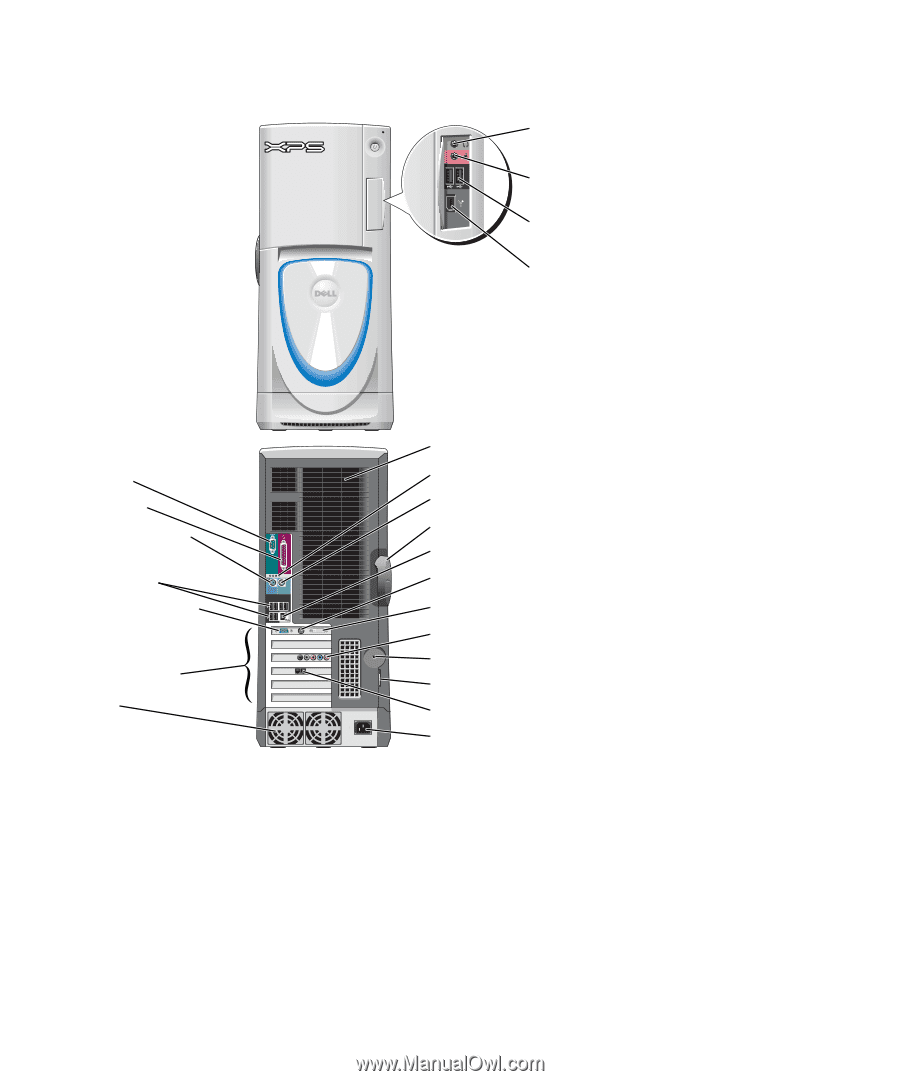
fans (2) *Not present on all computers. fans (2) diagnostic lights mouse connector cover latch release network adapter connector TV-OUT connector* DVI video connector sound card connectors security cable slot padlock ring modem connector power connector Model WHL www.dell.com | support.dell.com - Dell XPS Gen 4 | Owner's Manual - Page 2
used in this text: Dell, the DELL logo, Inspiron, Dell Precision, Dimension, OptiPlex, Latitude, PowerEdge, PowerVault, PowerApp, DellNet, PowerConnect, and Axim are trademarks of Dell Inc.; Intel and Pentium are registered trademarks of Intel Corporation; Microsoft, Windows, and Outlook are - Dell XPS Gen 4 | Owner's Manual - Page 3
Contents Finding Information 9 1 Setting Up and Using Your Computer Opening the Drive Door 13 Changing the Front-Panel Light Color 14 Connecting Two Monitors 15 Connecting Two Monitors With VGA Connectors 15 Connecting One Monitor With a VGA connector and One Monitor With a DVI Connector - Dell XPS Gen 4 | Owner's Manual - Page 4
Mode 31 Hibernate Mode 31 Power Options Properties 32 2 Optimizing Performance Hyper-Threading 35 Overclocking 35 PCI Express Cards 36 3 Solving Problems Troubleshooting Tips 37 Battery Problems 37 Drive Problems 37 CD and DVD drive problems 38 Hard drive problems 39 E-Mail, Modem, and - Dell XPS Gen 4 | Owner's Manual - Page 5
Problems 50 If the screen is blank 50 If the screen is difficult to read 50 4 Advanced Troubleshooting Diagnostic Lights 53 Dell Diagnostics 56 When to Use the Dell Diagnostics 56 Drivers 59 What Is a Driver 59 Identifying Drivers 59 Reinstalling Drivers 60 Using Microsoft® Windows® XP - Dell XPS Gen 4 | Owner's Manual - Page 6
Open 70 Back View 71 Opening the Computer Cover 73 Inside View of Your Computer 74 System Board Components 75 Memory 76 Installing Memory 77 Removing Memory 79 Cards 79 PCI Cards 80 PCI Express Cards 83 Drives 88 General Installation Guidelines 88 Connecting Drive Cables 89 Hard Drive - Dell XPS Gen 4 | Owner's Manual - Page 7
Processor 103 Removing the Processor 103 Installing the Processor 106 Front Panel 108 Removing the Front Panel 108 Replacing the Front Panel 109 Drive Door 110 Removing the Drive Door 110 Replacing the Drive Door 111 Battery 113 Replacing the Battery 113 Closing the Computer Cover 114 6 - Dell XPS Gen 4 | Owner's Manual - Page 8
FCC Notices (U.S. Only 129 Class A 130 Class B 130 FCC Identification Information 131 Contacting Dell 131 Index 149 8 Contents - Dell XPS Gen 4 | Owner's Manual - Page 9
users. • Additional information about setting up my computer • How to troubleshoot and solve problems • How to remove and install parts • Technical specifications • How to contact Dell Dimension Owner's Manual NOTE: This document is available as a PDF at support.dell.com. Finding Information 9 - Dell XPS Gen 4 | Owner's Manual - Page 10
• Safety instructions • Regulatory information • Ergonomics information • End User License Agreement • How to set up my computer Find it Here Dell™ Product Information Guide Setup Diagram • Service Tag and Express Service Code • Microsoft Windows License Label 10 Finding Information Service Tag - Dell XPS Gen 4 | Owner's Manual - Page 11
support site. The Dell Support website provides several online tools, including: • Solutions - Troubleshooting hints and tips, articles from technicians, and online courses • Community - Online discussion with other Dell customers • Upgrades - Upgrade information for components, such as memory - Dell XPS Gen 4 | Owner's Manual - Page 12
www.dell.com | support.dell.com 12 Finding Information - Dell XPS Gen 4 | Owner's Manual - Page 13
Setting Up and Using Your Computer Opening the Drive Door Setting Up and Using Your Computer 13 - Dell XPS Gen 4 | Owner's Manual - Page 14
www.dell.com | support.dell.com Changing the Front-Panel Light Color You can use this exclusive Dell™ Dimension™ XPS feature either to change the color of the front-panel light that illuminates the Dell name and displays around the badge on the front of your computer, or to turn off the front-panel - Dell XPS Gen 4 | Owner's Manual - Page 15
your TV to ensure that you properly configure and connect the TV. If you purchased a graphics card that supports dual monitors, follow these instructions to connect and enable your monitors. The instructions tell you how to connect either two monitors (each with a VGA connector), one monitor with - Dell XPS Gen 4 | Owner's Manual - Page 16
www.dell.com | support.dell.com 3 Connect the other monitor to the optional DVI adapter and connect the DVI adapter to the DVI (white) connector on the back of the - Dell XPS Gen 4 | Owner's Manual - Page 17
for your graphics card, see the user's guide in the Help and Support Center (click the Start button, click Help and Support, click User and system guides, click Device guides, and then click the guide for your graphics card). About Serial ATA Drives Your Dell™ Dimension™ XPS computer supports up to - Dell XPS Gen 4 | Owner's Manual - Page 18
www.dell.com | support.dell.com RAID Level 0 RAID level 0 uses a storage technique known as " is that it utilizes the full capacities of the drives. For example, if you have two 120-GB drives installed, you have 240 GB on which to store data. NOTICE: Because RAID level 0 provides no data redundancy, - Dell XPS Gen 4 | Owner's Manual - Page 19
did not select a RAID configuration when you purchased your computer. You must have at least two hard drives installed in your computer to set up a RAID configuration. For instructions on how to install a hard drive, see page 91. You can use one of two methods to configure RAID hard drive volumes - Dell XPS Gen 4 | Owner's Manual - Page 20
www.dell.com | support.dell.com 5 Use the left- and right-arrow keys to Use the up- and down-arrow keys to select Exit, and press . 13 Install the operating system (see "Reinstalling Microsoft® Windows® XP" on page 64). Creating a RAID Level 1 Configuration 1 Set your computer to RAID - Dell XPS Gen 4 | Owner's Manual - Page 21
on the main Intel Option ROM screen. 11 Use the up- and down-arrow keys to select Exit, and press . 12 Install the operating system (see "Reinstalling Microsoft® Windows® XP" on page 64). Deleting a RAID Volume NOTE: When you perform this operation, all data on the RAID drives will be lost - Dell XPS Gen 4 | Owner's Manual - Page 22
www.dell.com | support.dell.com Creating a RAID 0 Volume NOTE: When you perform this right arrow. Click a second hard drive until two drives appear in the Selected window, and then click Next. 5 In the Specify Volume Size window, click the Volume Size desired, and then click Next. 6 Click Finish to - Dell XPS Gen 4 | Owner's Manual - Page 23
Deleting a RAID Volume NOTE: While this procedure deletes the RAID 1 volume, it also splits the RAID 1 volume into two nonRAID hard drives with a partition, and leaves any existing data files intact. Deleting a RAID 0 volume, however, destroys all data on the volume. 1 Click the Start button and - Dell XPS Gen 4 | Owner's Manual - Page 24
www.dell.com | support.dell.com Migrating to a RAID 1 Volume 1 Set your computer to RAID-enabled Right-click the hard drive you want to mark as a spare hard drive. 3 Click Mark as Spare. To Remove Spare Marking From a Spare Hard Drive: 1 Right-click the spare hard drive icon. 2 Click Reset Hard - Dell XPS Gen 4 | Owner's Manual - Page 25
1 volume, you can manually rebuild the computer's redundancy Window sizes • Internet bookmarks You can transfer the data to the new computer over a network or serial connection, or you can store it on a removable the Windows XP Operating System CD. 2 On the Welcome to Microsoft Windows XP screen, - Dell XPS Gen 4 | Owner's Manual - Page 26
www.dell.com | support.dell.com 7 On the What do you want to transfer? screen, select the items you want to transfer and click Next. After the information has been - Dell XPS Gen 4 | Owner's Manual - Page 27
To format CDs for storing data, to create music CDs, or to copy CDs, see the CD software that came with your computer. NOTE: Ensure that you follow all copyright laws when you create CDs. A CD player includes the following basic buttons: Play. Move backward within the current track. Pause. Move - Dell XPS Gen 4 | Owner's Manual - Page 28
dell.com | support.dell window. Adjusting the Picture If an error message notifies you that the current resolution and color depth are using too much memory offered by Dell may vary by country. The following instructions show how audio files on your computer and creating MP3 CDs. For instructions - Dell XPS Gen 4 | Owner's Manual - Page 29
problems, check for available software patches at the Sonic support website at support.sonic.com. Currently, five DVD-writable disc formats available: DVD+R, DVD+RW, DVD-R, DVD-RW and DVD-RAM. The DVD-writable drives installed in Dell RecordNow! 2 Click either the audio tab or the data tab, - Dell XPS Gen 4 | Owner's Manual - Page 30
support website at support.sonic.com for additional information. Network Setup Wizard The Microsoft® Windows® XP operating system provides a Network Setup Wizard to guide Windows XP SP1. 4 Complete the checklist and required preparations. Return to the Network Setup Wizard and follow the instructions - Dell XPS Gen 4 | Owner's Manual - Page 31
the computer exits from a power conservation mode, the Windows desktop is restored to the state it was in before it entered the mode. NOTE: Windows XP Professional includes security and networking features not available in Windows XP Home Edition. When a Windows XP Professional computer is connected - Dell XPS Gen 4 | Owner's Manual - Page 32
memory, Dell creates an appropriately sized hibernate mode file before shipping the computer to you. If the computer's hard drive becomes corrupted, Windows XP recreates the hibernate file automatically. Power standard Windows schemes installed on your computer, choose a scheme from the Power schemes - Dell XPS Gen 4 | Owner's Manual - Page 33
the Hibernate tab. For more information on power management options: 1 Click the Start button and click Help and Support. 2 In the Help and Support window, click Performance and maintenance. 3 In the Performance and maintenance window, click Conserving power on your computer. Setting Up and Using - Dell XPS Gen 4 | Owner's Manual - Page 34
www.dell.com | support.dell.com 34 Setting Up and Using Your Computer - Dell XPS Gen 4 | Owner's Manual - Page 35
performance by allowing one physical processor to function as two logical processors, capable of performing certain tasks simultaneously. It is recommended that you use the Microsoft® Windows® XP Service Pack 1 (SP1) or later operating system because Windows XP is optimized to take advantage - Dell XPS Gen 4 | Owner's Manual - Page 36
www.dell.com | support.dell.com PCI Express Cards PCI Express is the next generation technology for graphics cards and PCI cards. The dimensions of PCI Express card slots are different from PCXI card slots, and the cards are not interchangeable (you cannot install a PCI card in a PCI Express card - Dell XPS Gen 4 | Owner's Manual - Page 37
Tips Follow these tips when you troubleshoot your computer: • If you added or removed a part before the problem started, review the installation procedures and ensure that the part is correctly installed. • If a peripheral device does not work, ensure that the device is properly connected - Dell XPS Gen 4 | Owner's Manual - Page 38
www.dell.com | support.dell.com TEST THE DRIVE - • Mode" on page 31 or search for the keyword standby in Windows Help and Support Center. for information on power management modes. For infomration on accessing window Help, see "Windows Help and Support Center" on page 11. 38 Solving Problems - Dell XPS Gen 4 | Owner's Manual - Page 39
and attempt recovery of bad sectors. 7 Click Start. E-Mail, Modem, and Internet Problems CAUTION: Before you begin any of the procedures in this section, follow the safety instructions located in the Product Information Guide. NOTE: Connect the modem to an analog telephone jack only. The modem does - Dell XPS Gen 4 | Owner's Manual - Page 40
| support.dell.com VERIFY THAT THE MODEM IS COMMUNICATING WITH WINDOWS - 1 Click the Start button and click Control Panel. 2 Click Printers and Other Hardware. 3 Click Phone and Modem Options. 4 Click the Modems tab. 5 Click the COM port for your modem. 6 Click Properties, click the Diagnostics tab - Dell XPS Gen 4 | Owner's Manual - Page 41
you want to use first. O P E R A T I N G S YS T E M N O T F O U N D - Contact Dell (see page 131). IEEE 1394 Device Problems CAUTION: Before you begin any of the procedures in this section, follow the safety instructions located in the Product Information Guide. ENSURE THAT THE CABLE FOR THE IEEE - Dell XPS Gen 4 | Owner's Manual - Page 42
Lockups and Software Problems CAUTION: Before you begin any of the procedures in this section, follow the safety instructions located in the Product Information Guide. The computer does not start up C H E C K T H E D I A G N O S T I C L I G H T S - See page 53. ENSURE THAT THE POWER CABLE IS FIRMLY - Dell XPS Gen 4 | Owner's Manual - Page 43
turns off. Then restart your computer. Other software problems CHECK THE SOFTWARE DOCUMENTATION OR CONTACT THE SOFTWARE MANUFACTURER FOR TROUBLESHOOTING INFORMATION - • Ensure that the program is compatible with the operating system installed on your computer. • Ensure that your computer meets - Dell XPS Gen 4 | Owner's Manual - Page 44
about the type of memory supported by your computer, see "Memory" on page 115. • Run the Dell Diagnostics (see page 56). Mouse Problems CAUTION: Before you begin any of the procedures in this section, follow the safety instructions located in the Product Information Guide. CHECK THE MOUSE CABLE - Dell XPS Gen 4 | Owner's Manual - Page 45
page 64. Network Problems CAUTION: Before you begin any of the procedures in this section, follow the safety instructions located in the Product Information Guide. C H E C O M P U T E R - If the link integrity light is off, that indicates no network communication exists. Replace the network cable. - Dell XPS Gen 4 | Owner's Manual - Page 46
| support.dell.com Power Problems CAUTION: Before you begin any of the procedures in this section, follow the safety instructions located in the Product Information Guide. I F T H E P O W E R L I G H T I S G R E E N A N D T H E C O M P U T E R I S N O T R E S P O N D I N G - See "Diagnostic Lights - Dell XPS Gen 4 | Owner's Manual - Page 47
instructions located in the Product Information Guide. NOTE: If you need technical assistance for your scanner, contact the scanner's manufacturer. C H E C K T H E S C A N N E R D O C U M E N T A T I O N - See the scanner documentation for setup and troubleshooting information. Solving Problems - Dell XPS Gen 4 | Owner's Manual - Page 48
www.dell.com | support.dell.com instructions. Sound and Speaker Problems CAUTION: Before you begin any of the procedures in this section, follow the safety instructions located in the Product Information Guide. No sound from speakers NOTE: The volume control in some MP3 players overrides the Windows - Dell XPS Gen 4 | Owner's Manual - Page 49
. E L I M I N A T E P O S S I B L E I N T E R F E R E N C E - Turn off nearby fans, fluorescent lights, or halogen lamps to check for interference. RUN THE SPEAKER DIAGNOSTICS R E I N S T A L L T H E S O U N D D R I V E R - See page 59. R U N T H E H A R the sound is not muted. Solving Problems 49 - Dell XPS Gen 4 | Owner's Manual - Page 50
www.dell.com | support.dell.com Video and Monitor Problems CAUTION: Before you begin any of the procedures in this section, follow the safety instructions located in the Product Information Guide. If the screen is blank NOTE: See the monitor documentation for troubleshooting procedures. CHECK THE - Dell XPS Gen 4 | Owner's Manual - Page 51
ADJUST THE WINDOWS DISPLAY SETTINGS - 1 Click the Start button, click Control Panel, and then click Appearance and Themes. 2 Click Display and click the Settings tab. 3 Try different settings for Screen resolution and Color quality. Solving Problems 51 - Dell XPS Gen 4 | Owner's Manual - Page 52
www.dell.com | support.dell.com 52 Solving Problems - Dell XPS Gen 4 | Owner's Manual - Page 53
follow the safety instructions located in the Product Information Guide. To help you troubleshoot a problem, your computer has four lights labeled "A," "B," "C," and "D" on the back panel (see page 71). The lights can be yellow or green. When the computer starts normally, the lights flash. After the - Dell XPS Gen 4 | Owner's Manual - Page 54
or reinstalled all modules without error. • If available, install properly working memory of the same type into your computer (see page 77). • If the problem persists, contact Dell (see page 131). • If the computer has a graphics card, remove the card (see page 87), reinstall it, and then restart - Dell XPS Gen 4 | Owner's Manual - Page 55
• Verify that the memory modules that you are installing are compatible with your computer (see page 76). • If the problem persists, contact Dell (see page 131). A possible expansion card failure has occurred. 1 Determine if a conflict exists by removing a card (not a graphics card) and restarting - Dell XPS Gen 4 | Owner's Manual - Page 56
Problems" (see page 37) and run the Dell Diagnostics before you contact Dell for technical assistance. NOTICE: The Dell Diagnostics works only on Dell™ computers. Start the Dell Diagnostics from either your hard drive (see page 56) or from the Dell Dimension ResourceCD. 56 Advanced Troubleshooting - Dell XPS Gen 4 | Owner's Manual - Page 57
appears, continue to wait until you see the Microsoft® Windows® desktop. Then shut down your computer (see page 67) and try again. 3 When the boot device list appears, highlight Boot to Utility Partition and press 4 When the Dell Diagnostics Main Menu appears, select the test you want to - Dell XPS Gen 4 | Owner's Manual - Page 58
Write down the error code and problem description and follow the instructions on the screen. If you cannot resolve the error condition, contact Dell (see page 131). NOTE: The Service Tag for your computer is located at the top of each test screen. If you contact Dell, technical support will ask for - Dell XPS Gen 4 | Owner's Manual - Page 59
you: • Upgrade your operating system. • Reinstall your operating system. • Connect or install a new device. Identifying Drivers If you experience a problem with any device, identify whether the driver is the source of your problem and, if necessary, update the driver. Advanced Troubleshooting 59 - Dell XPS Gen 4 | Owner's Manual - Page 60
your Dell Dimension ResourceCD provide approved drivers for Dell™ computers. If you install drivers obtained from other sources, your computer might not work correctly. Using Windows XP Device Driver Rollback If a problem occurs on your computer after you install or update a driver, use Windows XP - Dell XPS Gen 4 | Owner's Manual - Page 61
Wizard Complete window appears, remove the ResourceCD and click Finish to restart the computer. 4 When you see the Windows desktop, reinsert the ResourceCD. 5 At the Welcome Dell System Owner screen, click Next. NOTE: The ResourceCD displays drivers only for hardware that came installed in your - Dell XPS Gen 4 | Owner's Manual - Page 62
www.dell.com | support.dell.com Creating a Restore Point 1 Click the Start button and click Help and Support. 2 Click System Restore. 3 Follow the instructions on the screen. Restoring the Computer to an Earlier Operating State If problems occur after you install a device driver, use Device Driver - Dell XPS Gen 4 | Owner's Manual - Page 63
If you reinstall Windows XP with less than . Using Dell PC Restore by Symantec Use Dell PC Restore hard drive and removes any applications or drivers installed after you received manually shut down the computer. Click Finish and let the computer completely reboot. Advanced Troubleshooting 63 - Dell XPS Gen 4 | Owner's Manual - Page 64
® Windows® XP NOTICE: You must use Windows XP Service Pack 1 (SP1) or later when you reinstall Windows XP. Before You Begin If you are considering reinstalling the Windows XP operating system to correct a problem with a newly installed driver, first try using Windows XP Device Driver Rollback - Dell XPS Gen 4 | Owner's Manual - Page 65
drive. Therefore, do not reinstall Windows XP unless a Dell technical support representative instructs you to do so. NOTICE: To prevent conflicts with Windows XP, disable any virus protection software installed on your computer before you reinstall Windows XP. See the documentation that came with - Dell XPS Gen 4 | Owner's Manual - Page 66
dell.com | support.dell. your settings, accept the default selections. Windows XP installs the operating system components and configures the 18 Click Finish to complete the setup, and remove the CD. 19 Reinstall the appropriate drivers with the ResourceCD (see page 60). 20 Reinstall Troubleshooting - Dell XPS Gen 4 | Owner's Manual - Page 67
Dell™ Product Information Guide. • A component can be replaced by performing the removal procedure in reverse order. Recommended Tools The procedures in this document may require the following tools: • Small flat-blade screwdriver • Phillips screwdriver • Flash BIOS update off computer window, click - Dell XPS Gen 4 | Owner's Manual - Page 68
on a card. Hold a card by its edges or by its metal mounting bracket. Hold a component such as a processor by its edges, not by its pins. NOTICE: Only a certified service technician should perform repairs on your computer. Damage due to servicing that is not authorized by Dell is not covered by your - Dell XPS Gen 4 | Owner's Manual - Page 69
to access the floppy and CD/DVD drives. Open the door to use the front-panel connectors. NOTE: The front door is removable; if you remove it or accidentally knock it off its hinges, it snaps back in place. For instructions on how to reattach the door, see page 111. Removing and Installing Parts 69 - Dell XPS Gen 4 | Owner's Manual - Page 70
www.dell.com | support.dell.com Front View (Doors Open) 1 2 3 4 1 headphone connector 2 microphone connector 3 USB 2.0 connectors (2) 4 IEEE 1394 connector Use as printers and keyboards. Attach high-speed serial multimedia devices, such as digital video cameras. 70 Removing and Installing Parts - Dell XPS Gen 4 | Owner's Manual - Page 71
processor fans (2) For optimal cooling, two processor fans are provided. Do not block the vents. 2 cover latch release To open the computer, lay the computer on its side with the cover with a network connector card, use the connector on the card. It is recommended Removing and Installing Parts 71 - Dell XPS Gen 4 | Owner's Manual - Page 72
. If you have a USB printer, plug it into a USB connector. 14 diagnostic lights (4) Use the lights to help you troubleshoot a computer problem based on the diagnostic code. For more information, see "Diagnostics Lights" on page 53. 15 keyboard connector If you have a standard keyboard, plug - Dell XPS Gen 4 | Owner's Manual - Page 73
exists to accommodate the open cover-at least 30 cm (1 ft) of desk top space. 3 Slide the cover release latch toward the top of the computer. 4 Raise the cover, and pivot it toward the front of the computer. cover release latch security cable slot padlock ring Removing and Installing Parts 73 - Dell XPS Gen 4 | Owner's Manual - Page 74
www.dell.com | support.dell.com Inside View of Your Computer floppy drive CD/DVD drive processor airflow shroud hard drive shroud PCI card shroud and fan processor fan power supply fans (2) system board power supply 74 Removing and Installing Parts - Dell XPS Gen 4 | Owner's Manual - Page 75
-panel light connector (LED) IEEE 1394 connector (1394) battery socket (BATTERY) rear fan connector (REAR FAN1) PCI-Express x1 card connector power connector (12V PWR) PCI-Express x16 card connector PCI card connectors (PCI SLOT 1, PCI SLOT 2, PCI SLOT 3, PCI SLOT 4) Removing and Installing - Dell XPS Gen 4 | Owner's Manual - Page 76
.dell.com | support.dell.com Memory You can increase your computer memory by installing memory modules on the system board. Your computer supports DDR2 memory. For additional information on the type of memory supported by your computer, see "Memory" on page 115. DDR2 Memory Overview • DDR2 memory - Dell XPS Gen 4 | Owner's Manual - Page 77
pair of modules in DIMM connectors 1 and 2 (white securing clips) NOTE: Memory purchased from Dell is covered under your computer warranty. NOTICE: If you remove your original memory modules from the computer during a memory upgrade, keep them separate from any new modules that you may have, even if - Dell XPS Gen 4 | Owner's Manual - Page 78
dell.com | support.dell.com 3 Press out the securing clip at each end of the memory module connector. memory connector closest to processor securing clips (2) connector 4 Align the notch on the bottom of the module with the crossbar in the connector. notch memory . 78 Removing and Installing Parts - Dell XPS Gen 4 | Owner's Manual - Page 79
cover verify that the memory is installed correctly, check the amount of memory (RAM) listed. Removing Memory CAUTION: Before you memory module connector. 3 Grasp the module and pull up. If the module is difficult to remove, gently ease the module back and forth to remove it from the connector. Cards - Dell XPS Gen 4 | Owner's Manual - Page 80
support.dell.com Your Dell™ computer provides the following slots for PCI and PCI Express cards: • Four PCI card slots • One PCI Express x16 card slot • One PCI Express x1 card slot PCI Cards If you are installing or replacing a card, follow the procedures in the next section. If you are removing - Dell XPS Gen 4 | Owner's Manual - Page 81
3 If you are installing a new card, remove the filler bracket to create a card-slot opening. Then continue with step 5. 4 If you are replacing a card that is already installed in the computer, remove the card. If necessary, disconnect any cables connected to the card. Grasp the card by its top - Dell XPS Gen 4 | Owner's Manual - Page 82
www.dell.com | support.dell.com 8 Press the retention arm into place, securing the card(s) in the computer. retention arm alignment guide alignment bar filler bracket NOTICE: Do not route card cables over or behind the cards. Cables routed over the cards can prevent the computer cover from closing - Dell XPS Gen 4 | Owner's Manual - Page 83
removing but not replacing a PCI Express card, see "Removing a PCI Express Card" on page 87. If you are replacing a card, remove the current driver for the card from the operating system. If you are installing or replacing a PCI card, see "Installing a PCI Card" on page 80. Removing and Installing - Dell XPS Gen 4 | Owner's Manual - Page 84
www.dell.com | support.dell.com Installing a PCI Express Card 1 Follow the procedures in "Before You Begin" on page 67. 2 Press the lever on the card retention arm and raise the retention arm. tab top of retention mechanism filler bracket retention arm lever x16 card securing slot securing tab - Dell XPS Gen 4 | Owner's Manual - Page 85
slot opening. Then continue with step 5. 4 If you are replacing a card that is already installed in the computer, remove the card. If necessary, disconnect any cables connected to the card. If your card includes a retention mechanism, remove the top of the retention mechanism by pressing the tab and - Dell XPS Gen 4 | Owner's Manual - Page 86
www.dell.com | support.dell.com 8 If you replaced a card that was already installed in the computer and you removed the top of the retention mechanism, you can reinstall the top. 9 Before you lower the retention arm, ensure that: • The tops of all cards and filler brackets are flush with the - Dell XPS Gen 4 | Owner's Manual - Page 87
wall jack and then plug it into the computer. 8 Close the computer cover, reconnect the computer and devices to electrical outlets, and then turn them on. 9 Remove the card's driver from the operating system. 10 If you removed an add-in network connector: a Enter system setup (see page 120), select - Dell XPS Gen 4 | Owner's Manual - Page 88
device (drive 0), and the device attached to the middle connector on the interface cable is the secondary device (drive 1). See the drive documentation in your upgrade kit for information on configuring devices for the cable select setting. 88 Removing and Installing Parts - Dell XPS Gen 4 | Owner's Manual - Page 89
install a drive, you connect two cables-a DC power cable and a data cable-to the back of the drive and to the system board. Some drives may also have an audio connector; one end of the audio The system board serial ATA connector may have an attached cover or shroud. Removing and Installing Parts 89 - Dell XPS Gen 4 | Owner's Manual - Page 90
www.dell.com | support.dell.com Power Cable Connector power input connector power cable Hard Drive CAUTION: Before you begin any of the procedures in this section, follow the safety instructions located in the Product Information Guide. NOTICE: To avoid damage to the drive, do not set it on a - Dell XPS Gen 4 | Owner's Manual - Page 91
hard drive, and prepare it for installation. 2 Check the documentation for the drive to verify that it is configured for your computer. 3 If your replacement hard drive does not have the bracket rails attached, remove the rails from the old drive by removing the two screws that secure each rail - Dell XPS Gen 4 | Owner's Manual - Page 92
dell.com | support.dell.com 4 Install the hard drive into the computer by gently sliding the drive into place until the tabs securely click into position. NOTE: If you are installing a hard drive in the lower bay, place the drive in the bay so that the power . 92 Removing and Installing Parts - Dell XPS Gen 4 | Owner's Manual - Page 93
), and update the appropriate Drive option. 16 Exit system setup, and restart the computer. 17 Partition and logically format your drive before you proceed to the next step. See the documentation for your operating system for instructions. 18 Test the hard drive by running the Dell Diagnostics (see - Dell XPS Gen 4 | Owner's Manual - Page 94
.dell.com | support.dell.com 19 If the drive you just installed is the primary drive, install your operating system on the hard drive. Adding a Second Hard Drive CAUTION: Before you begin any of the procedures in this section, follow the safety instructions located in the Product Information Guide - Dell XPS Gen 4 | Owner's Manual - Page 95
you begin any of the procedures in this section, follow the safety instructions located in the Product Information Guide. CAUTION: To guard against electrical shock, always unplug your computer from the electrical outlet before opening the cover. Follow the procedure in "Before You Begin" on page 67 - Dell XPS Gen 4 | Owner's Manual - Page 96
www.dell.com | support.dell.com Removing a Floppy Drive 1 Disconnect the power and data cables from the back of the floppy drive. 2 Disconnect the other end of the data cable from the system board. data cable power cable tabs (2) floppy drive 3 Press inward on the two tabs on the sides of the - Dell XPS Gen 4 | Owner's Manual - Page 97
drive bracket rails (2) screws (4) 2 Gently slide the drive into place until the tabs securely click into position. data cable power cable tabs (2) floppy drive Removing and Installing Parts 97 - Dell XPS Gen 4 | Owner's Manual - Page 98
that came with the drive for instructions on installing any software required for drive operation. 8 Enter system setup (see page 119) and update the appropriate Diskette Drive option. 9 Verify that your computer works correctly by running the Dell Diagnostics (see page 56). CD/DVD Drive - Dell XPS Gen 4 | Owner's Manual - Page 99
. If you are installing an IDE drive, configure the drive for the cable select setting. 2 Connect the new drive to the set of rails that are attached to the inside of the cover. If a set of rails is not attached inside the computer cover, call Dell (see page 131). Removing and Installing Parts 99 - Dell XPS Gen 4 | Owner's Manual - Page 100
www.dell.com | support.dell.com 3 If you are installing a replacement drive and the new drive does not have the bracket rails attached, remove the rails from the old drive by removing the two screws that secure each rail to the drive. Attach the bracket to the new drive by aligning the screw holes - Dell XPS Gen 4 | Owner's Manual - Page 101
came with the drive for instructions on installing any software required for drive operation. 9 Enter system setup (see page 120) and select the appropriate Drive option. 10 Verify that your computer works correctly by running the Dell Diagnostics (see page 56). Removing and Installing Parts 101 - Dell XPS Gen 4 | Owner's Manual - Page 102
dell.com | support.dell.com Processor Airflow Shroud Removing the Processor Airflow Shroud CAUTION: Before you perform this procedure, follow the safety instructions located in the Product Information Guide chassis. NOTICE: To avoid damaging the fan power cables, do not slide the shroud too quickly - Dell XPS Gen 4 | Owner's Manual - Page 103
, and turn them on. Processor Removing the Processor NOTICE: Do not perform the following steps unless you are familiar with hardware removal and replacement. Performing these steps incorrectly could damage your system board. For technical service, see "Dell Technical Support Policy (U.S. Only)" on - Dell XPS Gen 4 | Owner's Manual - Page 104
www.dell.com | support.dell.com anchor tabs (3) shroud release lever CAUTION: The heat sink can get very hot during normal operation. Be sure that the heat sink has had sufficient time to cool before you touch it. 5 Remove the heat sink: a Remove the retention module clips. Press the tabs toward - Dell XPS Gen 4 | Owner's Manual - Page 105
the power supply. Press on the retention base tab until the heat sink pops up slightly. c Press out on the second retention tab while lifting the heat sink up and out of the retention base. NOTICE: Lay the heat sink down on its side. NOTICE: If you are installing a processor upgrade kit from Dell - Dell XPS Gen 4 | Owner's Manual - Page 106
www.dell.com | support.dell.com 7 Open the processor cover. processor cover processor socket release lever 8 Remove the processor from the socket. Leave the release lever extended in the release position so that the socket is ready for the new processor. Installing the Processor NOTICE: Ground - Dell XPS Gen 4 | Owner's Manual - Page 107
a processor upgrade kit from Dell, reuse the original heat sink assembly when you replace the processor. If you installed a processor replacement kit from Dell, return the original heat sink assembly and processor to Dell in the same package in which your replacement kit was sent. Removing and - Dell XPS Gen 4 | Owner's Manual - Page 108
dell.com | support.dell.com 7 Install the power cable to the 12V PWR connector (see "System Board Components" on page 75) on the system board. 12 Close the computer cover. this section, follow the safety instructions located in the Product Information Guide. Removing the Front Panel 1 Follow the - Dell XPS Gen 4 | Owner's Manual - Page 109
4 Close the computer cover halfway and pull the front panel away from the computer. Replacing the Front Panel To replace the front panel, perform the removal procedure in reverse. Removing and Installing Parts 109 - Dell XPS Gen 4 | Owner's Manual - Page 110
www.dell.com | support.dell.com Drive Door CAUTION: Before you begin any of the procedures in this section, follow the safety instructions located in the Product Information Guide. Removing the Drive Door 1 Open the drive door. 110 Removing and Installing Parts - Dell XPS Gen 4 | Owner's Manual - Page 111
designed to "break away" from the computer if it is opened too far. If the drive door detaches from the computer without disassembling, perform the removal procedure in reverse. Removing and Installing Parts 111 - Dell XPS Gen 4 | Owner's Manual - Page 112
www.dell.com | support.dell.com If the drive door is open and it is opened too far, instead of breaking away from the computer in one assembly door lower part of the door hinge 3 Attach the drive door to the computer, starting with the bottom bracket hinge. 112 Removing and Installing Parts - Dell XPS Gen 4 | Owner's Manual - Page 113
any of the procedures in this section, follow the safety instructions located in the Product Information Guide. NOTICE: To prevent static damage to components inside your snap the battery into place. battery socket 6 Close the computer cover. tab battery Removing and Installing Parts 113 - Dell XPS Gen 4 | Owner's Manual - Page 114
www.dell.com | support.dell.com NOTICE: To connect a network cable, first plug the in step 1. 9 Properly dispose of the old battery. See the Product Information Guide for battery disposal information. Closing the Computer Cover 1 Ensure that all cables are connected, and fold cables out of the - Dell XPS Gen 4 | Owner's Manual - Page 115
Processor type Cache Memory Type Memory connectors Memory capacities Minimum memory Maximum memory BIOS address Computer Information Chipset DMA channels Interrupt levels BIOS chip (NVRAM) NIC System clock Video Type Intel® Pentium® 4 with HT Technology NOTE: Not all Pentium 4 processors support - Dell XPS Gen 4 | Owner's Manual - Page 116
www.dell.com | support.dell.com Expansion Bus Bus type PCI 2.3 PCI Express x1 and x16 Bus devices Internally accessible: two 3.5-inch drive bays two 5.25-inch drive bays Serial ATA drive, floppy drive, memory devices, CD drive, CD-RW drive, DVD drive, DVD-RW drive, and DVD and CD-RW combo - Dell XPS Gen 4 | Owner's Manual - Page 117
-pin connector 4-pin connector push button green light - Blinking green in sleep state; solid green for power-on state. amber light - Blinking amber indicates a problem with an installed device; solid amber indicates an internal power problem (see "Power Problems" on page 46). green Appendix 117 - Dell XPS Gen 4 | Owner's Manual - Page 118
the Front-Panel Light Color" on page 14.) Power DC power supply: Wattage 460 W Heat dissipation 931.2 BTU/hr Voltage (see the safety instructions fixed-voltage power supply -1 10 V at 50/60 Hz located in the Product Information Guide for important voltage setting manual selection and auto - Dell XPS Gen 4 | Owner's Manual - Page 119
the system configuration information after you add, change, or remove any hardware in your computer • To set or change a user-selectable option such as the user password • To read the current amount of memory or set the type of hard drive installed Before you use system setup, it is recommended that - Dell XPS Gen 4 | Owner's Manual - Page 120
www.dell.com | support.dell.com Entering System Setup 1 Turn on (or restart) your computer. 2 When the blue DELL™ logo appears, press immediately. If you wait too long and the operating system logo appears, continue to wait until you see the Microsoft® Windows® desktop. Then shut down your - Dell XPS Gen 4 | Owner's Manual - Page 121
name, the BIOS version number and date, system tags, and other system-specific information. Identifies whether the computer's processor supports Hyper-Threading and lists the processor bus speed, processor ID, clock speed, and L2 cache. Indicates amount of installed memory, memory speed, channel - Dell XPS Gen 4 | Owner's Manual - Page 122
www.dell.com | support.dell.com LPT Port Mode LPT Port Address LPT Port DMA Serial video controller is primary when two video controllers are present on the computer. If your computer's processor supports Hyper-Threading, this option appears in the Options List. • Bypass - Your computer does not - Dell XPS Gen 4 | Owner's Manual - Page 123
a standby state where the power is reduced or turned off for most components, however, system memory remains active. Maintenance CMOS Defaults This setting restores the computer's factory-installed default settings. Event Log Displays the system event log. BIOS Update After downloading a new - Dell XPS Gen 4 | Owner's Manual - Page 124
so that you can run the Dell Diagnostics on the Dell Dimension ResourceCD, but you want the computer to boot from the hard drive when the diagnostic tests are complete. You can also use this feature to restart your computer to a USB device such as a floppy drive, memory key, or CD-RW drive. NOTE - Dell XPS Gen 4 | Owner's Manual - Page 125
continue to wait until you see the Microsoft Windows desktop. Then shut down your computer (see page 67 example, if you are booting to a USB memory key, highlight USB Flash Device and press . NOTE: To . NOTE: Write down your current boot sequence in case you want to restore it. 3 Press the up - Dell XPS Gen 4 | Owner's Manual - Page 126
www.dell.com | support.dell.com Clearing Forgotten Passwords CAUTION: Before you begin any of the procedures in this section, follow the safety instructions located in the Product Information Guide. 1 Follow the procedures in "Before You Begin" on page 67. PASS CLR CMOS (page 127) 2 Locate the 3- - Dell XPS Gen 4 | Owner's Manual - Page 127
the safety instructions located in the Product Information Guide. 1 Remove the jumper plug from pins 2 and 3. c Place the jumper plug on pins 1 and 2 and wait approximately 5 seconds. d Replace the jumper plug on pins 2 and 3. 3 Close the computer cover your monitor screen, lightly dampen a soft, - Dell XPS Gen 4 | Owner's Manual - Page 128
www.dell.com | support.dell.com Mouse If your screen cursor skips or moves abnormally, clean the mouse. To clean a non-optical mouse: 1 Turn the retainer ring on the underside of your mouse counterclockwise, and then remove the ball. 2 Wipe the ball with a clean, lint-free cloth. 3 Blow carefully - Dell XPS Gen 4 | Owner's Manual - Page 129
Only) Technician-assisted technical support requires the cooperation and participation of the customer in the troubleshooting process and provides for restoration of the operating system, software programs, and hardware drivers to the original default configuration as shipped from Dell, as well as - Dell XPS Gen 4 | Owner's Manual - Page 130
when the equipment is operated in a commercial environment. This equipment generates, uses, and can radiate radio frequency energy and, if not installed and used in accordance with the manufacturer's instruction manual, may cause harmful interference with radio communications. Operation of this - Dell XPS Gen 4 | Owner's Manual - Page 131
covered in this document in compliance with FCC regulations: • Model number: WHL Company name: Dell Inc. One Dell Way Round Rock, Texas 78682 USA 512-338-4400 Contacting Dell To contact Dell™ electronically, you can access the following websites: • www.dell.com • support.dell.com (technical support - Dell XPS Gen 4 | Owner's Manual - Page 132
: www.dell.com.ar International Access Code: 00 E-mail: [email protected] Country Code: 54 City Code: 11 E-mail for desktop and portable computers: [email protected] E-mail for servers and EMC: [email protected] Customer Care Tech Support Tech Support Services Sales Aruba - Dell XPS Gen 4 | Owner's Manual - Page 133
/ Technical Support Technical Support Fax Customer Care Corporate Sales Fax Switchboard Bermuda General Support Bolivia General Support Brazil Website: www.dell.com/br International Access Code: 00 Customer Support, Technical Support Country Code: 55 Technical Support Fax City Code: 51 - Dell XPS Gen 4 | Owner's Manual - Page 134
Name or Service Area, Website and E-Mail Address Sales, Customer Support, and Technical Support Technical Support website: support.dell.com.cn Technical Support E-mail: [email protected] Customer Care E-mail: [email protected] Technical Support Fax Technical Support (Dimension™ and Inspiron - Dell XPS Gen 4 | Owner's Manual - Page 135
: support.euro.dell.com International Access Code: 00 E-mail: [email protected] Country Code: 420 Technical Support Customer Care Fax Tech Fax Switchboard Denmark (Copenhagen) Website: support.euro.dell.com International Access Code: 00 Country Code: 45 E-mail: http://support.euro.dell - Dell XPS Gen 4 | Owner's Manual - Page 136
Code: 00 Country Code: 49 City Code: 6103 Department Name or Service Area, Website and E-Mail Address Website: support.euro.dell.com E-mail: support.euro.dell.com/fr/fr/emaildell/ Home and Small Business Technical Support Customer Care Switchboard Switchboard (calls from outside of France) Sales - Dell XPS Gen 4 | Owner's Manual - Page 137
Switchboard Gold Service Switchboard Sales Fax Grenada General Support Guatemala General Support Guyana General Support Hong Kong Website: support.ap.dell.com International Access Code: 001 Technical Support E-mail: [email protected] Country Code: 852 Technical Support (Dimension and - Dell XPS Gen 4 | Owner's Manual - Page 138
Fax/Sales Fax Switchboard Website: support.euro.dell.com E-mail: support.euro.dell.com/it/it/emaildell/ Home and Small Business Technical Support Customer Care Fax Switchboard Corporate Technical Support Customer Care Fax Switchboard General Support (dial from within Jamaica only) Area Codes, Local - Dell XPS Gen 4 | Owner's Manual - Page 139
: support.jp.dell.com International Access Code: 001 Technical Support (servers) Country Code: 81 Technical Support outside of Japan (servers) City Code: 44 Technical Support (Dimension and Inspiron) Technical Support outside of Japan (Dimension and Inspiron) Technical Support (Dell Precision - Dell XPS Gen 4 | Owner's Manual - Page 140
, Belgium) Switchboard (Brussels, Belgium) Technical Support Customer Service (Xiamen, China) Transaction Sales (Xiamen, China) Website: support.ap.dell.com Technical Support (Dell Precision, OptiPlex, and Latitude) Technical Support (Dimension, Inspiron, and Electronics and Accessories) Technical - Dell XPS Gen 4 | Owner's Manual - Page 141
mail (New Zealand): [email protected] E-mail (Australia): [email protected] Technical Support (for desktop and portable computers) Technical Support (for servers and workstations) Home and Small Business Government and Business Sales Fax General Support Area Codes, Local Numbers, and - Dell XPS Gen 4 | Owner's Manual - Page 142
Fax Switchboard Panama General Support Peru General Support Poland (Warsaw) Website: support.euro.dell.com International Access Code: 011 E-mail: [email protected] Country Code: 48 Customer Service Phone City Code: 22 Customer Care Sales Customer Service Fax Reception Desk Fax - Dell XPS Gen 4 | Owner's Manual - Page 143
: 65 Technical Support (Dimension, Inspiron, and Electronics and Accessories) Technical Support (OptiPlex, Latitude, and Dell Precision) Technical Support (PowerApp, PowerEdge, PowerConnect, and PowerVault) Customer Service (Penang, Malaysia) Transaction Sales Corporate Sales Slovakia (Prague - Dell XPS Gen 4 | Owner's Manual - Page 144
(Geneva) International Access Code: 00 Country Code: 41 City Code: 22 Department Name or Service Area, Website and E-Mail Address Website: support.euro.dell.com E-mail: support.euro.dell.com/es/es/emaildell/ Home and Small Business Technical Support Customer Care Sales Switchboard Fax Corporate - Dell XPS Gen 4 | Owner's Manual - Page 145
support.ap.dell.com International Access Code: 002 E-mail: [email protected] Country Code: 886 Technical Support (OptiPlex, Latitude, Inspiron, Dimension, and Electronics and Accessories) Technical Support (PowerApp, PowerEdge, PowerConnect, and PowerVault) Transaction Sales Corporate Sales - Dell XPS Gen 4 | Owner's Manual - Page 146
Code Country Code City Code U.K. (Bracknell) International Access Code: 00 Country Code: 44 City Code: 1344 Uruguay Department Name or Service Area, Website and E-Mail Address Area Codes, Local Numbers, and Toll-Free Numbers Website: support.euro.dell.com Customer Care website: support.euro.dell - Dell XPS Gen 4 | Owner's Manual - Page 147
, education, and healthcare) Customer Service and Technical Support toll-free: 1-800-456-3355 Employee Purchase Program (EPP) Customers toll-free: 1-800-234-1490 Dell Sales toll-free: 1-800-289-3355 or toll-free: 1-800-879-3355 Dell Outlet Store (Dell refurbished computers) toll-free: 1-888 - Dell XPS Gen 4 | Owner's Manual - Page 148
www.dell.com | support.dell.com 148 Appendix - Dell XPS Gen 4 | Owner's Manual - Page 149
USB device, 124 C cards installing PCI, 80 installing PCI Express, 84 PCI, 80 PCI Express, 83 PCI Express slots, 72 PCI slots, 72 removing PCI, 82 removing PCI Express, 87 slots, 72, 79 types supported, 79 case front-panel light color, 14 CD/DVD drive installing, 99 problems, 38 removing, 98 CD-RW - Dell XPS Gen 4 | Owner's Manual - Page 150
installing, 96 removing, 95 H hard drive activity light, 69 installing, 91 installing second, 94 problems, 39 removing, 90 hardware Dell Diagnostics, 56 drives, RAID configuration, 17 Hardware Troubleshooter, 64 headphone connector, 70 Help and Support Center, 11 help file Windows Help and Support - Dell XPS Gen 4 | Owner's Manual - Page 151
K keyboard connector, 72 problems, 41 L labels Microsoft Windows, 10 Service Tag, 10 lights back of computer, 53 diagnostic, 53 hard-drive activity, 69 M memory 4-GB configurations, 77 DDR2 overview, 76 installation guidelines, 76 installing, 77 problems, 44 removing, 79 type supported, 76 messages - Dell XPS Gen 4 | Owner's Manual - Page 152
troubleshooting tips, 37 video and monitor, 50 volume adjusting, 48 processor fans, 71 type, 115 Product Information Guide, 10 Program Compatibility Wizard, 43 R RAID configuring, 17 regulatory information, 10 reinstalling Windows XP, 64 ResourceCD, 9, 60 Dell Diagnostics, 56 S safety instructions - Dell XPS Gen 4 | Owner's Manual - Page 153
, 26 troubleshooting Dell Diagnostics, 56 diagnostic lights, 53 Hardware Troubleshooter, 64 Help and Support Center, 11 restore to previous state, 61 tips, 37 TV connect to computer, 15-16, 71 U USB booting to devices, 124 connectors, 70, 72 V VGA connector, 72 video connector, 72 problems, 50 - Dell XPS Gen 4 | Owner's Manual - Page 154
154 Index
-
 1
1 -
 2
2 -
 3
3 -
 4
4 -
 5
5 -
 6
6 -
 7
7 -
8
-
9
-
10
-
11
-
12
-
13
-
14
-
15
-
16
-
17
-
18
-
19
-
20
-
21
-
22
-
23
-
24
-
25
-
26
-
27
-
28
-
29
-
30
-
31
-
32
-
33
-
34
-
35
-
36
-
37
-
38
-
39
-
40
-
41
-
42
-
43
-
44
-
45
-
46
-
47
-
48
-
49
-
50
-
51
-
52
-
53
-
54
-
55
-
56
-
57
-
58
-
59
-
60
-
61
-
62
-
63
-
64
-
65
-
66
-
67
-
68
-
69
-
70
-
71
-
72
-
73
-
74
-
75
-
76
-
77
-
78
-
79
-
80
-
81
-
82
-
83
-
84
-
85
-
86
-
87
-
88
-
89
-
90
-
91
-
92
-
93
-
94
-
95
-
96
-
97
-
98
-
99
-
100
-
101
-
102
-
103
-
104
-
105
-
106
-
107
-
108
-
109
-
110
-
111
-
112
-
113
-
114
-
115
-
116
-
117
-
118
-
119
-
120
-
121
-
122
-
123
-
124
-
125
-
126
-
127
-
128
-
129
-
130
-
131
-
132
-
133
-
134
-
135
-
136
-
137
-
138
-
139
-
140
-
141
-
142
-
143
-
144
-
145
-
146
-
147
-
148
-
149
-
150
-
151
-
152
-
153
-
154
 |
 |
www.dell.com | support.dell.com
Dell™ Dimension™ XPS
headphone
connector
microphone
connector
USB 2.0
connectors (2)
IEEE 1394
connector
PCI card (4), PCI Express
x1 card (1), PCI Express
x16 card (1) slots
serial port
parallel port
diagnostic lights
keyboard connector
USB 2.0
connectors (6)
VGA video connector
cover latch release
fans (2)
network adapter connector
security cable slot
fans (2)
sound card connectors
padlock ring
modem connector
power connector
DVI video connector
mouse connector
TV-OUT connector*
Model WHL
*Not present on all computers.