Dell XPS Gen 4 Owner's Manual - Page 108
Front Panel, Removing the Front Panel
 |
View all Dell XPS Gen 4 manuals
Add to My Manuals
Save this manual to your list of manuals |
Page 108 highlights
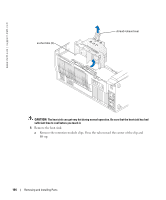
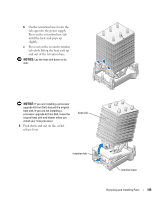
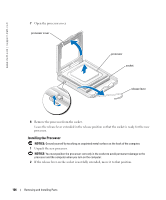
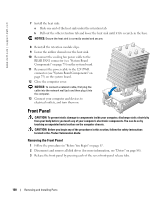
www.dell.com | support.dell.com 7 Install the heat sink: a Slide one end of the heat sink under the retention tab. b Pull out the other retention tab and lower the heat sink until it fits securely in the base. NOTICE: Ensure the heat sink is correctly seated and secure. 8 Reinstall the retention module clips. 9 Lower the airflow shroud over the heat sink. 10 Reconnect the cooling fan power cable to the REAR FAN1 connector (see "System Board Components" on page 75) on the system board. 11 Reconnect the power cable to the 12V PWR connector (see "System Board Components" on page 75) on the system board. 12 Close the computer cover. NOTICE: To connect a network cable, first plug the cable into the network wall jack and then plug it into the computer. 13 Connect your computer and devices to electrical outlets, and turn them on. Front Panel CAUTION: To prevent static damage to components inside your computer, discharge static electricity from your body before you touch any of your computer's electronic components. You can do so by touching an unpainted metal surface on the computer chassis. CAUTION: Before you begin any of the procedures in this section, follow the safety instructions located in the Product Information Guide. Removing the Front Panel 1 Follow the procedures in "Before You Begin" on page 67. 2 Disconnect and remove all disk drives (for more information, see "Drives" on page 88). 3 Release the front panel by pressing each of the seven front-panel release tabs. 108 Removing and Installing Parts
-
 1
1 -
2
-
3
-
4
-
5
-
6
-
7
-
8
-
9
-
10
-
11
-
12
-
13
-
14
-
15
-
16
-
17
-
18
-
19
-
20
-
21
-
22
-
23
-
24
-
25
-
26
-
27
-
28
-
29
-
30
-
31
-
32
-
33
-
34
-
35
-
36
-
37
-
38
-
39
-
40
-
41
-
42
-
43
-
44
-
45
-
46
-
47
-
48
-
49
-
50
-
51
-
52
-
53
-
54
-
55
-
56
-
57
-
58
-
59
-
60
-
61
-
62
-
63
-
64
-
65
-
66
-
67
-
68
-
69
-
70
-
71
-
72
-
73
-
74
-
75
-
76
-
77
-
78
-
79
-
80
-
81
-
82
-
83
-
84
-
85
-
86
-
87
-
88
-
89
-
90
-
91
-
92
-
93
-
94
-
95
-
96
-
97
-
98
-
99
-
100
-
101
-
102
-
 103
103 -
 104
104 -
 105
105 -
 106
106 -
 107
107 -
 108
108 -
 109
109 -
 110
110 -
 111
111 -
 112
112 -
 113
113 -
114
-
115
-
116
-
117
-
118
-
119
-
120
-
121
-
122
-
123
-
124
-
125
-
126
-
127
-
128
-
129
-
130
-
131
-
132
-
133
-
134
-
135
-
136
-
137
-
138
-
139
-
140
-
141
-
142
-
143
-
144
-
145
-
146
-
147
-
148
-
149
-
150
-
151
-
152
-
153
-
154
 |
 |
