Denon DCM-65 Owners Manual - Page 7
ENGLISH, Control Input Connector CONTROL IN DCM-65 only - manual
 |
View all Denon DCM-65 manuals
Add to My Manuals
Save this manual to your list of manuals |
Page 7 highlights
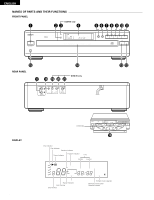
ENGLISH q Power Switch (POWER) • Press this button to switch on the power. w Remote Control Receptor (REMOTE SENSOR) • This receptor receives infrared signals from the wireless remote control unit. • Aim the wireless remote control unit at this receptor window when operating it. e HDCD Indicator (DCM-65 only) • This lights when an HDCD-compatible disc is playing. r Display Window • The Disc No., Track No., playing time and other information are displayed in the display window. t Repeat Button (REPEAT) • Press this button for repeated playback. The REPEAT indicator appears on the display. The following three types of repeat modes are available. • When pressed once, the REPEAT and 1 indicators light and the track currently playing is repeated. • When pressed again, the REPEAT and 1 DISC indicators light and all the tracks on the disc currently playing are repeated. • When pressed again, the REPEAT , ALL and DISC indicators light and all the discs currently set on the tray are repeated. • When pressed again, the REPEAT , ALL and DISC indicators turn off and the repeat mode is cancelled. The repeat function can also be used during programmed and random playback, but in this case only the all repeat ( ALL and DISC indicator) mode is available. (Refer to page 11 for details.) y Program Button (PROG) • Press this button when you want to enter tracks for programmed playback. (Refer to page 10 for details.) u Automatic/Manual Search Reverse Button (8/6) • Press this button to return the pickup to the beginning of the present track. Press again to return to other tracks. • By pressing the button a number of times, the pickup will move back the corresponding number of tracks. • Keep on pressing this button for more than 0.5 seconds during playback for fast reverse search. As long as the button is kept pressed, music signals are played back faster than normal. • Keep on pressing this button for more than 5 seconds, reverse search becomes approximately 4 times faster. i Automatic/Manual Search Forward Button (7/9) • Press this button to move the pickup forward to the beginning of the next track. Press again to move ahead to other tracks. • By pressing the button a number of times, the pickup will advance the corresponding number of tracks. • Keep on pressing this button for more than 0.5 seconds during playback for fast forward search. As long as the button is kept pressed, music signals are played back faster than normal. • Keep on pressing this button for more than 5 seconds, forward search becomes approximately 4 times faster. o Stop Button (2 STOP) • Press this button to stop play. !0 Pause Button (3 PAUSE) • Press this button to stop play temporarily. • Pressing the Pause button during play stops play temporarily. The 1 indicator goes off and the 3 indicator lights up. • To cancel the Pause state, press either the Play button !1 or the Pause button !0 a second time. !1 Play Button (1 PLAY) • Press this button to play a disc. The 1 indicator lights up when the button is pressed, the number of the disc and the track being played is displayed by the Disc Number and Track No. indicator, and the amount of elapsed time for the current track is displayed by the Time indicator. • The 1 indicator goes off after playing of the final track of the final disc is finished and the player stops. !2 Disc Skip Button (DISC SKIP) • Each time this button is pressed, the carousel will rotate in a clockwise direction to the next tray position. This allows for loading or unloading of discs. This button is also used to select the next disc, in the normal play continuously. !3 Open/Close Button (5 OPEN/CLOSE) • Press this button when opening. • The drawer is opened toward the front. • Press the button again to close the drawer. !4 Loading Drawer • Discs can be loaded and unloaded when this drawer is open. Do not force the drawer closed by hand. !5 Headphone Jack (PHONES) • Insert the jack of the headphones when desiring to listen to a disc privately. (Headphones are sold separately.) !6 Disc Trays (1 ~ 5) • One disc per tray can be loaded. !7 Output Terminal (LINE OUT) • Connect the connection cords from these terminals to the amplifier's input terminals. (Refer to page 9 for connections.) !8 SYNCHRO Jack (SYNCHRO) • To make a synchronized recording, this jack must be connected to the SYNCHRO jack of the deck with a connection cord. (Refer to page 9 for connections.) !9 Control Input Connector (CONTROL IN) (DCM-65 only) • This is the input connector for wired remote control. Consult your DENON dealer if you wish to use this connector. @0 Control Output Connector (CONTROL OUT) (DCM-65 only) • This is the output connector for wired remote control. Consult your DENON dealer if you wish to use this connector. @1 Digital Audio Output Connector (COAXIAL) (DCM-65 only) • Connect a commercially available 75 Ω/ohms pin-plug cord. • Digital data is output from this connector. Continuous Button Operation If the automatic/manual search reverse button u or the automatic/manual search forward button i are held in, the function of that button will be repeated. 7
-
 1
1 -
 2
2 -
 3
3 -
 4
4 -
 5
5 -
 6
6 -
 7
7 -
 8
8 -
 9
9 -
 10
10 -
 11
11 -
 12
12 -
13
-
14
-
15
-
16
-
17
-
18
-
19
-
20
-
21
-
22
-
23
-
24
-
25
-
26
-
27
-
28
-
29
-
30
-
31
-
32
-
33
-
34
-
35
-
36
-
37
-
38
 |
 |