Dewalt DW715 Instruction Manual - Page 8

MAINTENANCE, Repairs, Three Year Limited Warranty - manual

Page 8 highlights

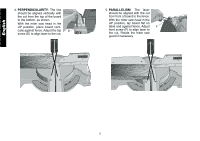
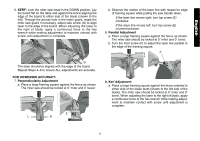
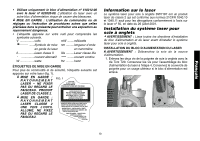
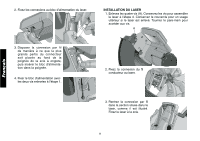
English b. Align the blade with the framing square. Turn the side screw (G) to adjust laser line to edge of framing square/blade. G NOTE: Repeat Steps 7-9 to ensure accuracy throughout the travel of the chop stroke. 10. Remove the trigger lock (C) and replace in LPS. Reattach the 2.5 mm hex wrench (D) in LPS. C D • Carefully clean sawdust and debris from laser lens with a cotton swab. • DO NOT use solvents of any kind, they may damage the lens. • Avoid touching any sharp points of the blade with your hands or fingers. • Dust build-up can block the laser and prevent it from accurately indicating the line of cut. • Follow miters saw's instruction manual to remove and install blade. • With blade removed from saw, clean pitch and build-up from blade. Pitch and debris can interfere with the laser and prevent it from accurately indicating the line of cut. SPECIFICATIONS Light Source Semiconductor laser diode Laser Wavelength 630 - 680 nm Visible Laser Power

  • 1
  • 2
  • 3
  • 4
  • 5
  • 6
  • 7
  • 8
  • 9
  • 10
  • 11
  • 12
  • 13
  • 14
  • 15
  • 16
  • 17
  • 18
  • 19
  • 20
  • 21
  • 22
  • 23
  • 24
  • 25
  • 26
  • 27
  • 28

English
7
b. Align the blade with the framing square. Turn the side
screw (G) to adjust laser line to edge of framing
square/blade.
NOTE:
Repeat Steps 7–9 to ensure accuracy throughout the
travel of the chop stroke.
10. Remove the trigger lock (C) and replace in LPS. Reattach
the 2.5 mm hex wrench (D) in LPS.
MAINTENANCE
WARNING:
Disconnect the saw from the power source.
For the best laser performance, perform the following mainte-
nance regularly.
D
C
C
D
G
Carefully clean sawdust and debris from laser lens with a cot-
ton swab.
• DO NOT use solvents of any kind, they may damage the
lens.
Avoid touching any sharp points of the blade with your hands
or fingers.
Dust build-up can block the laser and prevent it from accu-
rately indicating the line of cut.
Follow miters saw’s instruction manual to remove and install
blade.
With blade removed from saw, clean pitch and build-up from
blade. Pitch and debris can interfere with the laser and
prevent it from accurately indicating the line of cut.
Repairs
To assure product SAFETY and RELIABILITY, repairs, main-
tenance and adjustment (including brush inspection and
replacement) should be performed by authorized service
centers or other qualified service organizations, always using
identical replacement parts.
Three Year Limited Warranty
D
E
WALT will repair, without charge, any defects due to faulty
materials or workmanship for three years from the date of
purchase. This warranty does not cover part failure due to
SPECIFICATIONS
Light Source
Semiconductor laser diode
Laser Wavelength
630 – 680 nm Visible
Laser Power
<1mw (each beam) CLASS 2
LASER PRODUCT
Power Supply
Input: 120–240V AC; 50/60Hz
Output: 3–3.6V DC max.
Operating Temperature
32°F to 104°F (0°C to 40°C)
Storage Temperature
0°F to 185°F (-40°C to 85°C)
Environmental
Water Resistant