Dymo Rhino 6000 Industrial Label Printer Quick Start Guide - Page 6
Connecting the printer to your computer, Installing the Software
 |
View all Dymo Rhino 6000 Industrial Label Printer manuals
Add to My Manuals
Save this manual to your list of manuals |
Page 6 highlights
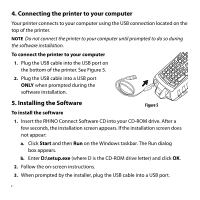
4. Connecting the printer to your computer Your printer connects to your computer using the USB connection located on the top of the printer. NOTE Do not connect the printer to your computer until prompted to do so during the software installation. To connect the printer to your computer 1. Plug the USB cable into the USB port on the bottom of the printer. See Figure 5. 2. Plug the USB cable into a USB port ONLY when prompted during the software installation. 5. Installing the Software Figure 5 To install the software 1. Insert the RHINO Connect Software CD into your CD-ROM drive. After a few seconds, the installation screen appears. If the installation screen does not appear: a. Click Start and then Run on the Windows taskbar. The Run dialog box appears. b. Enter D:\setup.exe (where D is the CD-ROM drive letter) and click OK. 2. Follow the on-screen instructions. 3. When prompted by the installer, plug the USB cable into a USB port. 4
-
 1
1 -
 2
2 -
 3
3 -
 4
4 -
 5
5 -
 6
6 -
 7
7 -
 8
8 -
 9
9
 |
 |
