Electrolux E23BC69SPS Complete Owners Guide English - Page 10
Shelf features, select models
 |
View all Electrolux E23BC69SPS manuals
Add to My Manuals
Save this manual to your list of manuals |
Page 10 highlights
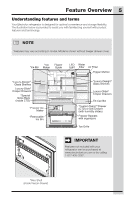
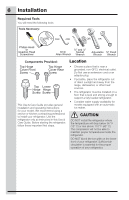
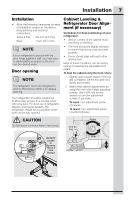
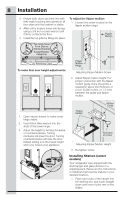
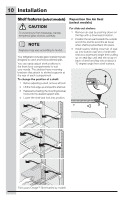
10 Installation Shelf features (select models) CAUTION To avoid injury from breakage, handle tempered glass shelves carefully. NOTE Features may vary according to model. Your refrigerator includes glass shelves that are designed to catch and hold accidental spills. You can easily adjust shelf positions in the fresh food compartments to suit your needs. The shelves have mounting brackets that attach to slotted supports at the rear of each compartment. To change the position of a shelf: 1 Before adjusting a shelf, remove all food. 2 Lift the front edge up and pull the shelf out. 3 Replace by inserting the mounting bracket hooks into the desired support slots. 4 Lower the shelf and lock into position. Reposition the Air Seal (select models) For slide-out shelves: 1 Remove air seal by pushing down on the flap with a downward rotation. 2 Position the air seal towards the outside end of the shelf to avoid the air tower when shelf is pushed back into place. 3 Install seal by sliding lower tab of seal up into bottom rear slot of shelf with seal at a downward angle then pulling up on seal flap until seal sits snug on back of shelf and flap sits at about a 10 degree angle from shelf surface. Full Luxury-DesignTM Shelf (varies by model)
-
 1
1 -
2
-
3
-
4
-
 5
5 -
 6
6 -
 7
7 -
 8
8 -
 9
9 -
 10
10 -
 11
11 -
 12
12 -
 13
13 -
 14
14 -
 15
15 -
16
-
17
-
18
-
19
-
20
-
21
-
22
-
23
-
24
-
25
-
26
-
27
-
28
-
29
-
30
-
31
-
32
-
33
-
34
-
35
-
36
-
37
-
38
-
39
-
40
-
41
-
42
-
43
 |
 |
