Epson 2190N User Manual - Remote Configuration Manager
Epson 2190N - FX B/W Dot-matrix Printer Manual
 |
UPC - 010343850026
View all Epson 2190N manuals
Add to My Manuals
Save this manual to your list of manuals |
Epson 2190N manual content summary:
- Epson 2190N | User Manual - Remote Configuration Manager - Page 1
convenient in a multi-printer network environment; individual configuration files can be created for each printer's specific application requirements. The program works on these printers: ❏ FX-880+ ❏ FX-880+ in Okidata® mode ❏ FX-1180+ ❏ FX-890 ❏ FX-890 in Okidata mode ❏ FX-2190 ❏ FX-2190 in Okidata - Epson 2190N | User Manual - Remote Configuration Manager - Page 2
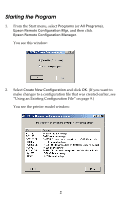
Mgr, and then click Epson Remote Configuration Manager. You see this window: 2. Select Create New Configuration and click OK. (If you want to make changes to a configuration file that was created earlier, see "Using an Existing Configuration File" on page 9.) You see the printer model window: 2 - Epson 2190N | User Manual - Remote Configuration Manager - Page 3
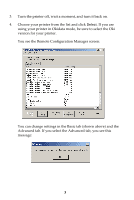
from the list and click Select. If you are using your printer in Okidata mode, be sure to select the Oki version for your printer. You see the Remote Configuration Manager screen: You can change settings in the Basic tab (shown above) and the Advanced tab. If you select the Advanced tab, you see - Epson 2190N | User Manual - Remote Configuration Manager - Page 4
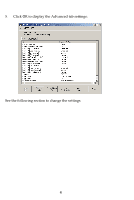
5. Click OK to display the Advanced tab settings: See the following section to change the settings. 4 - Epson 2190N | User Manual - Remote Configuration Manager - Page 5
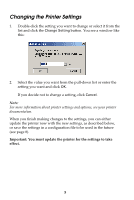
click Cancel. Note: For more information about printer settings and options, see your printer documentation. When you finish making changes to the settings, you can either update the printer now with the new settings, as described below, or save the settings in a configuration file to be used in the - Epson 2190N | User Manual - Remote Configuration Manager - Page 6
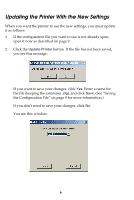
as described on page 9. 2. Click the Update Printer button. If the file has not been saved, you see this message: If you want to save your changes, click Yes. Enter a name for the file (keeping the extension .cfg), and click Save. (See "Saving the Configuration File" on page 8 for more information - Epson 2190N | User Manual - Remote Configuration Manager - Page 7
to update the printer. Note: You may need to click the Update button again (step 2). You see this window: 4. Click OK. The control panel lights flash and the print head moves to show that the settings have been changed. The new settings remain in effect until you select another configuration file or - Epson 2190N | User Manual - Remote Configuration Manager - Page 8
File If you want to save the changes you have made to the printer settings in a configuration file, do one of the following: ❏ To save a new configuration file or overwrite the current one with the new settings, click Save Configuration. If you are making changes to an existing file, the new - Epson 2190N | User Manual - Remote Configuration Manager - Page 9
open it to: ❏ Check its settings ❏ Change one or more settings ❏ Update the printer with the configuration file settings Follow these steps: 1. Start the Remote Configuration Manager. 2. When you see the first screen (shown below), click the Open Existing Configuration button and click OK. You see - Epson 2190N | User Manual - Remote Configuration Manager - Page 10
Choose the file you want to open and click Select. You see the EPSON Remote Configuration Manager screen, shown on page 3. Now you can change any settings, if necessary. If you want to save your changes, click the Save Configuration button or select Save As from the file menu. 4. When you are ready - Epson 2190N | User Manual - Remote Configuration Manager - Page 11
change the printer's settings from a DOS system, you can create a binary file. First make the changes to the printer . No part of this EPSON printers. EPSON is not responsible for any use of this information as applied to other printers. Trademarks EPSON is a registered trademark of SEIKO EPSON
-
 1
1 -
 2
2 -
 3
3 -
 4
4 -
 5
5 -
 6
6 -
 7
7 -
8
-
9
-
10
-
11
 |
 |

1
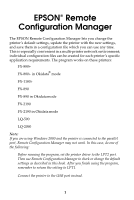
EPSON Remote
Configuration Manager
The EPSON Remote Configuration Manager lets you change the
printer’s default settings, update the printer with the new settings,
and save them in a configuration file which you can use any time.
This is especially convenient in a multi-printer network environment;
individual configuration files can be created for each printer’s specific
application requirements. The program works on these printers:
FX-880+
FX-880+ in Okidata
®
mode
FX-1180+
FX-890
FX-890 in Okidata mode
FX-2190
FX-2190 in Okidata mode
LQ-590
LQ-2090
Note:
If you are using Windows 2000 and the printer is connected to the parallel
port, Remote Configuration Manager may not work. In this case, do one of
the following:
Before running the program, set the printer driver to the LPT2 port.
Then use Remote Configuration Manager to check or change the default
settings as described in this book. After you finish using the program,
remember to return the setting to LPT1.
Connect the printer to the USB port instead.
®