Epson C11C558001 User Manual - Page 25
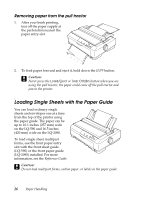
Paper Handling, Never use the knob to adjust the top-of-form position; this may, damage the printer
 |
UPC - 010343850040
View all Epson C11C558001 manuals
Add to My Manuals
Save this manual to your list of manuals |
Page 25 highlights
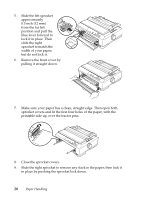
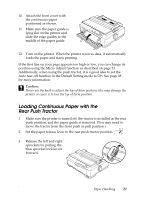
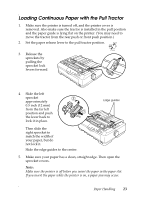
10. If you load paper in the front slot, reattach the front cover. If you have the LQ-2090, remove the sub cover from the front cover before replacing the front cover. Be sure to reattach the sub cover when you want to print from a different paper source. 11. Turn on the printer. 12. Remove any slack in the paper by pressing the LF/FF button. When the printer receives data, it will start printing at the current position without advancing the paper. If necessary, adjust the top of form position using the Micro Adjust function (see page 33). c Caution: Never use the knob to adjust the top-of-form position; this may damage the printer or cause it to lose the top-of-form position. 13. Attach the printer cover by inserting the front tabs into the slots, then lowering the cover into place. Close the paper guide cover. 14. Send a print job to the printer. The printer starts printing from the top-of-form position. After you finish printing, open the paper guide cover and tear off the printed document at the perforation nearest the paper exit slot. Paper Handling 25
-
 1
1 -
2
-
3
-
4
-
5
-
6
-
7
-
8
-
9
-
10
-
11
-
12
-
13
-
14
-
15
-
16
-
17
-
18
-
19
-
 20
20 -
 21
21 -
 22
22 -
 23
23 -
 24
24 -
 25
25 -
 26
26 -
 27
27 -
 28
28 -
 29
29 -
 30
30 -
31
-
32
-
33
-
34
-
35
-
36
-
37
-
38
-
39
-
40
-
41
-
42
-
43
-
44
-
45
-
46
-
47
-
48
 |
 |
