Epson C11CA73201 Quick Guide - Page 26
Printing With a Macintosh
 |
View all Epson C11CA73201 manuals
Add to My Manuals
Save this manual to your list of manuals |
Page 26 highlights
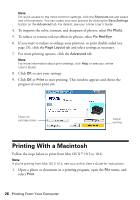
Note: For quick access to the most common settings, click the Shortcuts tab and select one of the presets. You can create your own presets by clicking the Save Settings button on the Advanced tab. For details, see your online User's Guide. 4. To improve the color, contrast, and sharpness of photos, select Fix Photo. 5. To reduce or remove red-eye effects in photos, select Fix Red-Eye. 6. If you want to reduce or enlarge your printout, or print double-sided (see page 25), click the Page Layout tab and select settings as necessary. 7. For more printing options, click the Advanced tab. Note: For more information about print settings, click Help or see your online User's Guide. 8. Click OK to save your settings. 9. Click OK or Print to start printing. This window appears and shows the progress of your print job. Check ink cartridge status Cancel printing Printing With a Macintosh Follow the steps below to print from Mac OS X ® 10.5 to 10.6. Note: If you're printing from Mac OS X 10.4, see your online User's Guide for instructions. 1. Open a photo or document in a printing program, open the File menu, and select Print. 26 Printing From Your Computer
-
 1
1 -
2
-
3
-
4
-
5
-
6
-
7
-
8
-
9
-
10
-
11
-
12
-
13
-
14
-
15
-
16
-
17
-
18
-
19
-
20
-
 21
21 -
 22
22 -
 23
23 -
 24
24 -
 25
25 -
 26
26 -
 27
27 -
 28
28 -
 29
29 -
 30
30 -
 31
31 -
32
-
33
-
34
-
35
-
36
-
37
-
38
-
39
-
40
-
41
-
42
-
43
-
44
-
45
-
46
-
47
-
48
-
49
-
50
-
51
-
52
-
53
-
54
-
55
-
56
-
57
-
58
-
59
-
60
-
61
-
62
-
63
-
64
-
65
-
66
-
67
-
68
 |
 |
