Epson CX4800 Quick Reference Guide
Epson CX4800 - Stylus Color Inkjet Manual
 |
UPC - 010343855090
View all Epson CX4800 manuals
Add to My Manuals
Save this manual to your list of manuals |
Epson CX4800 manual content summary:
- Epson CX4800 | Quick Reference Guide - Page 1
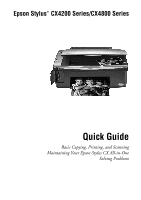
Epson Stylus® CX4200 Series/CX4800 Series Quick Guide Basic Copying, Printing, and Scanning Maintaining Your Epson Stylus CX All-in-One Solving Problems - Epson CX4800 | Quick Reference Guide - Page 2
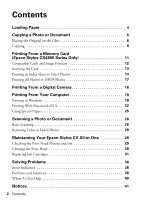
Photo or Document 26 Basic Scanning 26 Restoring Color in Faded Photos 28 Maintaining Your Epson Stylus CX All-in-One 29 Checking the Print Head Nozzles and Ink 29 Cleaning the Print Head 30 Replacing Ink Cartridges 31 Solving Problems 36 Error Indicators 36 Problems and Solutions 38 Where - Epson CX4800 | Quick Reference Guide - Page 3
about your Epson Stylus CX. Tip: Tips contain hints for better copying, scanning, and printing. Note: The illustrations in this guide show the Epson Stylus CX4800 Series all-in-one and its software, but the instructions are the same for the Epson Stylus CX4200 Series all-in-one except where - Epson CX4800 | Quick Reference Guide - Page 4
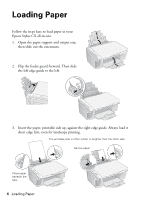
Loading Paper Follow the steps here to load paper in your Epson Stylus CX all-in-one. 1. Open the paper support and output tray, then slide out the extensions. 2. Flip the feeder guard forward. Then slide the left edge guide to the left. 3. Insert the paper, printable side up, against the right edge - Epson CX4800 | Quick Reference Guide - Page 5
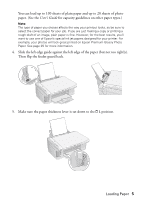
, for the best results, you'll want to use one of Epson's special ink jet papers designed for your printer. For example, your photos will look great printed on Epson Premium Glossy Photo Paper. See page 25 for more information. 4. Slide the left edge guide against the left edge of the paper (but not - Epson CX4800 | Quick Reference Guide - Page 6
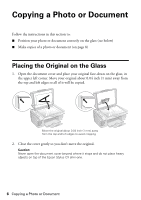
Photo or Document Follow the instructions in this section to: ■ Position your photo or document correctly on the glass (see below) ■ Make copies of a photo or document (on page 8) Placing the Original on not place heavy objects on top of the Epson Stylus CX all-in-one. 6 Copying a Photo or Document - Epson CX4800 | Quick Reference Guide - Page 7
can remove the document cover. Just open it and pull it straight up. If you need to press the document flat while you copy or scan it, do not press too hard and be careful not to move it. Caution: Do not use excessive force on the document cover, and do - Epson CX4800 | Quick Reference Guide - Page 8
to fit the loaded paper size, press the Fit to Page button. 8. To make a color copy, press the x Start Color button. To make a black and white copy, press the x Start B&W button. The P On light flashes and after a moment the Epson Stylus CX starts printing. If you need to stop copying at any time - Epson CX4800 | Quick Reference Guide - Page 9
the Fit to Page button. Otherwise, photos are printed with a .06-inch (1.5 mm) border. 8. To make a color copy, press the x Start Color button. To make a black and white copy, press the x Start B&W button. The P On light flashes and after a moment the Epson Stylus CX starts printing. If you need - Epson CX4800 | Quick Reference Guide - Page 10
page 6. Be sure to close the document cover. 3. Press the Copy button until you see "-" in the Copy window. This tells the Epson Stylus CX to print Start Color or x Start B&W button. The Epson Stylus CX makes copies until it runs out of paper. Then the red b Error light comes on. 8. To make more - Epson CX4800 | Quick Reference Guide - Page 11
" on page 13 ■ "Printing an Index Sheet to Select Photos" on page 14 ■ "Printing All Photos or DPOF Photos" on page 17 For instructions on copying memory card files between your Epson Stylus CX4800 Series and a computer or other device, see the User's Guide. Printing From a Memory Card (Epson Stylus - Epson CX4800 | Quick Reference Guide - Page 12
, DOS FAT (FAT 12 or 16, one partition) taken with a DCF version 1.0 or 2.0 compliant digital camera Supports Exif version 2.21 80 × 80 pixels to 9200 × 9200 pixels Up to 999 * DCF is the "Design rule for Camera File system" standard 12 Printing From a Memory Card (Epson Stylus CX4800 Series Only) - Epson CX4800 | Quick Reference Guide - Page 13
Inserting the Card 1. Make sure the Epson Stylus CX4800 Series all-in-one is turned on. Note: When you print directly from a memory card, it is best if the Epson Stylus CX4800 Series is not connected to your computer (or your computer should be turned off). 2. Open the memory card door. 3. Make - Epson CX4800 | Quick Reference Guide - Page 14
pages to be printed. 3. Insert the memory card if it is not already in the slot (see page 13). 4. Press the Memory Card button one or more times until the Print Index Sheet light comes on. 5. Make sure Plain Paper and Letter are selected. 14 Printing From a Memory Card (Epson Stylus CX4800 Series - Epson CX4800 | Quick Reference Guide - Page 15
each selected photo and mark the sheet carefully; once it has been scanned you will not be able to change your selections. Note: If you want one copy of all the photos on the index sheet, fill in the ALL oval at the top of the page. Printing From a Memory Card (Epson Stylus CX4800 Series Only) 15 - Epson CX4800 | Quick Reference Guide - Page 16
5"x 7" for the paper size. 8. Press the x Start Color button to start printing. Note: If you need to stop printing, press the y Stop button. 9. When you are done printing, remove the memory card by pulling it straight out of its slot. 16 Printing From a Memory Card (Epson Stylus CX4800 Series Only) - Epson CX4800 | Quick Reference Guide - Page 17
5"x 7" for the paper size. 6. Press the x Start Color button to start printing. Note: If you need to stop printing, press the y Stop button. 7. When you are done printing, remove the memory card by pulling it straight out of its slot. Printing From a Memory Card (Epson Stylus CX4800 Series Only) 17 - Epson CX4800 | Quick Reference Guide - Page 18
photos as explained in your camera manual. Note: If your camera is not supported, a flashing P appears in the Copy window, and the b Error light flashes. (On the Epson Stylus CX4800 Series, the Print All/DPOF/ PictBridge light also flashes.) Epson cannot guarantee the compatibility of any camera - Epson CX4800 | Quick Reference Guide - Page 19
page 25 Printing in Windows 1. Load paper (see page 4). 2. Open the photo or document in your application program. 3. Open the File menu and select Print. You see a window like this one: Select EPSON Stylus CX4200 Series or EPSON Stylus CX4800 Series Click here to open your printer software Printing - Epson CX4800 | Quick Reference Guide - Page 20
4. Make sure Epson Stylus CX4200 Series or Epson Stylus CX4800 Series is selected, then click the Preferences or Properties button. (If you see a Setup, Printer, or Options button, click it. Then click Preferences or Properties on the next screen.) 5. On the Main tab, select the basic print settings - Epson CX4800 | Quick Reference Guide - Page 21
, click the Page Layout tab and select settings as necessary. 8. Click OK to save your settings, then click OK or Print to start printing. This window appears and shows the progress of your print job. Cancel printing Pause or resume printing Check remaining ink levels Printing From Your Computer - Epson CX4800 | Quick Reference Guide - Page 22
) option in the Paper Size list for your paper size (US Letter, 8 x 10, 5 x 7, or 4 x 6). 4. Click OK to close the Page Setup window. 5. Select Print from the File menu. You see a window like this one: Select Stylus CX4200 or Stylus CX4800 Select Print Settings 22 Printing From Your Computer - Epson CX4800 | Quick Reference Guide - Page 23
and select the following settings as necessary: Select your Media Type (see page 25) Select Color or Black ink Select higher quality or faster printing (if available) Select Automatic mode Note: For more information about printer settings, click the ? button. 7. Depending on your settings, you can - Epson CX4800 | Quick Reference Guide - Page 24
click the Print Center icon instead, then double-click Stylus CX4200 or Stylus CX4800 in the Printer List window. You see a screen like this: Pause printing Resume printing Cancel printing Select the print job 11. When you're finished, close the printer window or Print Center. 24 Printing From - Epson CX4800 | Quick Reference Guide - Page 25
Media Type (see page 23) setting in your printer software: For this paper Epson Ultra Premium Glossy Photo Paper Plain paper or Epson Premium Bright White Paper Envelopes Epson Matte Paper Heavyweight Epson Double-Sided Matte Paper Epson Photo Quality Ink Jet Paper Epson Premium Glossy Photo Paper - Epson CX4800 | Quick Reference Guide - Page 26
use your Epson Stylus CX all-in-one to scan a photo or document and save it on your computer or other device, or to fax or e-mail it to someone else. You can even automatically restore faded color photographs as you scan. See page 28 for details. The EPSON Scan software provides three scanning modes - Epson CX4800 | Quick Reference Guide - Page 27
or Epson Stylus CX4800 Series. You see the EPSON Scan standby window: 4. If the Mode setting in the upper right corner is set to Full Auto Mode, click the Scan button. Note: If you want to automatically restore a color photo as you scan, click the Customize button and see page 28 for instructions - Epson CX4800 | Quick Reference Guide - Page 28
one with true-to-life color and sharpness as you scan. Look for the Color Restoration option in EPSON Scan's Scan. Note: For details on using Home or Professional Mode, or for more information about Full Auto Mode settings, see the on-screen User's Guide. You can also click Help on the EPSON Scan - Epson CX4800 | Quick Reference Guide - Page 29
Your Epson Stylus CX All-in-One If you notice a decline in print quality, follow the instructions in this chapter for: ■ "Checking the Print Head Nozzles and Ink" (below) ■ "Cleaning the Print Head" on page 30 ■ "Replacing Ink Cartridges" on page 31 Checking the Print Head Nozzles and Ink If - Epson CX4800 | Quick Reference Guide - Page 30
still does not improve, one of the ink cartridges may be old or damaged and needs to be replaced; see page 31. Tip: If you do not use your Epson Stylus CX often, it is a good idea to print a few pages at least once a month to maintain good print quality. 30 Maintaining Your Epson Stylus CX All-in - Epson CX4800 | Quick Reference Guide - Page 31
printed, print settings, paper type, frequency of use, and temperature. The printer ships with full cartridges and part of the ink from the first cartridges is used for priming the printer. 1. Make sure the Epson Stylus CX is on. 2. Make sure that the document cover is closed, then open the scanner - Epson CX4800 | Quick Reference Guide - Page 32
or the printer will start to clean the print head. Caution: Do not move the print head by hand; this may damage the Epson Stylus CX. Always press the B ink button to move it. 4. Press the B ink button again. ■ If more than one cartridge is empty or low, the next cartridge moves to the _ ink out mark - Epson CX4800 | Quick Reference Guide - Page 33
package, shake it four or five times. Then remove it from the package. Caution: Do not remove or tear the label on the cartridge; otherwise, ink will leak. Do not touch the green chip on the front of the cartridge. This can damage the ink cartridge. Maintaining Your Epson Stylus CX All-in-One 33 - Epson CX4800 | Quick Reference Guide - Page 34
Place the new ink cartridge into the cartridge holder and push it down until it clicks into place. 8. Replace any other cartridges that need to be replaced. 9. Close the ink cartridge cover and press it until it clicks into place. 10. Close the scanner. 34 Maintaining Your Epson Stylus CX All-in-One - Epson CX4800 | Quick Reference Guide - Page 35
Stylus CX while the P On light is flashing or you'll waste ink. Note: If the B ink light stays on (not flashing), the ink cartridge may not be installed correctly. Press the B ink button again and reinstall the ink cartridge until it clicks into place. Maintaining Your Epson Stylus CX All-in-One - Epson CX4800 | Quick Reference Guide - Page 36
you have a problem with your Epson Stylus CX all-inone, check the lights on the control panel and the number or letter in the Copy window to diagnose the cause. You can also check "Problems and Solutions" on page 38 for basic troubleshooting suggestions, or double-click the User's Guide icon on your - Epson CX4800 | Quick Reference Guide - Page 37
Light: status Copy window status Cause Solution b Error: Flashing 1 Memory Card (all 3 lights): Flashing (Epson Stylus CX4800 Series only) A memory card is inserted that is not supported by the Epson Stylus CX4800 Series. Remove the incompatible memory card; see page 12. The inserted memory - Epson CX4800 | Quick Reference Guide - Page 38
're having trouble using your Epson Stylus CX allin-one. Copying Problems ■ Make paper). See the User's Guide for more information. ■ If paper is jammed, the red b Error light flashes. Follow these inside the Epson Stylus CX, press the P On button to turn it off. Open the scanner and remove any - Epson CX4800 | Quick Reference Guide - Page 39
the paper size and paper type settings on the control panel or in your printer software (see page 25). ■ For the best print quality, use Epson special paper (see page 25) and genuine Epson ink cartridges (see page 31). ■ Set the paper thickness lever to the m L position for most paper types. If - Epson CX4800 | Quick Reference Guide - Page 40
in the following table. Service World Wide Web Automated Telephone Services Access From the Internet, you can reach Epson Support at http://support.epson.com. At this site, you can download drivers and other files, look at product documentation, access troubleshooting information, and receive - Epson CX4800 | Quick Reference Guide - Page 41
using your Epson Stylus CX all-in-one, read and follow these safety instructions: ■ Be sure to follow all warnings and instructions marked on the Epson Stylus CX. ■ Use only the type of power source indicated on the Epson Stylus CX label. ■ Use only the power cord that comes with the Epson Stylus CX - Epson CX4800 | Quick Reference Guide - Page 42
hand inside the Epson Stylus CX or touch any cartridges during printing. ■ Install a new ink cartridge immediately after removing an empty one. Leaving cartridges uninstalled can dehydrate the print head and may prevent the Epson Stylus CX from printing. ■ If you remove an ink cartridge for later - Epson CX4800 | Quick Reference Guide - Page 43
, Epson has printers, fax machines, and copiers in an effort to reduce air pollution caused by power installed and used in accordance with the instructions, may cause harmful interference to radio is encouraged to try to correct the interference by one or more of the following measures: ■ Reorient - Epson CX4800 | Quick Reference Guide - Page 44
If this equipment has more than one interface connector, do not leave CPU Boards and Power Supplies used with Class B Personal Computers: We: Located at: Epson America, Inc. Epson Type of Product: Multifunction printer Model: C231B (Epson Stylus CX4200 Series) C231A (Epson Stylus CX4800 Series - Epson CX4800 | Quick Reference Guide - Page 45
Will Do To Correct Problems: Should your Epson printer prove defective during the warranty period, please call the Epson ConnectionSM at (562) 276-4382 (U.S.) or (905) 709-3839 (Canada) for warranty repair instructions and return authorization. An Epson service technician will provide telephone - Epson CX4800 | Quick Reference Guide - Page 46
, software problems, interaction with nonEpson products, or service other than by an Epson Authorized Servicer. Epson Authorized Reseller nearest you, visit our website at: www.epson.com. To find the Epson Customer Care Center nearest you, visit http://support.epson.com. You can also write to: Epson - Epson CX4800 | Quick Reference Guide - Page 47
cameras, scanners, and ink jet printers. Trademarks Epson and Epson Stylus are registered trademarks and Exceed Your Vision is a trademark of Seiko Epson Corporation. DURABrite is a registered trademark and Epson Connection, Epson Store, and SoundAdvice are service marks of Epson America, Inc - Epson CX4800 | Quick Reference Guide - Page 48
CPD-19831 Printed in XXXXXX XX.XX-XX XXX
-
 1
1 -
 2
2 -
 3
3 -
 4
4 -
 5
5 -
 6
6 -
 7
7 -
8
-
9
-
10
-
11
-
12
-
13
-
14
-
15
-
16
-
17
-
18
-
19
-
20
-
21
-
22
-
23
-
24
-
25
-
26
-
27
-
28
-
29
-
30
-
31
-
32
-
33
-
34
-
35
-
36
-
37
-
38
-
39
-
40
-
41
-
42
-
43
-
44
-
45
-
46
-
47
-
48
 |
 |
Epson Stylus
CX4200 Series/CX4800 Series
Quick Guide
Basic Copying, Printing, and Scanning
Maintaining Your Epson Stylus CX All-in-One
Solving Problems
®