Epson CX7800 Photo Projects Made Easy Without Using a Computer
Epson CX7800 - Stylus Color Inkjet Manual
 |
UPC - 010343855687
View all Epson CX7800 manuals
Add to My Manuals
Save this manual to your list of manuals |
Epson CX7800 manual content summary:
- Epson CX7800 | Photo Projects Made Easy Without Using a Computer - Page 1
- Epson CX7800 | Photo Projects Made Easy Without Using a Computer - Page 2
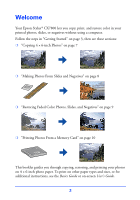
Color Photos, Slides, and Negatives" on page 9 ❍ "Printing Photos From a Memory Card" on page 10 This booklet guides you through copying, restoring, and printing your photos on 4 × 6-inch photo paper. To print on other paper types and sizes, or for additional instructions, see the Basics Guide or on - Epson CX7800 | Photo Projects Made Easy Without Using a Computer - Page 3
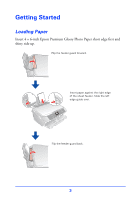
Getting Started Loading Paper Insert 4 × 6-inch Epson Premium Glossy Photo Paper short edge first and shiny side up. Flip the feeder guard forward. Insert paper against the right edge of the sheet feeder. Slide the left edge guide over. Flip the feeder guard back. 3 - Epson CX7800 | Photo Projects Made Easy Without Using a Computer - Page 4
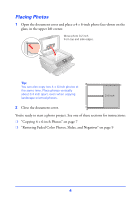
apart, even when copying landscape oriented photos. 0.4 inch 2 Close the document cover. You're ready to start a photo project. See one of these sections for instructions: ❍ "Copying 4 × 6-inch Photos" on page 7 ❍ "Restoring Faded Color Photos, Slides, and Negatives" on page 9 4 - Epson CX7800 | Photo Projects Made Easy Without Using a Computer - Page 5
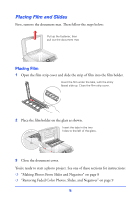
, then pull out the document mat. Placing Film 1 Open the film strip cover and slide the strip of film into the film holder. Insert the film under the tabs, with the . See one of these sections for instructions: ❍ "Making Photos From Slides and Negatives" on page 8 ❍ "Restoring Faded Color Photos - Epson CX7800 | Photo Projects Made Easy Without Using a Computer - Page 6
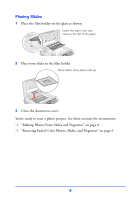
two holes to the left of the glass. 2 Place your slides in the film holder. Place slides shiny (base) side up. 3 Close the document cover. You're ready to start a photo project. See these sections for instructions: ❍ "Making Photos From Slides and Negatives" on page 8 ❍ "Restoring Faded Color Photos - Epson CX7800 | Photo Projects Made Easy Without Using a Computer - Page 7
can also restore faded color photos when copying. See "Restoring Faded Color Photos, Slides, and Negatives" on page 9 for details. 3 Press the x Start button the u or d Copies button to select the number of copies to print. 5 If necessary, press the paper type button to select Photo Paper and the - Epson CX7800 | Photo Projects Made Easy Without Using a Computer - Page 8
Restoring Faded Color Photos, Slides, and Negatives" on page 9 for details. 3 Press the x Start button to preview your photos on the LCD screen. 4 Press the l or r Photo/Options button to view your photos and the u or d Copies button to select the number of copies to print. 5 If necessary, press the - Epson CX7800 | Photo Projects Made Easy Without Using a Computer - Page 9
slides, your Epson Stylus CX7800 can bring them back to life using the color restoration feature. Before you begin, load paper and place your photo, negatives, or slides u or d Copies button to select the number of copies to print. 5 If necessary, press the paper type button to select Photo Paper and - Epson CX7800 | Photo Projects Made Easy Without Using a Computer - Page 10
Printing Photos From a Memory Card Before you begin, load paper as described in " Media xD-Picture Card* Memory Stick* SD Card* MultiMedia Card CompactFlash Microdrive *For a complete list of supported memory cards, see the table on page 11. The memory card light turns green when the card is - Epson CX7800 | Photo Projects Made Easy Without Using a Computer - Page 11
can use the following types of cards with your Epson Stylus CX7800: Slot Top slot Middle slot Bottom slot *Adapter the x Start button to start printing your photos. Note: To cancel printing, press the y Stop/Clear Settings button. Epson and Epson Stylus are registered trademarks and Exceed Your - Epson CX7800 | Photo Projects Made Easy Without Using a Computer - Page 12
CPD-20265 Printed in XXXXXX XX.XX-XX XXX
-
 1
1 -
 2
2 -
 3
3 -
 4
4 -
 5
5 -
 6
6 -
 7
7 -
8
-
9
-
10
-
11
-
12
 |
 |