Epson CX7800 Photo Projects Made Easy Without Using a Computer - Page 5
Placing Film and Slides, Placing Film
 |
UPC - 010343855687
View all Epson CX7800 manuals
Add to My Manuals
Save this manual to your list of manuals |
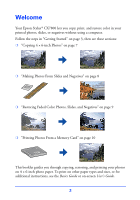
Page 5 highlights
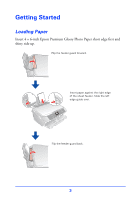
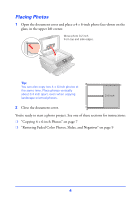
Placing Film and Slides First, remove the document mat. Then follow the steps below: Pull up the fastener, then pull out the document mat. Placing Film 1 Open the film strip cover and slide the strip of film into the film holder. Insert the film under the tabs, with the shiny (base) side up. Close the film strip cover. 2 Place the film holder on the glass as shown. Insert the tabs in the two holes to the left of the glass. 3 Close the document cover. You're ready to start a photo project. See one of these sections for instructions: ❍ "Making Photos From Slides and Negatives" on page 8 ❍ "Restoring Faded Color Photos, Slides, and Negatives" on page 9 5
-
 1
1 -
 2
2 -
 3
3 -
 4
4 -
 5
5 -
 6
6 -
 7
7 -
 8
8 -
 9
9 -
 10
10 -
 11
11 -
12
 |
 |

5
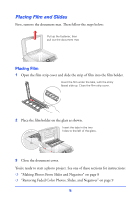
Placing Film and Slides
First, remove the document mat. Then follow the steps below:
Placing Film
1
Open the film strip cover and slide the strip of film into the film holder.
2
Place the film holder on the glass as shown.
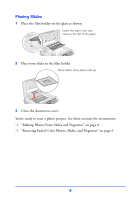
3
Close the document cover.
You’re ready to start a photo project. See one of these sections for instructions:
❍
“Making Photos From Slides and Negatives” on page 8
❍
“Restoring Faded Color Photos, Slides, and Negatives” on page 9
Pull up the fastener, then
pull out the document mat.
Insert the film under the tabs, with the shiny
(base) side up. Close the film strip cover.
Insert the tabs in the two
holes to the left of the glass.