Epson CX7800 Photo Projects Made Easy Without Using a Computer - Page 4
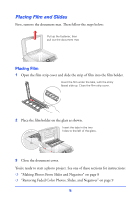
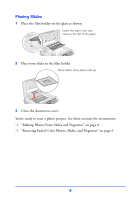
Placing Photos, Restoring Faded Color Photos, Slides, and Negatives
 |
UPC - 010343855687
View all Epson CX7800 manuals
Add to My Manuals
Save this manual to your list of manuals |
Page 4 highlights
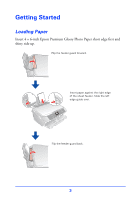
Placing Photos 1 Open the document cover and place a 4 × 6-inch photo face-down on the glass, in the upper left corner. Move photo 0.2 inch from top and side edges. Tip: You can also copy two 4 × 6-inch photos at the same time. Place photos vertically about 0.4 inch apart, even when copying landscape oriented photos. 0.4 inch 2 Close the document cover. You're ready to start a photo project. See one of these sections for instructions: ❍ "Copying 4 × 6-inch Photos" on page 7 ❍ "Restoring Faded Color Photos, Slides, and Negatives" on page 9 4
-
 1
1 -
 2
2 -
 3
3 -
 4
4 -
 5
5 -
 6
6 -
 7
7 -
 8
8 -
 9
9 -
 10
10 -
11
-
12
 |
 |

4
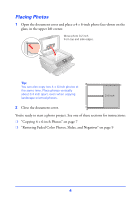
Placing Photos
1
Open the document cover and place a 4 × 6-inch photo face-down on the
glass, in the upper left corner.
Tip:
You can also copy two 4 × 6-inch photos at
the same time. Place photos vertically
about 0.4 inch apart, even when copying
landscape oriented photos.
2
Close the document cover.
You’re ready to start a photo project. See one of these sections for instructions:
❍
“Copying 4 × 6-inch Photos” on page 7
❍
“Restoring Faded Color Photos, Slides, and Negatives” on page 9
Move photo 0.2 inch
from top and side edges.
0.4 inch