Epson Expression 10000XL - Photo User Manual - Page 31
Getting Color Accuracy, Using Color Management - scanner transparency unit
 |
View all Epson Expression 10000XL - Photo manuals
Add to My Manuals
Save this manual to your list of manuals |
Page 31 highlights
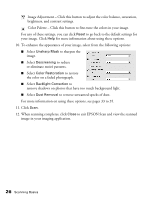
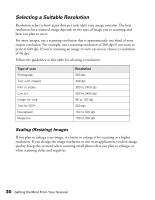
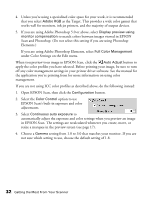
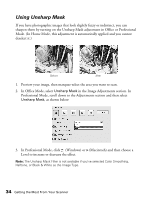
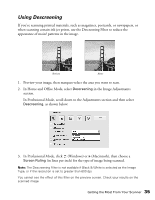
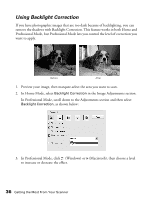
Getting Color Accuracy If the colors in your scanned image don't match those in your original document, make sure you've selected an appropriate Document Type setting (Home Mode) or Auto Exposure Type (Professional Mode). In Professional Mode, try selecting an Image Type setting that offers greater color depth. When scanning, it's important to marquee-select just the area you want to scan (see page 16). This lets the scanner software choose the optimal color and exposure settings for that part of the image. If there is a border around your image or if the document cover is in the scanning area, the exposure and colors in your scan may be altered. Using Color Management For the greatest accuracy in matching your monitor colors and the colors of your printed photos to the originals, you should use a professional grade monitor with a color management tool, such as MonacoEZcolor (included with your scanner). This software lets you build ICC profiles to calibrate your monitor, printer, and scanner and achieve consistent color across devices and paper types. When using color management, do the following: 1. Open EPSON Scan, then click the Configuration button. You see this screen: 2. Select the ICM option (Windows) or ColorSync® option (Macintosh). 3. For the scanner Source, select the profile you created for your scanner. (If you're using the transparency unit, be sure to use a profile created specifically for scanning transparencies, not reflective paper documents.) Getting the Most From Your Scanner 31
-
 1
1 -
2
-
3
-
4
-
5
-
6
-
7
-
8
-
9
-
10
-
11
-
12
-
13
-
14
-
15
-
16
-
17
-
18
-
19
-
20
-
21
-
22
-
23
-
24
-
25
-
 26
26 -
 27
27 -
 28
28 -
 29
29 -
 30
30 -
 31
31 -
 32
32 -
 33
33 -
 34
34 -
 35
35 -
 36
36 -
37
-
38
-
39
-
40
-
41
-
42
-
43
-
44
-
45
-
46
-
47
-
48
-
49
-
50
-
51
-
52
-
53
-
54
-
55
-
56
-
57
-
58
-
59
-
60
-
61
-
62
-
63
-
64
-
65
-
66
-
67
-
68
-
69
-
70
-
71
-
72
-
73
-
74
-
75
-
76
-
77
-
78
-
79
-
80
-
81
-
82
-
83
-
84
-
85
-
86
-
87
-
88
-
89
-
90
-
91
-
92
-
93
-
94
-
95
-
96
 |
 |
