Epson Expression 10000XL - Photo User Manual - Page 52
checkbox is not selected., button to see previews of your images.
 |
View all Epson Expression 10000XL - Photo manuals
Add to My Manuals
Save this manual to your list of manuals |
Page 52 highlights
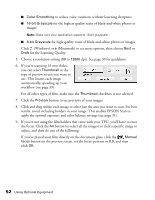
■ Color Smoothing to reduce color variations without lessening sharpness ■ 16-bit Grayscale for the highest quality scans of black-and-white photos or images Note: Make sure your application supports 16-bit grayscale. ■ 8-bit Grayscale for high quality scans of black-and-white photos or images Click (Windows) or (Macintosh) to see more options, then choose Best or Draft for the Scanning Quality. 5. Choose a resolution setting (50 to 12800 dpi). See page 30 for guidelines. 6. If you're scanning 35 mm slides, you can select Thumbnail as the type of preview screen you want to use. This locates each image automatically, speeding up your workflow (see page 39). For all other types of film, make sure the Thumbnail checkbox is not selected. 7. Click the Preview button to see previews of your images. 8. Click and drag within each image to select just the area you want to scan. For best results, avoid including borders in your image. This enables EPSON Scan to apply the optimal exposure and color balance settings (see page 31). 9. If you're not using the film holders that came with your TPU, you'll have to reset the focus. Click the All button (to select all the images) or click a specific image to adjust, and then do one of the following: If you've placed your film directly on the document glass, click the Manual focus button on the preview screen, set the focus position to 0.0, and then click OK. 52 Using Optional Equipment
-
 1
1 -
2
-
3
-
4
-
5
-
6
-
7
-
8
-
9
-
10
-
11
-
12
-
13
-
14
-
15
-
16
-
17
-
18
-
19
-
20
-
21
-
22
-
23
-
24
-
25
-
26
-
27
-
28
-
29
-
30
-
31
-
32
-
33
-
34
-
35
-
36
-
37
-
38
-
39
-
40
-
41
-
42
-
43
-
44
-
45
-
46
-
 47
47 -
 48
48 -
 49
49 -
 50
50 -
 51
51 -
 52
52 -
 53
53 -
 54
54 -
 55
55 -
 56
56 -
 57
57 -
58
-
59
-
60
-
61
-
62
-
63
-
64
-
65
-
66
-
67
-
68
-
69
-
70
-
71
-
72
-
73
-
74
-
75
-
76
-
77
-
78
-
79
-
80
-
81
-
82
-
83
-
84
-
85
-
86
-
87
-
88
-
89
-
90
-
91
-
92
-
93
-
94
-
95
-
96
 |
 |
