Epson Expression 10000XL - Photo User Manual - Page 57
Close the ADF., Make sure the high-speed
 |
View all Epson Expression 10000XL - Photo manuals
Add to My Manuals
Save this manual to your list of manuals |
Page 57 highlights
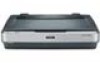
5. Mount the ADF on the installation screws, as shown. Warning: The ADF is heavy. Ask for assistance when lifting it. 6. Twist the knobs onto the ends of the screws and tighten them using the screwdriver tool. 7. Attach the ADF cable to the scanner's OPTION port, then tighten its connector screws. 8. Make sure the high-speed/ low-speed switch is set to the circular mark (for high-speed scanning) as shown. 9. Close the ADF. Using Optional Equipment 57
-
 1
1 -
2
-
3
-
4
-
5
-
6
-
7
-
8
-
9
-
10
-
11
-
12
-
13
-
14
-
15
-
16
-
17
-
18
-
19
-
20
-
21
-
22
-
23
-
24
-
25
-
26
-
27
-
28
-
29
-
30
-
31
-
32
-
33
-
34
-
35
-
36
-
37
-
38
-
39
-
40
-
41
-
42
-
43
-
44
-
45
-
46
-
47
-
48
-
49
-
50
-
51
-
 52
52 -
 53
53 -
 54
54 -
 55
55 -
 56
56 -
 57
57 -
 58
58 -
 59
59 -
 60
60 -
 61
61 -
 62
62 -
63
-
64
-
65
-
66
-
67
-
68
-
69
-
70
-
71
-
72
-
73
-
74
-
75
-
76
-
77
-
78
-
79
-
80
-
81
-
82
-
83
-
84
-
85
-
86
-
87
-
88
-
89
-
90
-
91
-
92
-
93
-
94
-
95
-
96
 |
 |
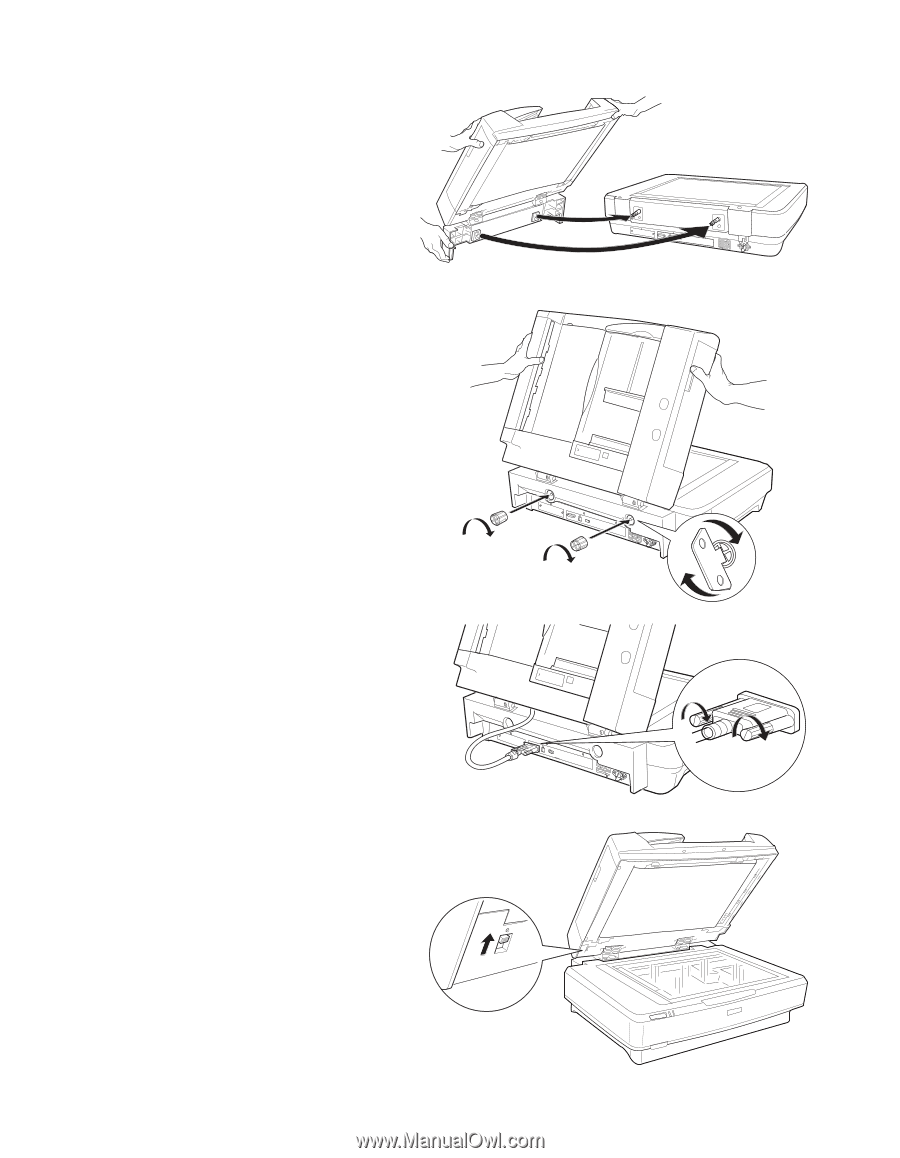
Using Optional Equipment
57
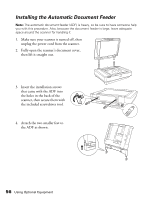
5.
Mount the ADF on the
installation screws, as shown.
Warning:
The ADF is heavy. Ask
for assistance when lifting it.
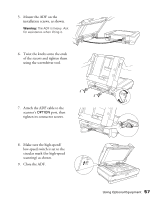
6.
Twist the knobs onto the ends
of the screws and tighten them
using the screwdriver tool.
7.
Attach the ADF cable to the
scanner’s
OPTION
port, then
tighten its connector screws.
8.
Make sure the high-speed/
low-speed switch is set to the
circular mark (for high-speed
scanning) as shown.
9.
Close the ADF.