Epson PowerLite 83c Product Information Guide - Page 6
Turning Off the Projector, Adjusting the Image and Presentation, Focusing and Zooming Your Image - case
 |
View all Epson PowerLite 83c manuals
Add to My Manuals
Save this manual to your list of manuals |
Page 6 highlights
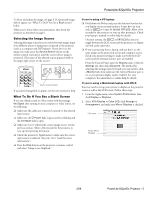
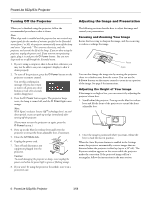
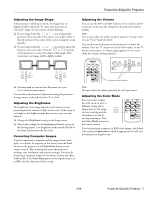
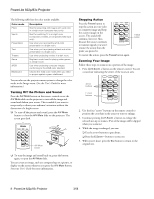
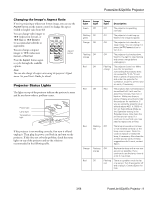
PowerLite 822p/83c Projector Turning Off the Projector When you've finished using the projector, follow the recommended procedure to shut it down. Note: When sleep mode is enabled and the projector has not received any input signals for the number of minutes specified in the Extended menu (from 1 to 30), the projector automatically turns off the lamp and enters "sleep mode." This conserves electricity, cools the projector, and extends the life of the lamp. If you are done using the projector, unplug the power cord. If you want to start projecting again, plug it in and press the P Power button. You can turn sleep mode on or off through the Extended menu. 1. If you're using a computer, shut it down first; otherwise you may not be able to see your computer's display to shut it down properly. 2. To turn off the projector, press the P Power button on the projector or remote control. You see this confirmation message: (If you don't want to turn it off, press any other button or wait a few seconds until it disappears.) 3. Press the P Power button again. The projector beeps twice, the lamp is turned off, and the P Power light turns orange. Note: With Epson's exclusive Instant Off ®technology there's no cooldown period, so you can pack up and go immediately after turning off the projector. (If you want to turn the projector on again, press the P Power button.) 4. Press up on the blue foot release lever and lower the projector to retract the front adjustable foot, if necessary. 5. Close the A/V Mute slide. 6. Unplug the power cord. 7. Turn off and disconnect any equipment plugged into the projector. Caution: To avoid damaging the projector or lamp, never unplug the power cord when the power light is green or flashing orange. 8. If you won't be using the projector for awhile, store it in a protective case. Adjusting the Image and Presentation The following sections describe how to adjust the image and control your presentation. Focusing and Zooming Your Image Rotate the focus ring to sharpen the image, and the zoom ring to reduce or enlarge the image. Focus Zoom You can also change the image size by moving the projector closer to or farther away from the screen. You can use the E-Zoom buttons on the remote control to zoom in on a portion of the image. See page 8 for instructions. Adjusting the Height of Your Image If the image is too high or low, you can correct it by adjusting the projector's front foot. 1. Stand behind the projector. Press up on the blue foot release lever and lift the front of the projector to extend the front adjustable foot. 2. Once the image is positioned where you want, release the lever to lock the foot in position. When the Auto Keystone feature is enabled in the Settings menu, the projector automatically corrects images that are distorted when the projector is tilted up (up to a 30° tilt). The Keystone window appears on the screen while the projector makes the correction. If the projected image still isn't rectangular, follow the instructions in the next section. 6 - PowerLite 822p/83c Projector 3/08
-
 1
1 -
 2
2 -
 3
3 -
 4
4 -
 5
5 -
 6
6 -
 7
7 -
 8
8 -
 9
9 -
 10
10 -
 11
11 -
 12
12 -
13
-
14
-
15
 |
 |
