Epson PowerLite 9300i Product Information Guide - Page 17
Cleaning the Lens, Cleaning the Projector, Cleaning and Replacing the Air Filters, Replacing
 |
View all Epson PowerLite 9300i manuals
Add to My Manuals
Save this manual to your list of manuals |
Page 17 highlights
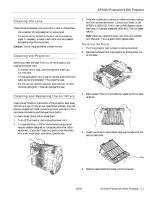
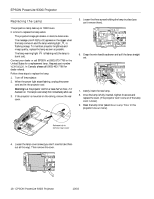
EPSON PowerLite 9300i Projector Cleaning the Lens Clean the lens whenever you notice dirt or dust on the surface. ❏ Use a canister of compressed air to remove dust. ❏ To remove dirt or smears on the lens, use lens-cleaning paper. If necessary, moisten a soft cloth with lens cleaner and gently wipe the lens surface. Caution: Do not use glass cleaner to clean the lens. Cleaning the Projector Before you clean the case, first turn off the projector and unplug the power cord. ❏ To remove dirt or dust, wipe the case with a soft, dry, lint-free cloth. ❏ To remove stubborn dirt or stains, moisten a soft cloth with water and a mild detergent. Then wipe the case. ❏ Do not use wax, alcohol, benzene, paint thinner, or other chemical detergents. These can damage the case. Cleaning and Replacing the Air Filters Clean the air filters on the bottom of the projector after every 100 hours of use. If they are not cleaned periodically, they can become clogged with dust, preventing proper ventilation. This can cause overheating and damage the projector. To clean the air filters, follow these steps: 1. Turn off the projector and unplug the power cord. 2. To clean the filters, EPSON recommends using a small vacuum cleaner designed for computers and other office equipment. If you don't have one, gently clean the filters with a soft brush (such as an artist's paintbrush). 3. If the dirt is difficult to remove or a filter is broken, replace the filters as described below. Contact your dealer or call EPSON at (800) 873-7766 in the United States to obtain new ones. In Canada, please call (800) 463-7766 for dealer referral. Note: When you replace the lamp, new filters are included with the lamp. This is a good time to replace them. Replacing the Filters 1. Turn the projector over (unless it's ceiling-mounted). 2. Remove the filters from the projector by sliding them out to the sides. 3. Remove each filter from its holder by releasing the two tabs, as shown. 4. Install new filters in the holders, aligning the tabs with the slots on each side. 2 Tabs 1 5. Slide the assembled filters back into the projector. 10/03 EPSON PowerLite 9300i Projector - 17
-
 1
1 -
2
-
3
-
4
-
5
-
6
-
7
-
8
-
9
-
10
-
11
-
 12
12 -
 13
13 -
 14
14 -
 15
15 -
 16
16 -
 17
17 -
 18
18 -
 19
19
 |
 |
