Frigidaire FFHB2740PE Use and Care Manual - Page 11
Lower Hinge Removal
 |
View all Frigidaire FFHB2740PE manuals
Add to My Manuals
Save this manual to your list of manuals |
Page 11 highlights
DOOR REMOVAL INSTRUCTIONS Press Press Water Line Approximately 5 Feet NOTE You will be pulling approximately five feet of water tube from the back of the refrigerator. 4 Unscrew the three lower hinge screws and hinge if necessary. To reinstall the right door, reverse the above steps. Lower Hinge Removal Once both doors are in place, ensure they are aligned with each other and level (Please see the "Installation" section for more details), and replace the top hinge cover. NOTE When reinserting the water tube and replacing the top hinge cover, use care to be sure you do not kink the tube. CAUTION Be sure doors are set aside in a secure position where they cannot fall and cause personal injury, or damage to the doors or handles. 11
-
 1
1 -
2
-
3
-
4
-
5
-
 6
6 -
 7
7 -
 8
8 -
 9
9 -
 10
10 -
 11
11 -
 12
12 -
 13
13 -
 14
14 -
 15
15 -
 16
16 -
17
-
18
-
19
-
20
-
21
-
22
-
23
-
24
-
25
-
26
-
27
-
28
-
29
-
30
-
31
-
32
-
33
-
34
-
35
-
36
-
37
-
38
-
39
-
40
 |
 |

CAUTION
Be sure doors are set aside in a secure
position where they cannot fall and cause
personal injury, or damage to the doors or
handles.
11
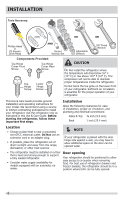
Press
Water
Line
Approximately
5 Feet
Press
DOOR REMOVAL INSTRUCTIONS
Once both doors are in place, ensure they are
aligned with each other and level (Please see
the “Installation” section for more details), and
replace the top hinge cover.
Lower Hinge Removal
4 Unscrew the three lower hinge screws and
hinge if necessary.
To reinstall the right door, reverse the above
steps.
NOTE
You will be pulling approximately five feet of
water tube from the back of the refrigerator.
NOTE
When reinserting the water tube and
replacing the top hinge cover, use care to be
sure you do not kink the tube.