Fujitsu S300M Getting Started Guide - Page 15
Rear View, 2 Paper Sizes of, Documents to be Scanned, ScanSnap S300M Operator's Guide - software
 |
UPC - 097564307355
View all Fujitsu S300M manuals
Add to My Manuals
Save this manual to your list of manuals |
Page 15 highlights
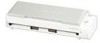
■ Rear View Adhesive label Reminds you that the supplied software has to be installed first. After installing ScanSnap Manager onto your computer, remove this label to connect the ScanSnap to your computer. USB connector Connect a USB cable here. Power connector Connect either the Power cable or USB bus power cable. Security cable slot You can plug a commercially available security cable into this slot (anti-theft). ATTENTION For the Document Specification, refer to "3.2 Paper Sizes of Documents to be Scanned" in "ScanSnap S300M Operator's Guide" stored in the ScanSnap Setup CD-ROM. The ScanSnap is turned on/off in conjunction with the connected computer, or with opening/closing of the paper chute. Ordinary, you can forget about turning on/off the ScanSnap. 14 ScanSnap S300M Getting Started
-
 1
1 -
2
-
3
-
4
-
5
-
6
-
7
-
8
-
9
-
 10
10 -
 11
11 -
 12
12 -
 13
13 -
 14
14 -
 15
15 -
 16
16 -
 17
17 -
 18
18 -
 19
19 -
 20
20 -
21
-
22
-
23
-
24
-
25
-
26
-
27
-
28
-
29
-
30
-
31
-
32
-
33
-
34
-
35
-
36
-
37
-
38
 |
 |
