Fujitsu T4220 T4220 BIOS Guide - Page 12
IrDA Port Configurations Submenu of the Advanced Menu, Table 6: Fields - specifications
 |
View all Fujitsu T4220 manuals
Add to My Manuals
Save this manual to your list of manuals |
Page 12 highlights
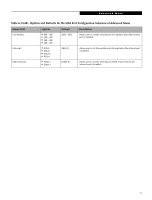
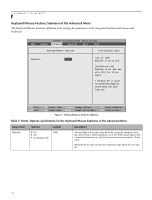
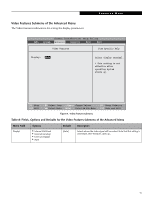
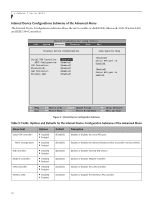
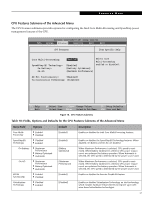
LifeBook T Series BIOS IrDA Port Configurations Submenu of the Advanced Menu The IrDA Port Configuratiosn submenu lets you set the I/O addresses and interrupt levels for the infrared port of your notebook. All I/O addresses in Table 6 are in hexadecimal. ■ To prevent IRQ and address conflicts, avoid changing the default settings. If you must change the settings, you can call 1-800-8Fujitsu for technical assistance. ■ If your notebook emits a series of beeps that sounds like a code and the display is blank, refer to the Troubleshooting Section in the system User's Guide. The Troubleshooting Section includes a list of error messages and their meanings. Phoenix TrustedCore(tm) Setup Utility Info System Advanced Security Boot Exit IrDA Port Configurations Item Specific Help Infrared Port: Mode: I/O Address: Interrupt: DMA Channel: [Enabled] [FIR] [2E8 - 2EF] [IRQ 6] [DMA 3] [Disabled] The port is disabled. [Enabled] The port is enabled with user configuration. [Auto] Plug & Play OS configures the port. F1 Help ESC Exit Select Item -/Space Change Values F9 Setup Defaults ▲ Select Menu Enter Select Sub-Menu F10 Save and Exit Figure 6. IrDA Port Configuration Submenu Table 6: Fields, Options and Defaults for the IrDA Port Configuration Submenu of Advanced Menu Menu Field Infrared Port: Mode: Options ■ Disabled ■ Enabled ■ Auto ■ IrDA ■ FIR Default [Enabled] [FIR] Description Configures the IrDA port using either no configuration (Disabled), a user defined configuration (Enabled), or by allowing the BIOS or OS to choose the configuration (Auto). When the infrared port is enabled this option is available allowing the user to set the mode for the infrared port. 12
-
 1
1 -
2
-
3
-
4
-
5
-
6
-
 7
7 -
 8
8 -
 9
9 -
 10
10 -
 11
11 -
 12
12 -
 13
13 -
 14
14 -
 15
15 -
 16
16 -
 17
17 -
18
-
19
-
20
-
21
-
22
-
23
-
24
-
25
-
26
-
27
-
28
-
29
 |
 |
