Garmin Edge 520 Plus Owners Manual - Page 11
Courses, Zooming the Map
 |
View all Garmin Edge 520 Plus manuals
Add to My Manuals
Save this manual to your list of manuals |
Page 11 highlights
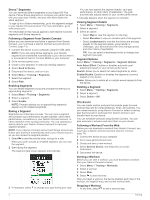
2 Select a location. 3 Select Edit. 4 Select a location detail. For example, select Change Elevation to enter a known altitude for the location. 5 Edit the value, and select . Deleting a Location 1 Select Menu > Navigation > Saved Locations. 2 Select a location. 3 Select Delete Location > OK. Setting Your Elevation If you have accurate elevation data for your present location, you can manually calibrate the altimeter on your device. 1 Go for a ride. 2 Select > Set Elevation. 3 Enter the elevation, and select . Courses Following a previously recorded activity: You can follow a saved course simply because it is a good route. For example, you can save and follow a bike friendly commute to work. Racing against a previously recorded activity: You can also follow a saved course, trying to match or exceed previously set performance goals. For example, if the original course was completed in 30 minutes, you can race against a Virtual Partner trying to complete the course in under 30 minutes. Following an existing ride from Garmin Connect: You can send a course from Garmin Connect to your device. Once it is saved to your device, you can follow the course or race against the course. Creating a Course on Your Device Before you can create a course, you must have an activity with GPS data saved to your device. 1 Select Menu > Navigation > Courses > Course Options > Create New. 2 Select an activity on which to base your course. 3 Enter a name for the course, and select . The course appears in the list. 4 Select the course, and review the course details. 5 If necessary, select Settings to edit the course details. For example, you can change the name or color of the course. 6 Select > Ride. Following a Course From Garmin Connect Before you can download a course from Garmin Connect, you must have a Garmin Connect account (Garmin Connect, page 14). 1 Select an option: • Open the Garmin Connect Mobile app. • Go to connect.garmin.com. 2 Create a new course, or select an existing course. 3 Select Send to Device. 4 Follow the on-screen instructions. 5 On the Edge device, select Menu > Navigation > Courses. 6 Select the course. 7 Select Ride. Tips for Training with Courses • Use turn guidance (Course Options, page 7). • If you include a warmup, select to begin the course, and warm up as normal. • Stay away from your course path as you warm up. When you are ready to begin, head toward your course. When you are on any part of the course path, a message appears. NOTE: As soon as you select , your Virtual Partner starts the course and does not wait for you to warm up. • Scroll to the map to view the course map. If you stray from the course, a message appears. Stopping a Course Select > Stop Course > OK. Displaying a Course on the Map For each course saved to your device, you can customize how it appears on the map. For example, you can set your commute course to always display on the map in yellow. You can have an alternate course display in green. This allows you to see the courses while you are riding, but not follow or navigate a particular course. 1 Select Menu > Navigation > Courses. 2 Select the course. 3 Select Settings. 4 Select Always Display to make the course appear on the map. 5 Select Color, and select a color. 6 Select Course Points to include course points on the map. The next time you ride near the course, it appears on the map. Viewing Course Details 1 Select Menu > Navigation > Courses. 2 Select a course. 3 Select an option: • Select Summary to view details about the course. • Select Map to view the course on the map. • Select Elevation to view an elevation plot of the course. • Select Laps to select a lap and view additional information about each lap. Course Options Select Menu > Navigation > Courses > Course Options. Turn Guidance: Enables or disables turn prompts. Off Crs. Warnings: Alerts you if you stray from the course. Segments: Allows you to race enabled segments included within the course. Search: Allows you to search for saved courses by name. Filter: Allows you to filter by course type, such as Strava courses. Delete: Allows you to delete all or multiple saved courses from the device. Deleting a Course 1 Select Menu > Navigation > Courses. 2 Select a course. 3 Select Delete > OK Zooming the Map 1 Go for a ride. 2 Select to view the map. 3 Select > Zoom Map In/Out. 4 Select an option: • Enable Auto Zoom to automatically set a zoom level for the map. Navigation 7
-
 1
1 -
2
-
3
-
4
-
5
-
 6
6 -
 7
7 -
 8
8 -
 9
9 -
 10
10 -
 11
11 -
 12
12 -
 13
13 -
 14
14 -
 15
15 -
 16
16 -
17
-
18
-
19
-
20
-
21
-
22
-
23
-
24
-
25
-
26
-
27
-
28
-
29
-
30
 |
 |
