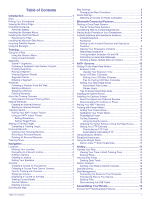
Garmin Edge 520 Plus Owners Manual - Page 5
Pairing Your Smartphone, Viewing the Status Charging the Device, Installing the Standard Mount - pairing mode
 |
View all Garmin Edge 520 Plus manuals
Add to My Manuals
Save this manual to your list of manuals |
Page 5 highlights
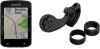
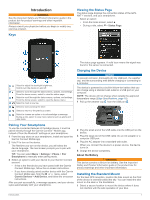
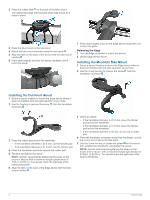
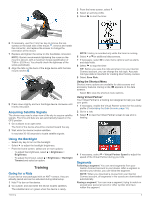
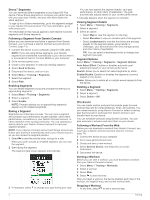
Introduction WARNING See the Important Safety and Product Information guide in the product box for product warnings and other important information. Always consult your physician before you begin or modify any exercise program. Keys Viewing the Status Page The status page displays the connection status of the GPS, ANT+® sensors, and your smartphone. Select an option: • From the home screen, select . • During a ride, select > Status Page. The status page appears. A solid icon means the signal was found or the sensor is connected. Select to adjust the backlight brightness. Hold to turn the device on and off. Select to scroll through the data screens, options, and settings. From the home screen, select to view the status page. Select to scroll through the data screens, options, and settings. From the home screen, select to view the device menu. Select to mark a new lap. Select to start and stop the timer. Select to return to the previous screen. Select to choose an option or to acknowledge a message. During a ride, select to view menu options such as alerts and data fields. Charging the Device NOTICE To prevent corrosion, thoroughly dry the USB port, the weather cap, and the surrounding area before charging or connecting to a computer. The device is powered by a built-in lithium-ion battery that you can charge using a standard wall outlet or a USB port on your computer. NOTE: The device will not charge when outside the approved temperature range (Edge Specifications, page 18). 1 Pull up the weather cap from the USB port . Pairing Your Smartphone To use the connected features of the Edge device, it must be paired directly through the Garmin Connect™ Mobile app, instead of from the Bluetooth® settings on your smartphone. 1 From the app store on your smartphone, install and open the Garmin Connect Mobile app. 2 Hold to turn on the device. The first time you turn on the device, you will select the device language. The next screen prompts you to pair with your smartphone. TIP: You can select Menu > Settings > Phone > Pair Smartphone to manually enter pairing mode. 3 Select an option to add your device to your Garmin Connect account: • If this is the first device you have paired with the Garmin Connect Mobile app, follow the on-screen instructions. • If you have already paired another device with the Garmin Connect Mobile app, from the or menu, select Garmin Devices > Add Device, and follow the on-screen instructions. After you pair successfully, a message appears, and your device syncs automatically with your smartphone. 2 Plug the small end of the USB cable into the USB port on the device. 3 Plug the large end of the USB cable into an AC adapter or a computer USB port. 4 Plug the AC adapter into a standard wall outlet. When you connect the device to a power source, the device turns on. 5 Charge the device completely. About the Battery WARNING This device contains a lithium-ion battery. See the Important Safety and Product Information guide in the product box for product warnings and other important information. Installing the Standard Mount For the best GPS reception, position the bike mount so the front of the device is oriented toward the sky. You can install the bike mount on the stem or the handlebars. 1 Select a secure location to mount the device where it does not interfere with the safe operation of your bike. Introduction 1
-
 1
1 -
 2
2 -
 3
3 -
 4
4 -
 5
5 -
 6
6 -
 7
7 -
 8
8 -
 9
9 -
 10
10 -
 11
11 -
12
-
13
-
14
-
15
-
16
-
17
-
18
-
19
-
20
-
21
-
22
-
23
-
24
-
25
-
26
-
27
-
28
-
29
-
30
 |
 |
