Garmin Edge 520 Plus Owners Manual - Page 14
Putting On the Heart Rate Monitor
 |
View all Garmin Edge 520 Plus manuals
Add to My Manuals
Save this manual to your list of manuals |
Page 14 highlights
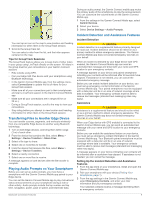
NOTE: When you enter emergency contacts, incident detection is automatically enabled on your device. 4 Enable GPS on your Edge device (Changing the Satellite Setting, page 16). Viewing Your Emergency Contacts Before you can view your emergency contacts on your device, you must set up your rider information and emergency contacts in the Garmin Connect Mobile app. Select Menu > Contacts. Your emergency contacts' names and phone numbers appear. Requesting Assistance Before you can request assistance, you must enable GPS on your Edge device. 1 Hold for four seconds to activate the assistance feature. The device beeps, and sends the message after the fivesecond countdown is complete. TIP: You can select before the countdown is complete to cancel the message. 2 If necessary, select to send the message immediately. Turning Incident Detection On and Off Select Menu > Settings > System > Incident Detection. Cancelling an Automated Message When an incident is detected by your device, you can cancel the automated emergency message on your device or your paired smartphone before it is sent to your emergency contacts. Select Cancel > Yes before the end of the thirty-second countdown. Sending a Status Update After an Incident Before you can send a status update to your emergency contacts, your device must detect an incident and send an automated emergency message to your emergency contacts. You can send a status update to your emergency contacts informing them you are not in need of assistance. From the status page, select Incident Detected > I'm Okay. A message is sent to all emergency contacts. ANT+ Sensors Your device can be used with wireless ANT+ sensors. For more information about compatibility and purchasing optional sensors, go to http://buy.garmin.com. Putting On the Heart Rate Monitor NOTE: If you do not have a heart rate monitor, you can skip this task. You should wear the heart rate monitor directly on your skin, just below your sternum. It should be snug enough to stay in place during your activity. 1 Snap the heart rate monitor module onto the strap. The Garmin logos on the module and the strap should be right-side up. 2 Wet the electrodes and the contact patches on the back of the strap to create a strong connection between your chest and the transmitter. 3 Wrap the strap around your chest, and connect the strap hook to the loop . NOTE: The care tag should not fold over. The Garmin logos should be right-side up. 4 Bring the device within 3 m (10 ft.) of the heart rate monitor. After you put on the heart rate monitor, it is active and sending data. TIP: If the heart rate data is erratic or does not appear, see the troubleshooting tips (Tips for Erratic Heart Rate Data, page 11). Recovery Time You can use your Garmin device with wrist-based heart rate or a compatible chest heart rate monitor to display how much time remains before you are fully recovered and ready for the next hard workout. NOTE: The recovery time recommendation uses your VO2 max. estimate and may seem inaccurate at first. The device requires you to complete a few activities to learn about your performance. The recovery time appears immediately following an activity. The time counts down until it is optimal for you to attempt another hard workout. Viewing Your Recovery Time Before you can use the recovery time feature, you must put on the heart rate monitor, and pair it with your device (Pairing Your ANT+ Sensors, page 12). If your device was packaged with a heart rate monitor, the device and sensor are already paired. For the most accurate estimate, complete the user profile setup (Setting Up Your User Profile, page 15), and set your maximum heart rate (Setting Your Heart Rate Zones, page 11). 1 Select Menu > My Stats > Recovery Advisor > Enable. 2 Go for a ride. 3 After your ride, select Save Ride. The recovery time appears. The maximum time is 4 days, and the minimum time is 6 hours. About VO2 Max. Estimates VO2 max. is the maximum volume of oxygen (in milliliters) you can consume per minute per kilogram of body weight at your maximum performance. In simple terms, VO2 max. is an indication of athletic performance and should increase as your level of fitness improves. VO2 max. estimates are provided and supported by Firstbeat. You can use your Garmin device paired with a compatible heart rate monitor and power meter to display your cycling VO2 max. estimate. Getting Your VO2 Max. Estimate Before you can view your VO2 max. estimate, you must put on the heart rate monitor, install the power meter, and pair them with your device (Pairing Your ANT+ Sensors, page 12). If your device was packaged with a heart rate monitor, the device and sensor are already paired. For the most accurate estimate, complete the user profile setup (Setting Up Your User Profile, 10 ANT+ Sensors
-
 1
1 -
2
-
3
-
4
-
5
-
6
-
7
-
8
-
 9
9 -
 10
10 -
 11
11 -
 12
12 -
 13
13 -
 14
14 -
 15
15 -
 16
16 -
 17
17 -
 18
18 -
 19
19 -
20
-
21
-
22
-
23
-
24
-
25
-
26
-
27
-
28
-
29
-
30
 |
 |
